The best Cheese Scones inspired by the beautiful scones in New Zealand. My easy recipe will show you how to make a buttery, tall Cheese Scone with flaky layers. Simple ingredients, easy technique – no electric mixer needed.
Quick Look Cheese Scones
- ⏱ Prep time: 35 minutes (plus 30 minutes chill time)
- 🔥 Cook time: 14 minutes
- ⏳ Total time: 1 hour 20 minutes
- 🍴 Serving: 14-15 scones
- 🍂 Flavour profile: Soft and tender scones filled with salty cheese. Perfect served warm with oodles of butter.
- 👌 Difficulty: Easy
SUMMARIZE & SAVE THIS CONTENT ON
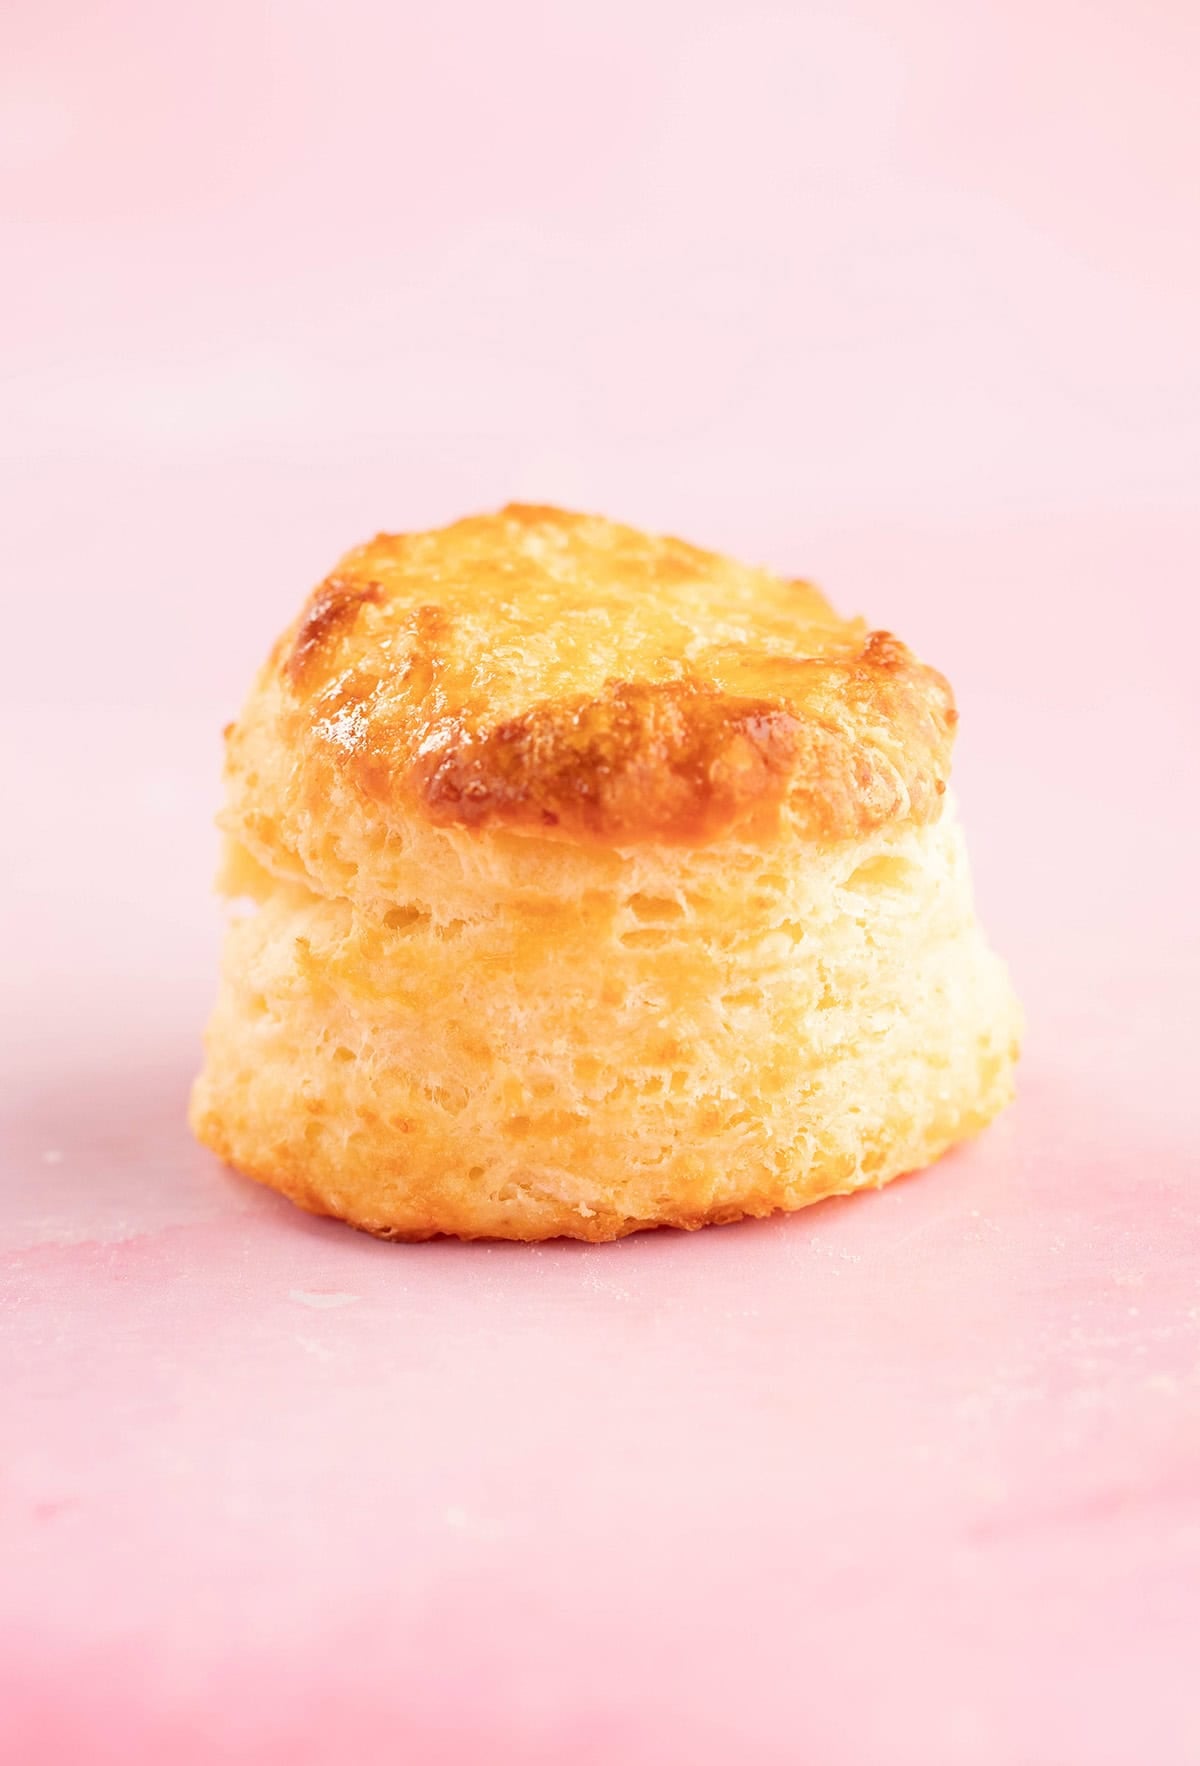
Ok, there’s a new scone on the scene and she does NOT disappoint. My easy Cheese Scones are small but mighty, with crunchy cheesy tops sitting on top of flaky, buttery layers.
These Cheese Scones come together in a flash – no mixer needed. And I’m sharing ALL my simple tips and tricks to ensure your scones are tender, moist and never (ever) dry.
Just like we learnt with my Buttermilk Scone recipe, a good homemade scone is more about the technique than it is about the ingredients. How you mix your scone dough and shape it, is what’s going to give you the height, the texture and the flavour you crave.
But once you master it, you’ll be able to whip out these buttery Cheese Scones anytime of the day. They’re perfect for morning tea or afternoon tea, for a quick dinner side or even to tuck into the lunchbox.
Why you will love this recipe
- Simple ingredients: My recipe only uses basic pantry staples so you can whip up these Cheese Scones whenever the craving hits.
- Quick and easy: Once you get the technique for making scones just right, you’ll be able to whip these up in no time – without getting out an electric mixer.
- Freezer friendly: These scones are best eaten fresh, but thankfully they freeze really well.
- Versatile: You can enjoy these Cheese Scones for morning tea, afternoon tea, as a quick breakfast, a dinner side or a hearty lunchbox snack.

Recipe testing
This recipe was inspired by my recent holiday to New Zealand. Two years ago when I visited Queenstown, I noticed that cheese scones seemed to often be on the menu at cafes and bakeries around town.
So this trip, I made sure to try as many of them as I could, all in the name of recipe testing, of course. After finally mastering the art of a good Homemade Scone last year, I was VERY keen to add another scone recipe to our collection.
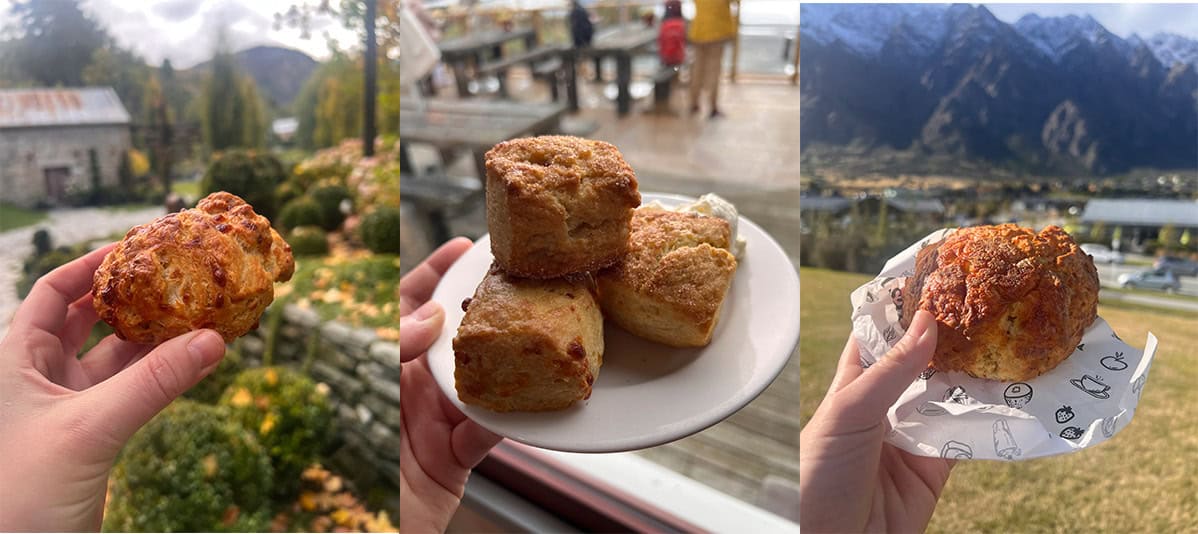
So after sampling the best of the best, I shook off the holiday blues and jumped into my kitchen to create my very own easy Cheese Scone Recipe. I took everything I learnt about making a tender scone from scratch and converted it to a salty, crunchy, cheesy version – just like the ones I had in New Zealand.
I took out the sugar, added cheese and altered the other ingredients ever so slightly. I made them smaller since they can be used as a side, but otherwise used the same technique I use in my popular Buttermilk Scones. Thankfully, it worked wonderfully well – and I was met with a Cheese Scone that was tall, flaky and oh-so-tasty.
Ingredients
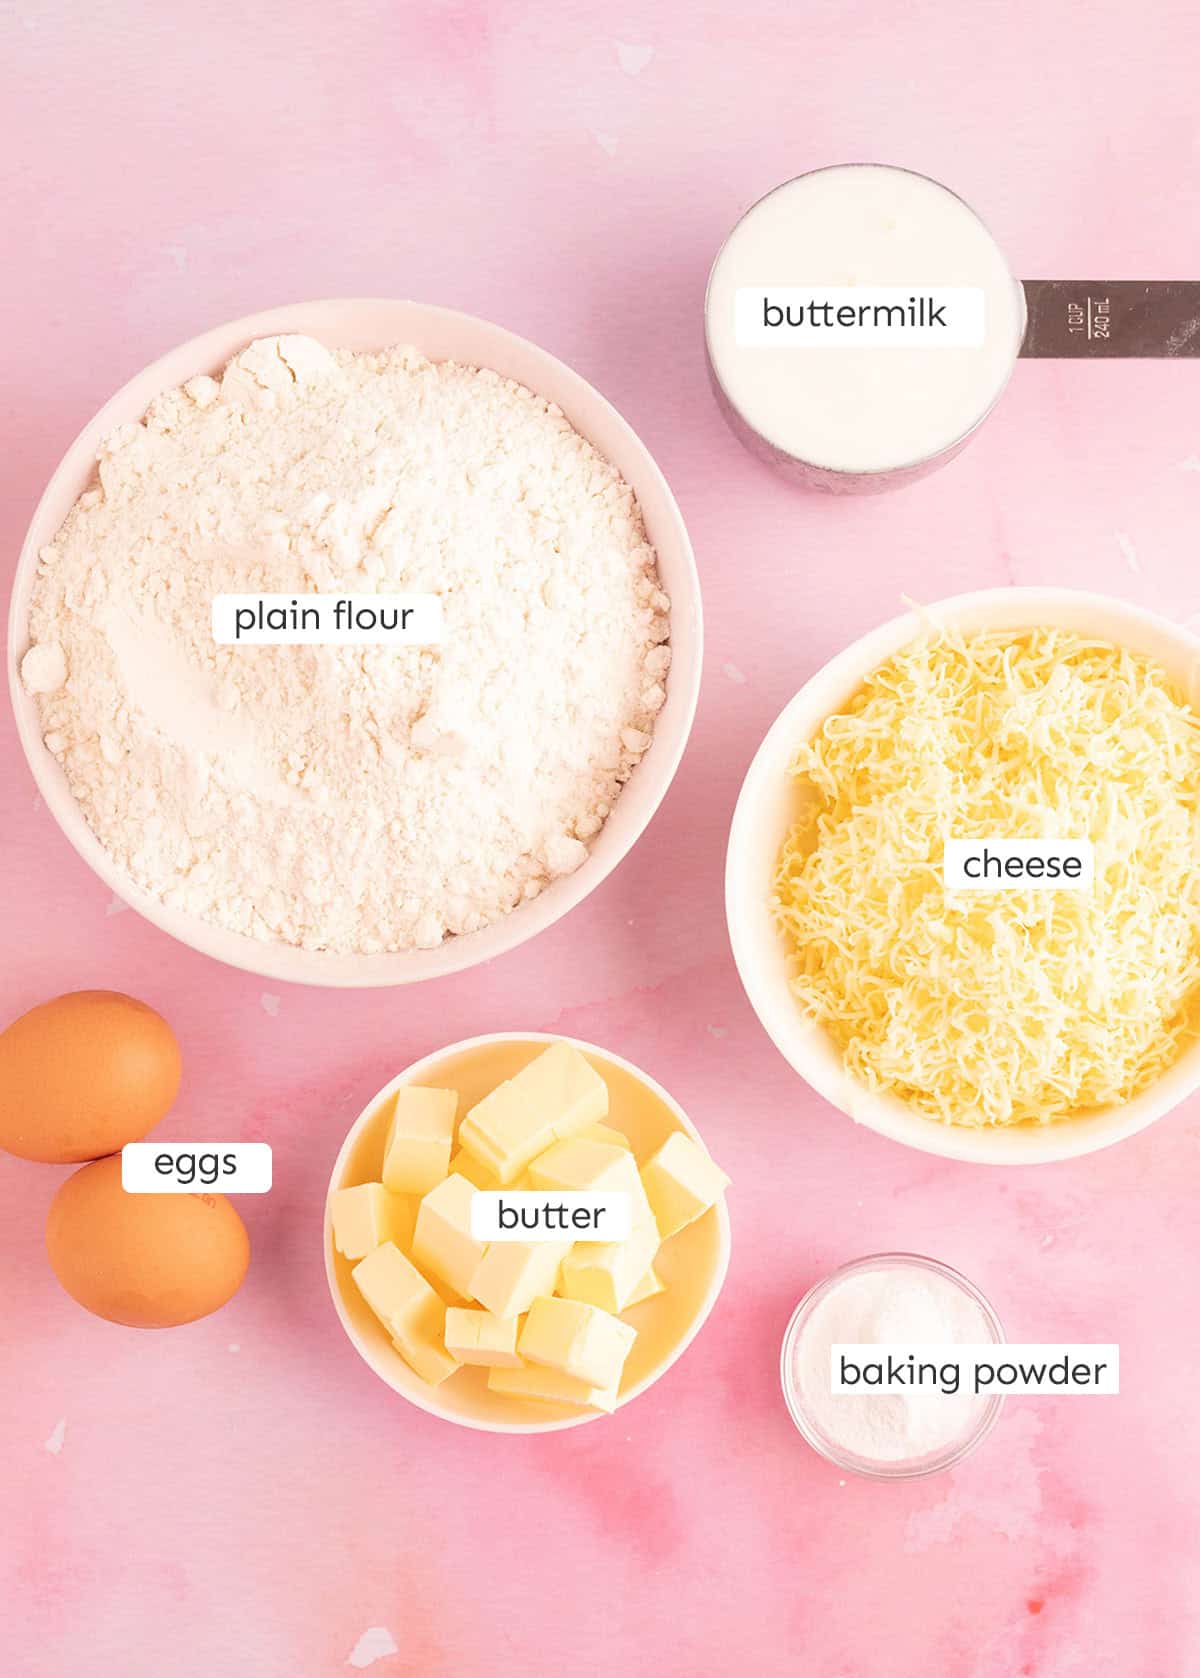
You can make these Cheese Scones using just six basic ingredients. Here’s a quick rundown on the ingredients you need, including any substitutions you can make.
- Plain flour: You can use plain flour or all purpose flour in this recipe. I haven’t tested it using self-raising flour as I like to adjust the baking powder myself.
- Baking powder: This recipe calls for quite a bit (3 and 1/2 teaspoons) of baking powder to achieve the height on these scones. Thankfully, unlike baking soda, baking powder doesn’t have a metallic aftertaste so you won’t be able to taste it.
- Cheese: You can use any cheese you like in this recipe. I’ve tested it using regular cheddar cheese, but you could use a sharper cheddar or an aged hard cheese like gruyere or parmesan or if you prefer, you could do do half, half.
- Butter: Of course, the key to making a buttery scone is using real good quality butter. You will need cold butter for this recipe, so don’t get the butter out of the fridge in advance.
- Buttermilk: I love using buttermilk in my scones. It helps create a light scone that’s not too dense. However, if you don’t have access to buttermilk, you could try the DIY buttermilk by using 1 cup of regular whole milk and adding 1 tablespoon of lemon juice or white vinegar. However, this substitution will be more runny, so keep that in mind and add it gradually to your scone dough.
- Eggs: These scones have one egg in the dough which adds moisture and richness. And another egg is used for the egg wash on top of the scones which helps them brown and go glossy. You can brush the scones with leftover buttermilk if you prefer – they won’t go quite as golden. But I don’t recommend leaving out the egg in the scone dough if you can help it.
See recipe card below for a full list of ingredients and measurements.
How to make Cheese Scones
Here’s a quick snapshot on how to make my Cheese Scones including step-by-step photos. You can find the full method in the printable recipe card below.
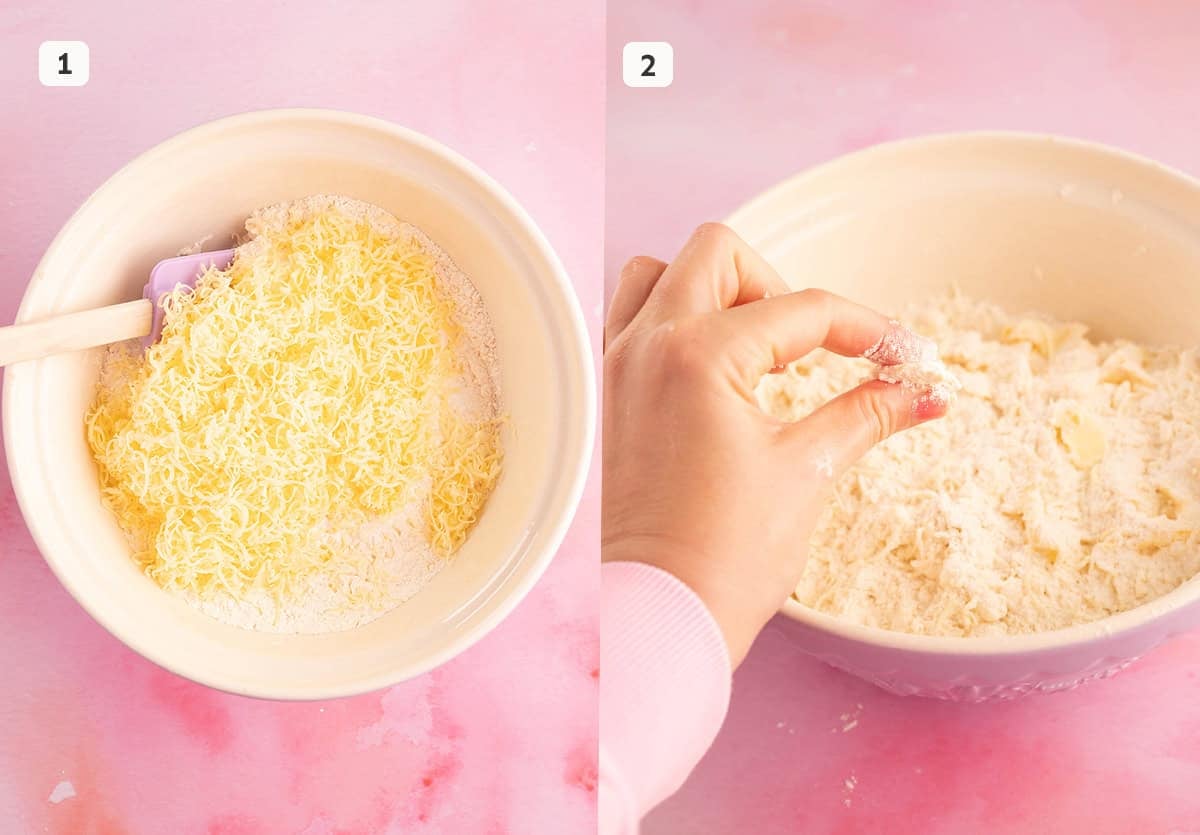
Step 1: In a large mixing bowl, add the flour, baking powder, salt and grated cheese. Give it a quick mix.
Step 2: Add the cold butter. Use your fingertips to flatten the butter cubes until there are no more large lumps of butter.
save this recipe
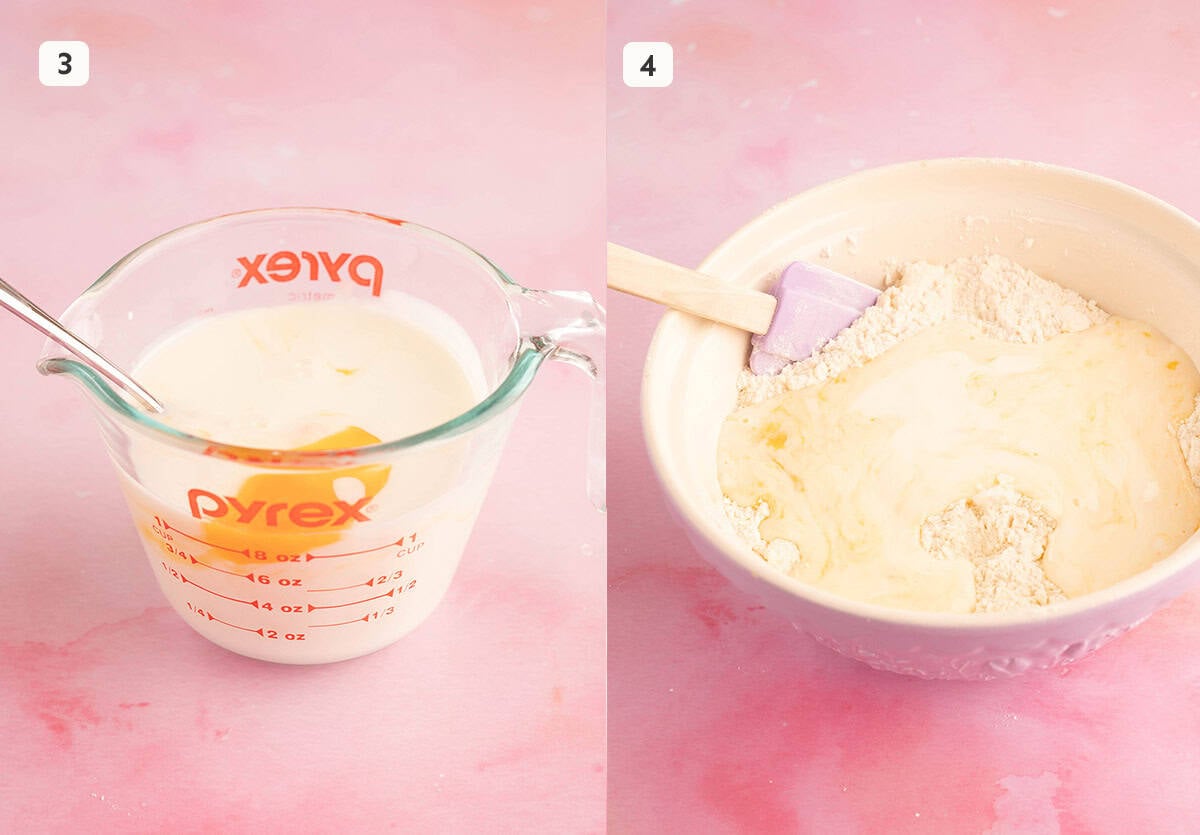
Step 3: In a separate bowl, add the egg and 240 ml (1 cup) of buttermilk. Whisk with a fork for 20 seconds or so just to break up the egg yolk.
Step 4: Add the buttermilk mixture to the dry ingredients. Gently stir with a butter knife until the mixture is shaggy – don’t worry if it appears dry.
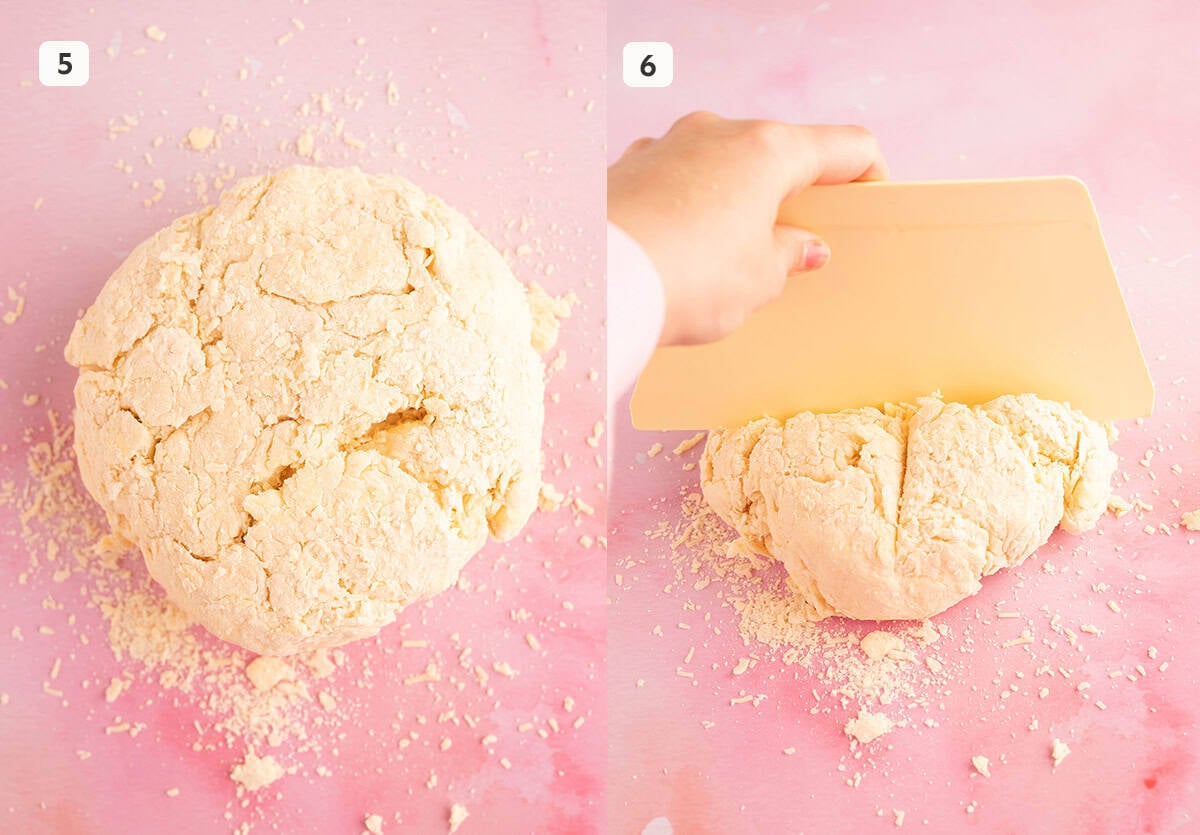
Step 5: Turn the mixture out onto the bench. Use your hands to bring it together into a round disc. If it is too dry, add an extra tablespoon or two of buttermilk.
Step 6: Gently divide the disc into four quarters. I like to use my dough scraper to do this.
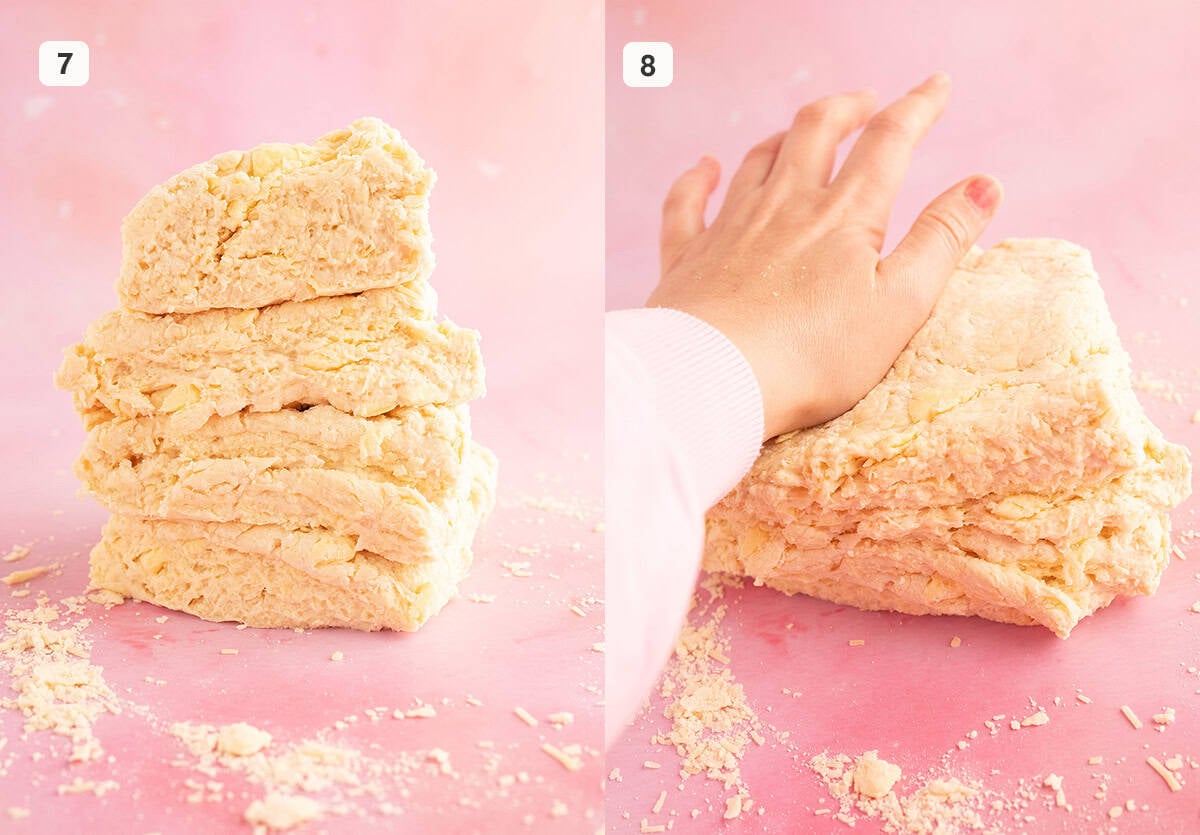
Step 7: Gently stack the quarters of scone dough on top of each other to create a tower.
Step 8: Use the palm of your hand to gently press the dough down until it is at least 3 cm (1-inch) thick.
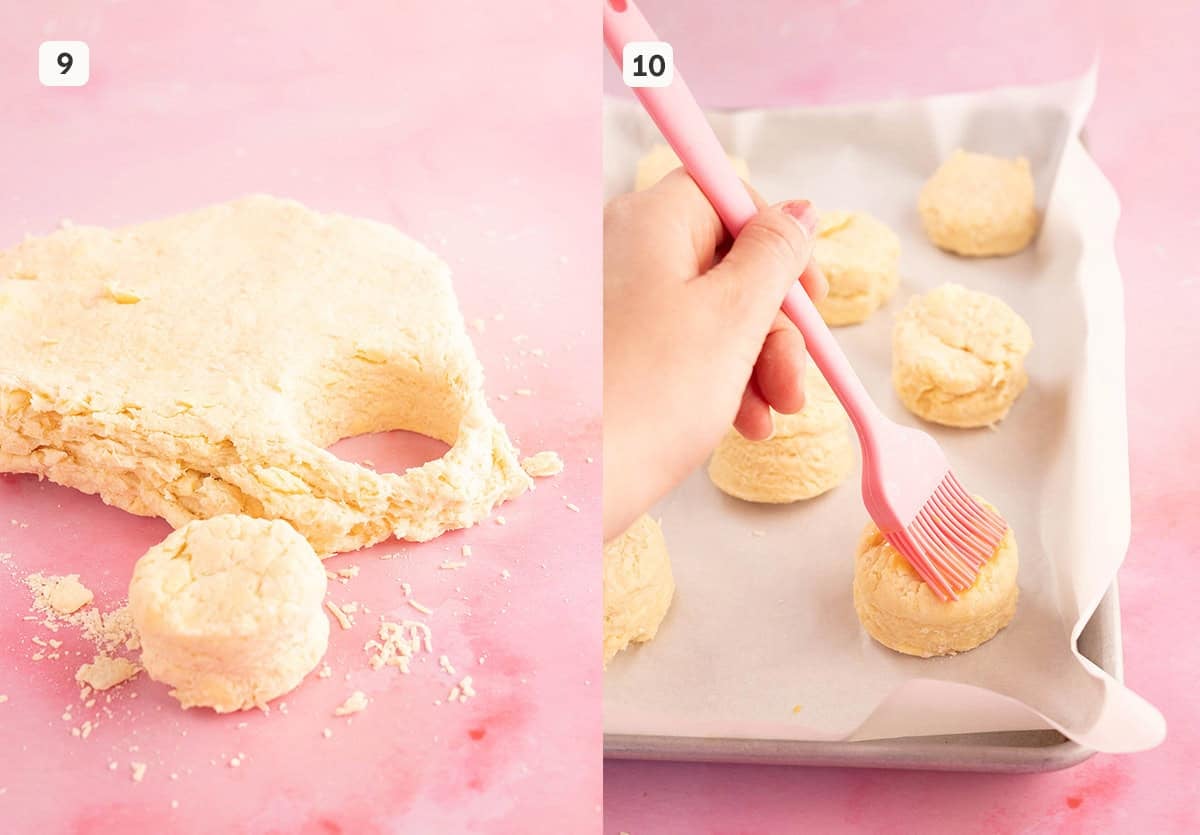
Step 9: Use a round 5 cm (2-inch) cookie cutter to cut out 14-15 scones. You can press leftover scone dough together once and cut out an extra scone or two.
Step 10: Place scones on your prepared baking trays. Chill the scones in the fridge for at least 30 minutes. Brush the tops of the scones with beaten egg.

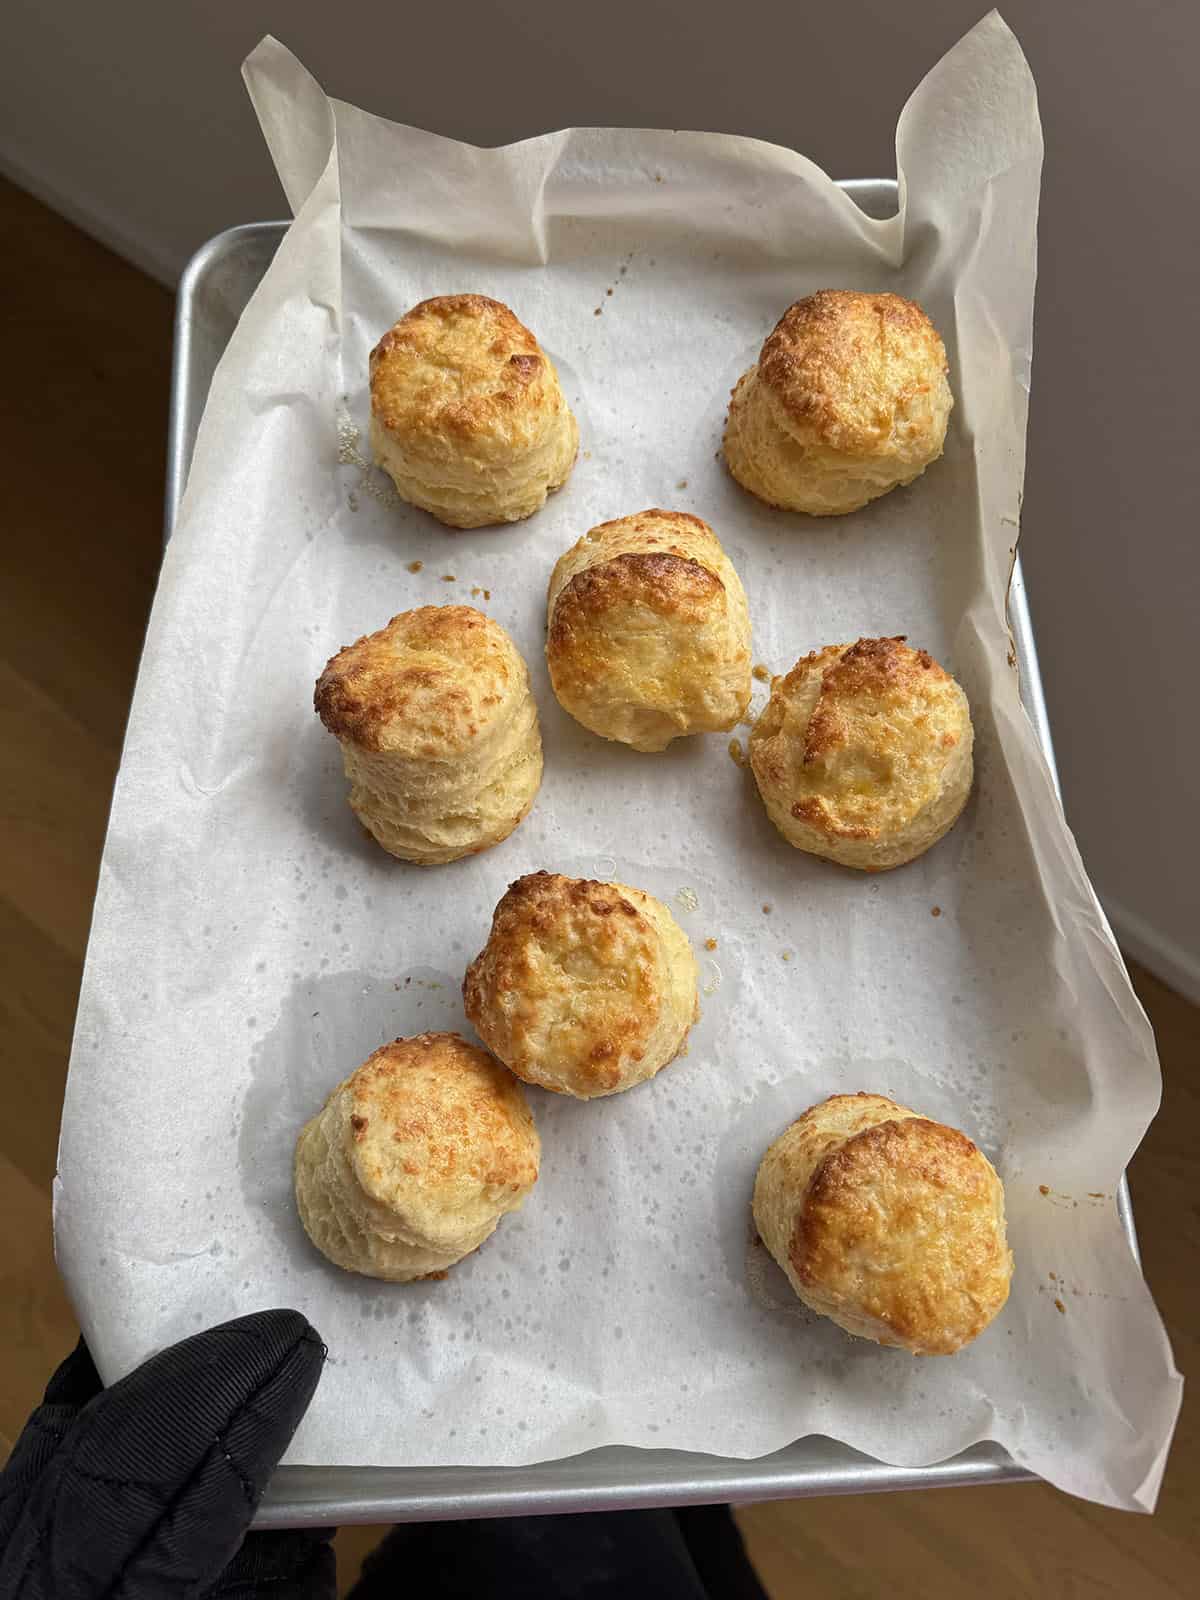
Step 11: Bake scones for 12-14 minutes or until golden brown on top. Enjoy warm from the oven with a generous smearing of butter.
Jess’s tips for perfect scones
To ensure your Cheese Scones have a wonderfully light texture, here are my 7 tips for success.
- Flatten your butter pieces: Many scone recipes will tell you to mix the butter into the flour until the pieces of butter are small and pea-sized. However, I prefer to use my fingertips to flatten the butter. These thin longer pieces of butter will help to create flaky layers that are often lost in scone dough.
- Don’t over-work your dough: Once you add your wet ingredients (buttermilk) it’s very important not to overwork your scone dough. It’s very different to cakes and cookies. You want to barely bring it together. It’s ok if it looks shaggy.
- Don’t knead, just push: Scone dough doesn’t need to be kneaded. All you want to do is push it or press it together to form a disc. You can work it a little so it’s combined, but it should look a like a shaggy mess. If it’s very dry, add a little extra buttermilk, one tablespoon at a time, until it comes together. But watch out – your dough should never be wet or sticky.
- Cut and stack: To ensure plenty of flaky, buttery layers, cut your dough into four quarters. I like to use a bench scraper or dough scraper for this. Then stack your layers on top of each other. This simple step will create more of those flaky layers.
- Forget the rolling pin: Instead of using a rolling pin, I prefer to use the palm of my hand to simply flatten out the dough. A rolling pin can flatten the dough too much and you can also easily over-work the dough by rolling back and forth. Simply press the dough out to be at least 3cm or 1 inch thick using the palm of your hand.
- Chill the dough: After all that mixing and shaping, your cold butter will start to become warm. This is why it’s so important to chill your dough in the fridge before baking. This will stop the butter from leaking out of your scones as they bake.
- Bake at a high temperature: Unlike cakes, muffins and cupcakes, scones need to be baked at a high temperature. It’s ensures they quickly rise, getting that crispy, crunchy exterior and remain soft and fluffy inside.

Storage and freezer instructions
Storage: Scones are best eaten on the day they are made. You can keep leftover scones in an airtight container at room temperature once they’ve cooled. To enjoy them warm, simply microwave your scone for 10-20 seconds.
Freezer instructions: You can absolutely freeze any leftover scones. Simply wrap them in plastic wrap and pop them in a ziplock bag or airtight container and place them in the freezer. To enjoy, defrost at room temperature or pop them in the microwave until warm again.
Cheese Scones FAQs
Cheese scones are best served warm with plenty of butter and flaky sea salt.
Yes, you can add mix-in’s like ham to your cheese scones. Simply start with a small amount and add them when you add the cheese. You might need to add a little more buttermilk to bring the dough together.
If you followed this recipe and used a kitchen scale to measure your flour, your dough shouldn’t be wet. If anything if should be on the dry side. Next time, I would add your buttermilk more gradually and stop as soon as the dough comes together – it’s ok if it looks a little shaggy (see my photos).
More buttermilk recipes we love
Did you make this recipe? Don’t forget to rate the recipe and leave a comment below. Hungry for more? Join me on Instagram, YouTube, Facebook, Pinterest and TikTok for more amazing recipe ideas.
Let’s Bake
Cheese Scones Recipe
You will love my light and fluffy cheese scones.
Ingredients
- 420 grams (3 cups) plain flour or all purpose flour
- 3 and 1/2 teaspoons baking powder
- 1/2 teaspoon salt
- 100 grams (2 cups) cheddar cheese, finely grated (loosely packed)
- 115 grams (1/2 cup) unsalted butter, cubed, COLD
- 1 large egg, COLD
- 240 ml (1 cup) full fat buttermilk, plus 1-2 tablespoons extra (as needed)
- 1 egg, lightly beaten, for brushing
Instructions
- Line two large baking trays with baking or parchment paper.
- In a large mixing bowl, add the flour, baking powder, salt and grated cheese. Give it a quick mix.
- Add the cubes of cold butter. Use your finger tips to squish and flatten the butter pieces. Work quickly until you have coarse crumbs and there are no more large lumps of butter – but long flat ones are ok.
- In a separate bowl, add the egg and 240 ml (1 cup) of buttermilk. Whisk with a fork for 20 seconds or so until combined. Add the buttermilk mixture to the dry ingredients and gently mix together using a butter knife until shaggy – don’t worry if it looks dry.
- Turn the mixture out onto the bench. Use your hands to gently bring it together into a round disc. If it is too dry, add an extra tablespoon or two of buttermilk. The dough doesn’t need to be wet, but it should come together. (See my step-by-step photos above)
- Gently divide the disc into four – I like to use my dough scraper to do this. Then stack quarters of scone dough on top of each other to make a tower. Use the palm of your hand to gently press the dough down until it is at least 3 cm (1-inch) thick.
- Use a round 5 cm (2-inch) cookie cutter to cut out 14-15 scones. Don’t twist the cutter. You can press leftover scone dough together once and cut out an extra scone or two. Discard any leftovers.
- Place scones on prepared baking trays, ensuring they’re not touching. Chill scones in the fridge for at least 30 minutes.
- Preheat oven to 220 C (430 F) standard / 200 C (390 F) fan-forced.
- Brush the tops of the scones with beaten egg. Bake scones for 12-14 minutes or until golden brown on top. Enjoy scones warm from the oven with a generous smearing of butter.
Notes
Cheese: You can use any cheese you like in this recipe. I’ve tested it using cheddar cheese, but you could use a sharper or aged hard cheese like gruyere or parmesan or if you prefer, or you could do do half, half.
Buttermilk: I love using buttermilk in my scones. It helps create a light scone that’s not too dense. However, if you don’t have access to buttermilk, you could try the DIY buttermilk by using 1 cup of regular whole milk and adding 1 tablespoon of lemon juice or white vinegar. However, this substitution will be more runny, so keep that in mind and add it gradually to your scone mix.
Egg wash: You can brush the scones with leftover buttermilk if you prefer – they won’t go quite as golden.
Storage: Scones are best eaten on the day they are made. You can keep leftover scones in an airtight container at room temperature once they’ve cooled. To enjoy warm, simply microwave scones for 10-20 seconds.
Freezer instructions: You can absolutely freeze any leftover scones. Simply wrap them in plastic wrap and pop them in a ziplock bag or airtight container and place them in the freezer. To enjoy, defrost at room temperature or pop them in the microwave until warm again.
Nutrition Information
Serving Size: 1 scone Calories: 221 Sugar: 1.1 g Sodium: 175.4 mg Fat: 11.1 g Carbohydrates: 23.7 g Protein: 6.7 g Cholesterol: 53.2 mg

Hi, I’m Jess, the creator of Sweetest Menu and the author of Something Sweet. A self-taught baker and published recipe writer who can’t stop making easy and delicious baking recipes.

Lallie says
Wow, The absolutely best perfect delicious recipe
Jessica Holmes says
I’m so glad you enjoyed it Lallie!
Josh says
We loved these!
Jessica Holmes says
Oh I love hearing that!