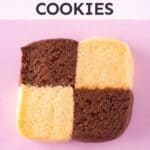
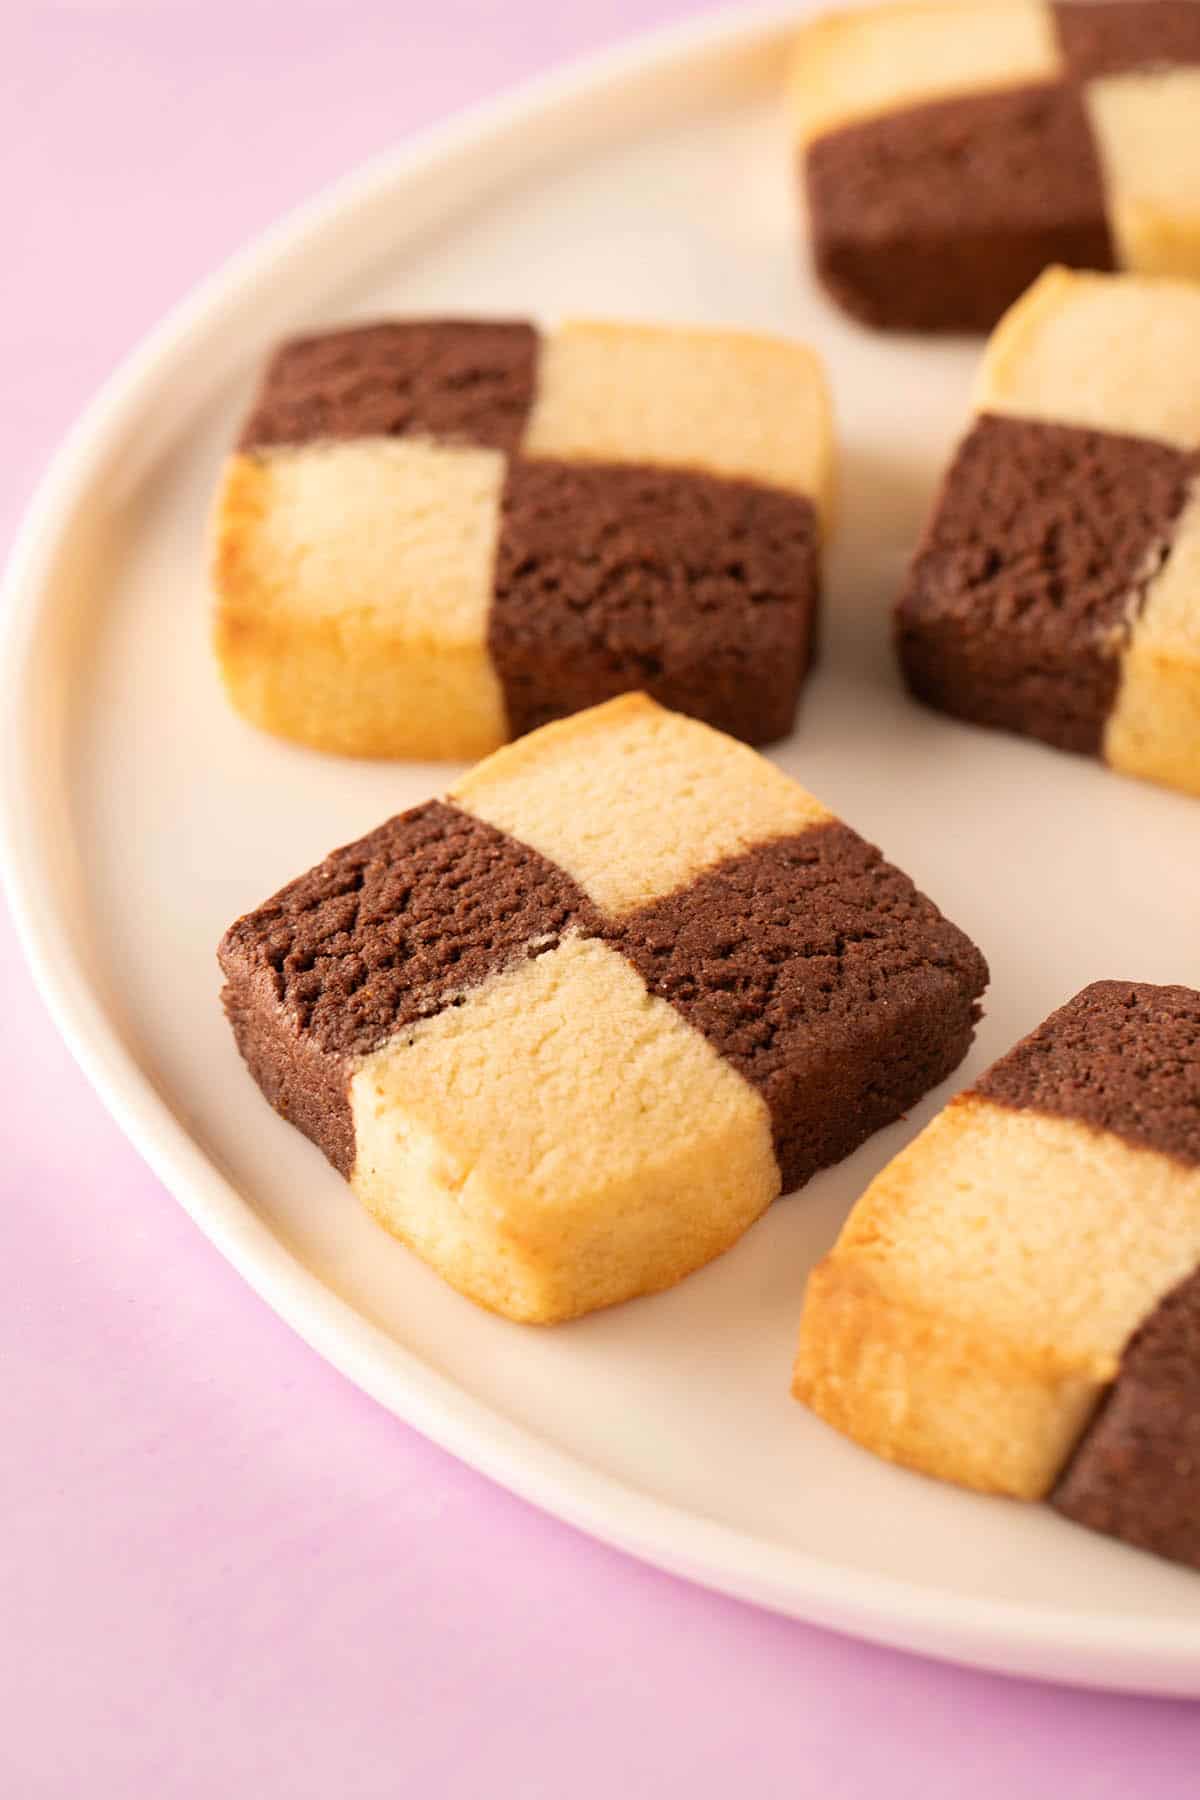
Meet my easy Checkerboard Cookies made from scratch. I’ll show you how to create that beautiful criss-cross pattern using two simple cookie doughs. These stunning cookies are perfect for Christmas and the holidays!

Beautiful Checkerboard Cookies – perfect for the holiday season! These striking biscuits are on my to-bake list this Christmas and for good reason.
Not only are they surprisingly easy to make, but their buttery texture will have everyone reaching for just one more cookie.
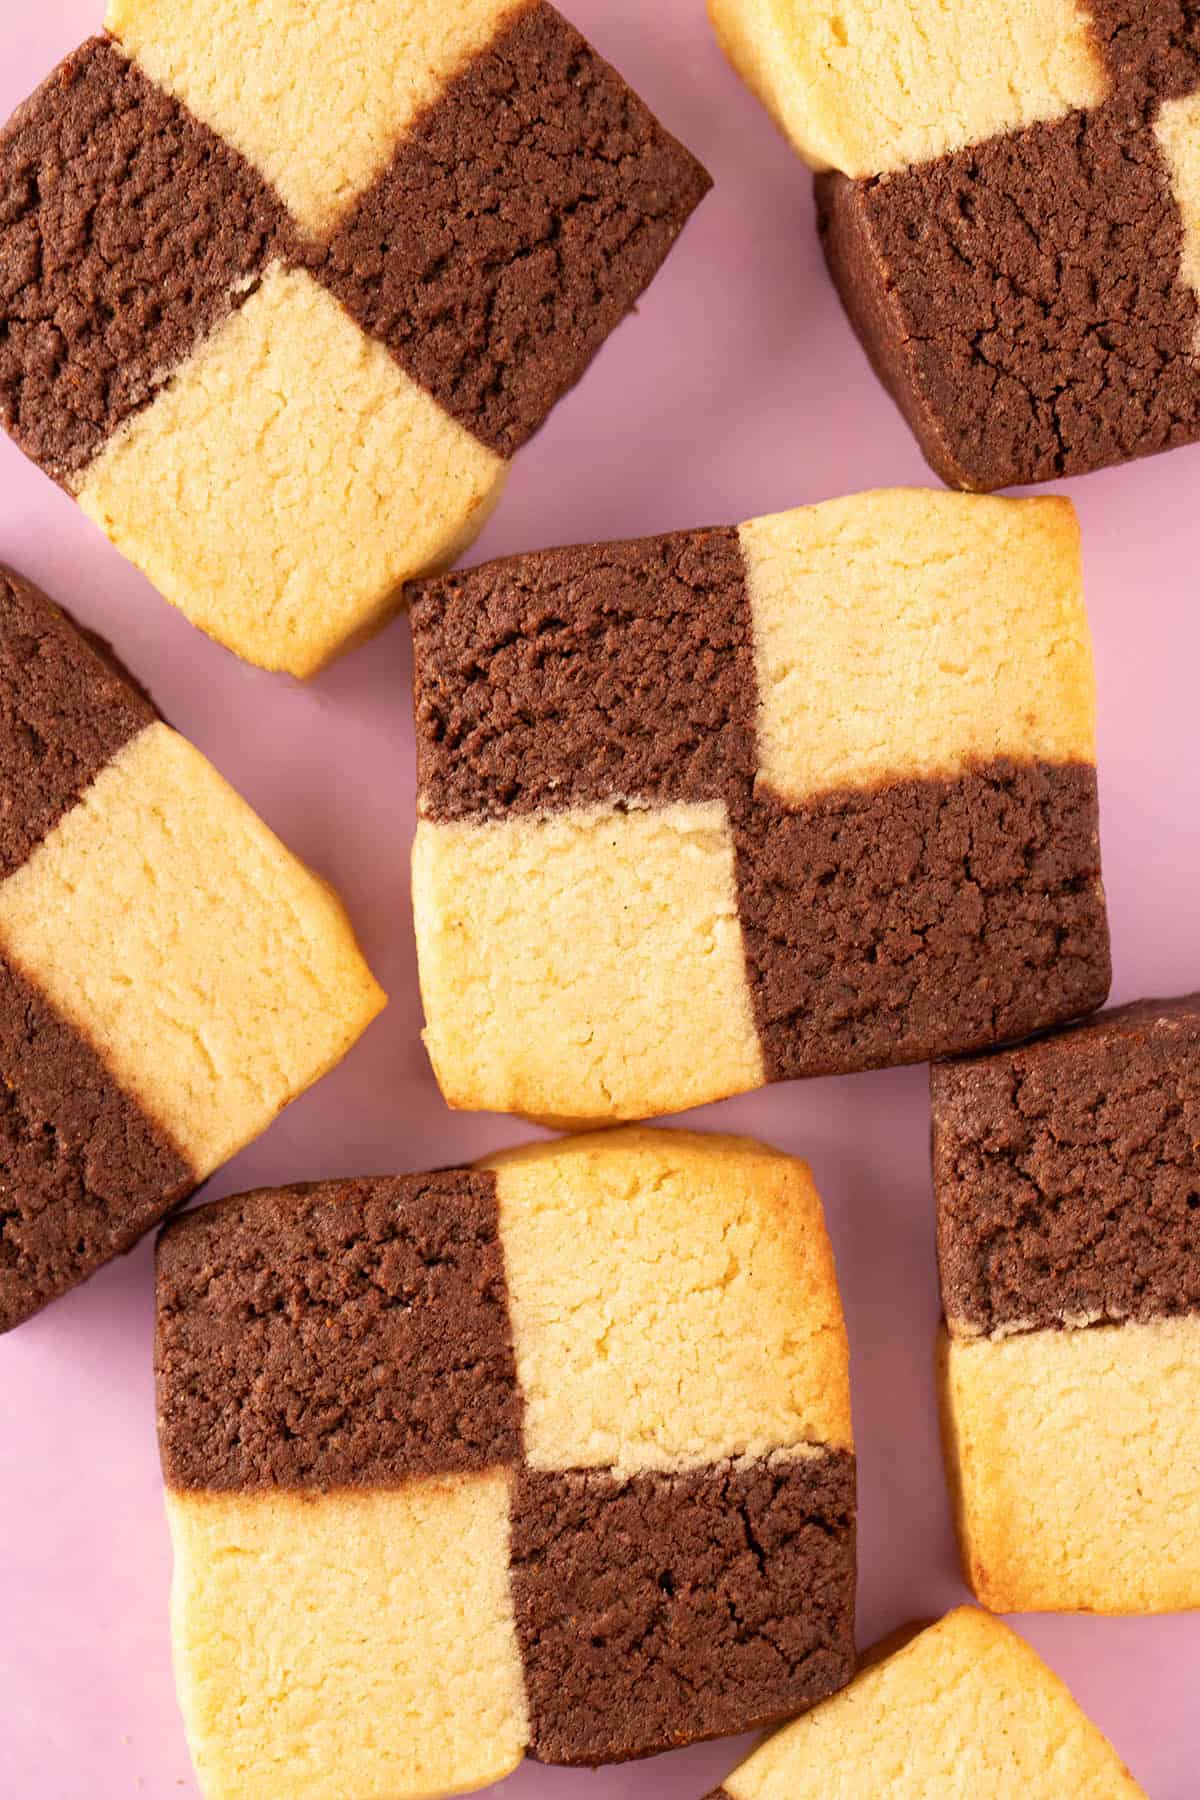
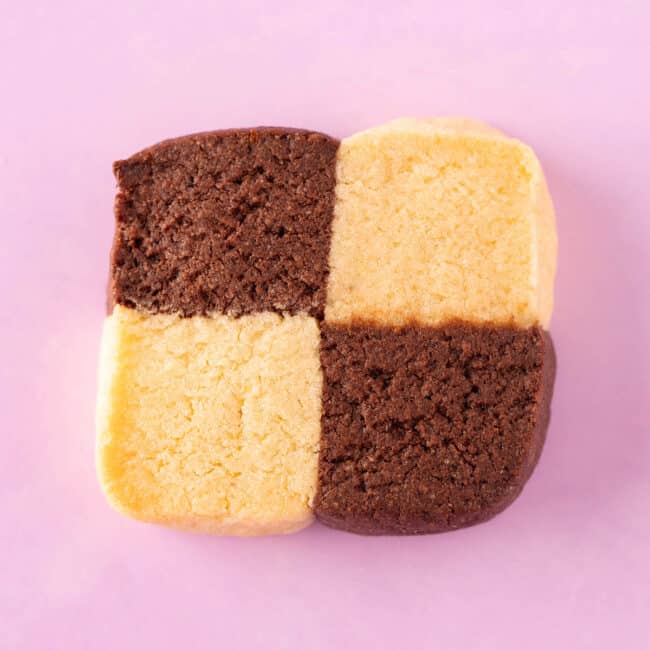
Their beautiful design consists of sweet vanilla cookie dough and chocolate orange cookie dough. And the checkerboard effect is so much easier to make than you’d think!
Why you will love this recipe
- Quick and easy: These buttery cookies are surprisingly easy to make. And once you’ve made and assembled the dough, you can just slice and bake.
- Simple ingredients: They might look fancy but Checkerboard Cookies don’t require any hard-to-find ingredients – only pantry staples.
- Make-ahead: You can easily make the cookie dough ahead of time and bake them later – perfect for the busy holiday season.
- Classic Christmas cookie: Thanks to their stunning checkerboard design and iconic square shape, these cookies are ideal for a cookie swap or holiday cookie exchanges.
Tried this for the first time today, the clear instructions made sure it went perfectly well. My 6 year old loved it, already asking to make it for his friends!
– SM
Recipe testing
If there are any Great British Bake Off fans out there, these cookies were inspired by Peter’s final bake back in season 11.
This Checkerboard Cookie recipe largely comes from my favourite Pinwheel Cookie recipe. Just like my Pinwheel Cookies, these Checkboard Cookies are made from two different cookie doughs – a vanilla dough and a chocolate dough.
When I was recipe testing my Pinwheel Cookie recipe, I discovered a few simple hacks that work so well when making and shaping these styles of cookies.
Just like my Chocolate Sugar Cookies, these cookies use cold butter – it helps to prevent the cookies from spreading too much. It makes the dough easier to handle and it reduces chill time.
The second is splitting the mixture after you have combined the butter, sugar, vanilla and egg to create two different doughs. It saves time and ensures both doughs have the EXACT same consistency.
To make these Checkerboard Cookies a little more Christmassy, I’ve added some orange zest to the chocolate cookie dough.
I promise you’ll be rewarded with gorgeous Checkboard Cookies that are not only dreamy to eat but look the part too. And you’ll love how it is to make the fun checkerboard pattern.
These festive cookies are perfect for the cookie season or homemade Christmas gifts.
Ingredients
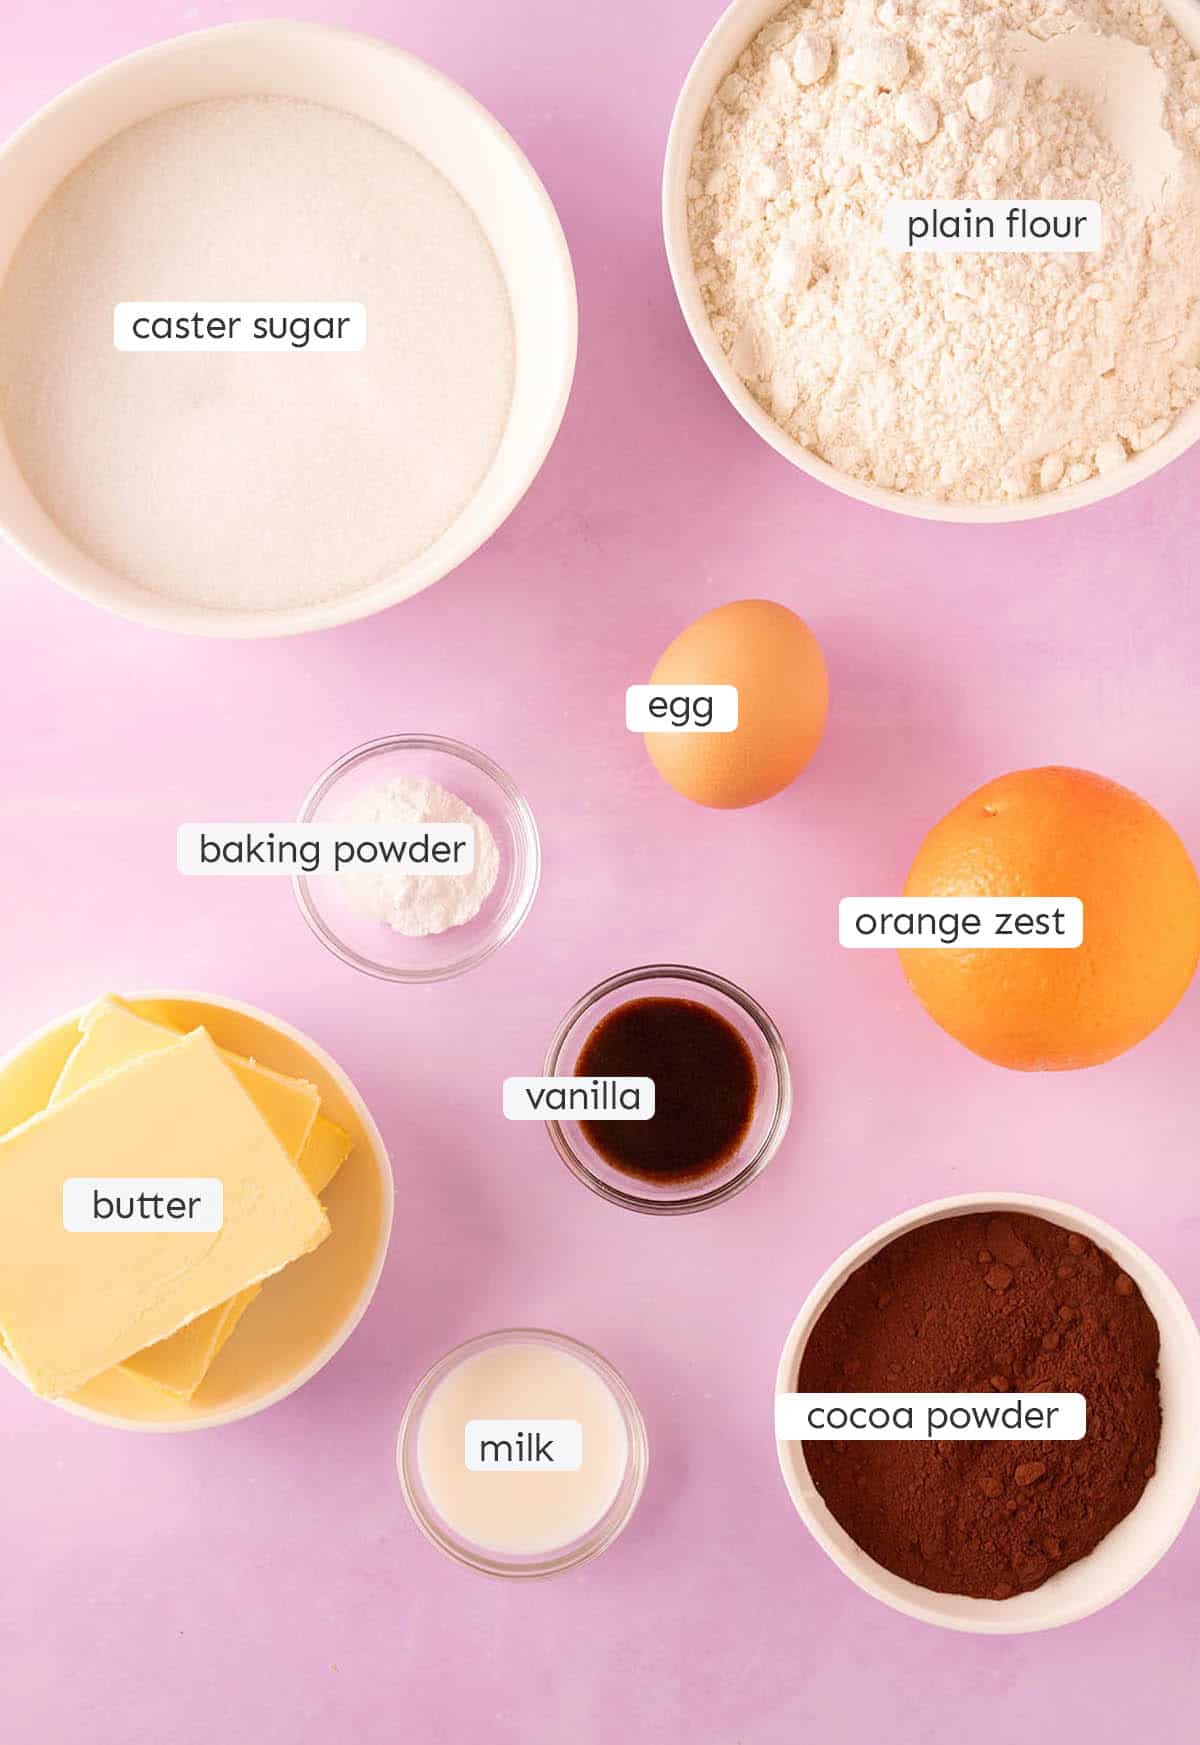
You only need a handful of basic ingredients to make these cookies. Here are some of the key items that make these Checkboard Cookies extra special, including any substitutions you can make.
Butter: Butter gives these cookies their delightfully crumbly texture. Use unsalted butter or if you choose to use salted butter, omit the extra salt included in the cookie dough. I don’t recommend using a butter substitute or oil for this recipe.
Caster sugar: Or granulated sugar.
Vanilla extract: Using good quality vanilla will really make these shortbread cookies shine. I like to use vanilla extract or vanilla bean paste. Or make them extra special by scraping in the beans from a vanilla pod. Avoid using vanilla essence. You could also use almond extract if you prefer.
Cocoa powder: You can use natural 100% cocoa powder or Dutch processed cocoa for this recipe. Do not use sweetened cocoa powder.
Orange zest: I like to add fresh orange zest to my chocolate cookie dough. It creates a beautiful choc orange biscuit dough – perfect for Christmas. However, you can omit the orange zest for traditional chocolate checkerboard cookies.
See recipe card below for a full list of ingredients and measurements.
save this recipe
How to make Checkerboard Cookies
These simple Checkboard Cookies are quick and easy to make. You will need an electric mixer to make a batch.
You can use a hand mixer or a stand mixer fitted with a paddle attachment. Since we are using cold butter, a stand mixer may work better.
Here’s a snapshot of how to make them. The full instructions are included in the recipe card below.
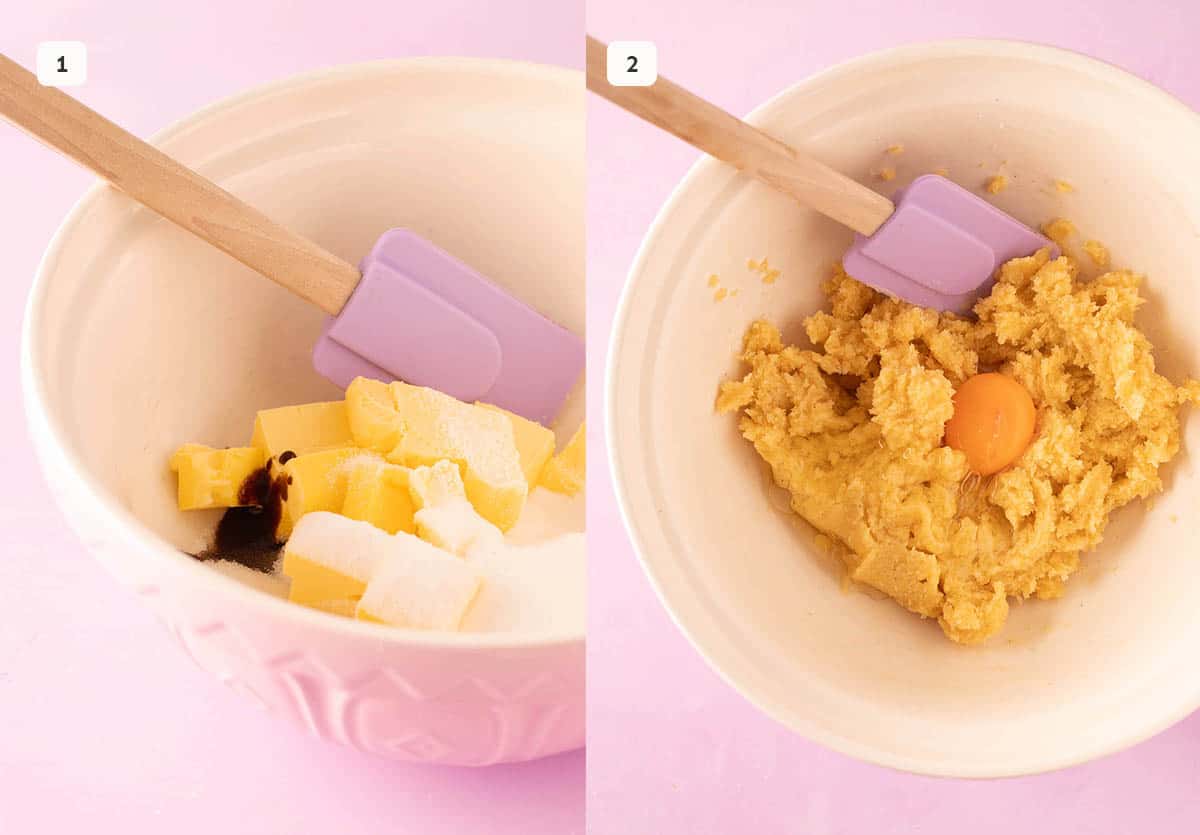
Step 1: In a large bowl, add butter, sugar and vanilla. Beat using an electric mixer on low speed for 1-2 minutes. Then turn up to medium speed and mix until smooth and creamy.
Step 2: Add egg. Mix briefly on low speed until combined. Then split the mixture into two – use a baking scale or just eyeball it.
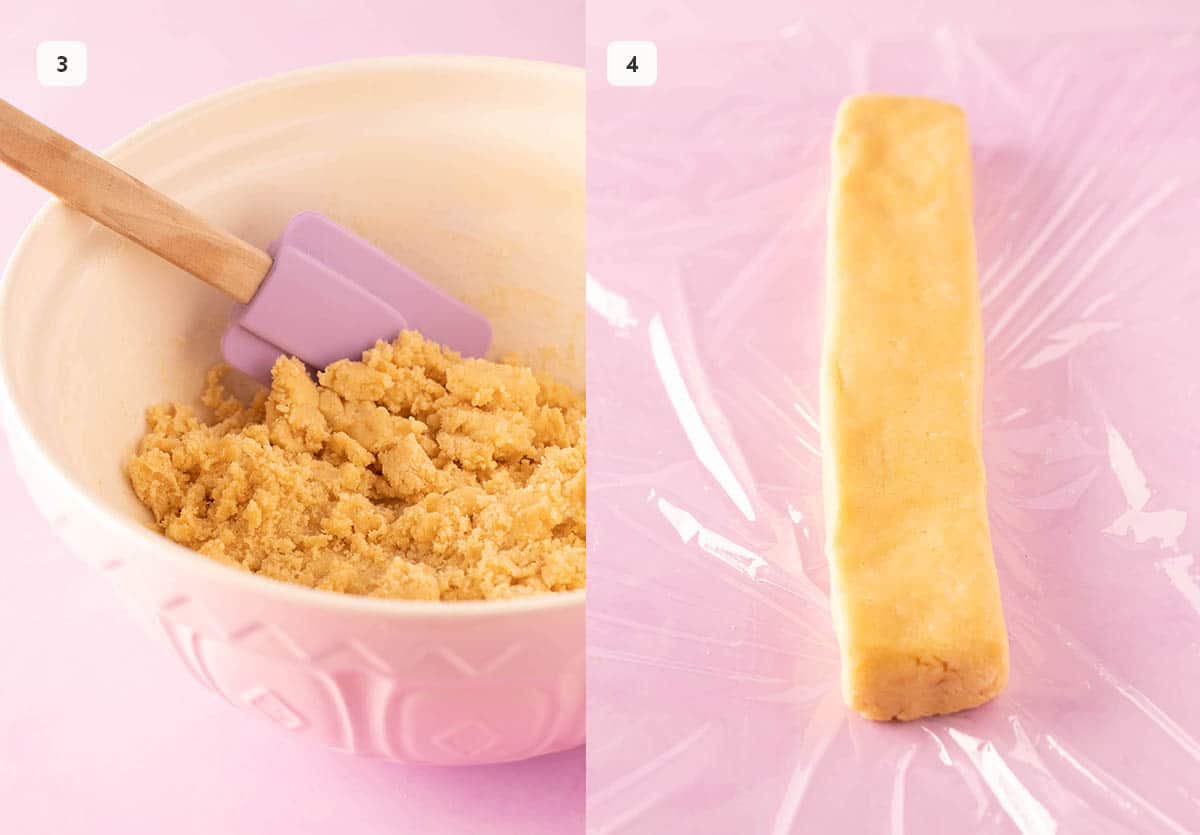
Step 3: Place one-half of the butter mixture back into your mixing bowl. Add the flour, baking powder and salt and mix on low speed until a soft cookie dough forms.
Step 4: Use your hands to shape the cookie dough into a rectangular log, approximately 27cm (10.5 inches) long by 4cm (1.5 inches). Wrap in plastic wrap.
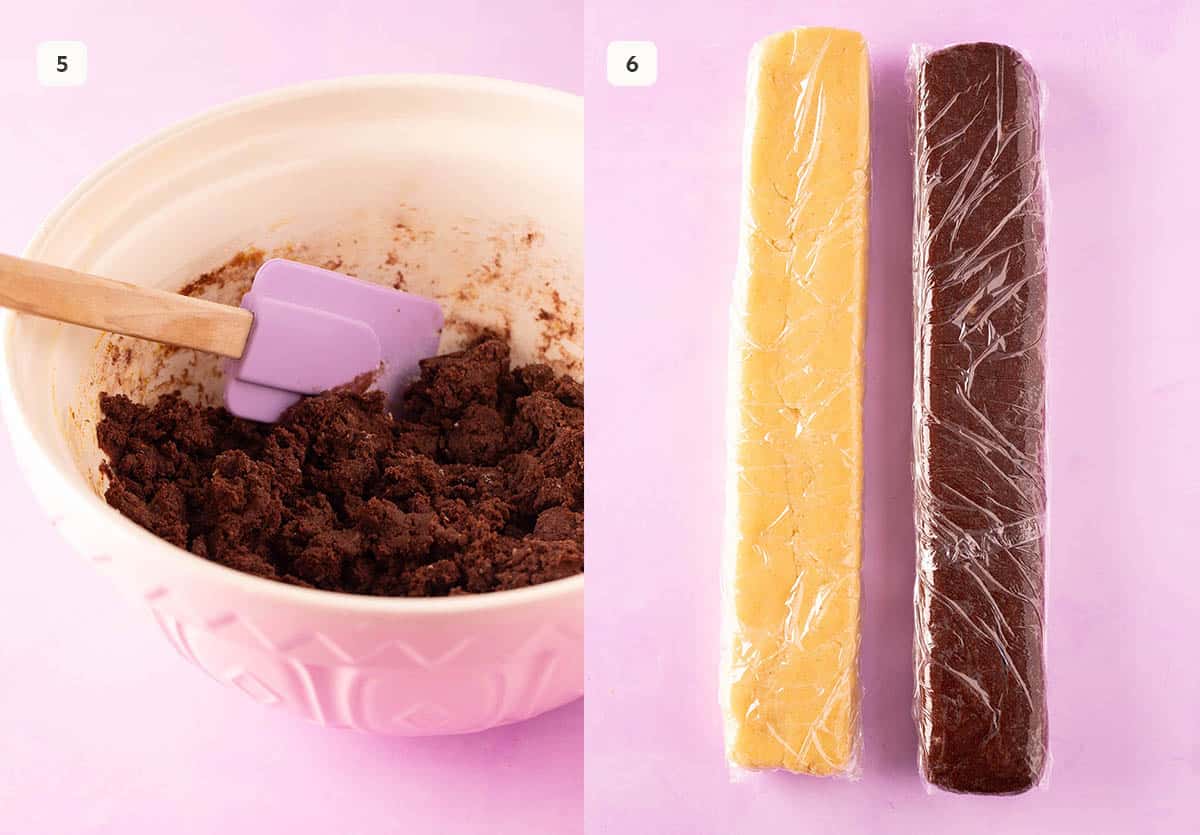
Step 5: Add remaining butter mixture to a large bowl. Add flour, cocoa powder, orange zest, baking powder, salt and milk. Mix on low speed until a chocolate cookie dough forms.
Step 6: Use your hands to shape cookie dough into a rectangular log, 27cm (10.5 inches) long by 4cm (1.5 inches). Wrap in plastic wrap and place both doughs in the fridge for 30 minutes.
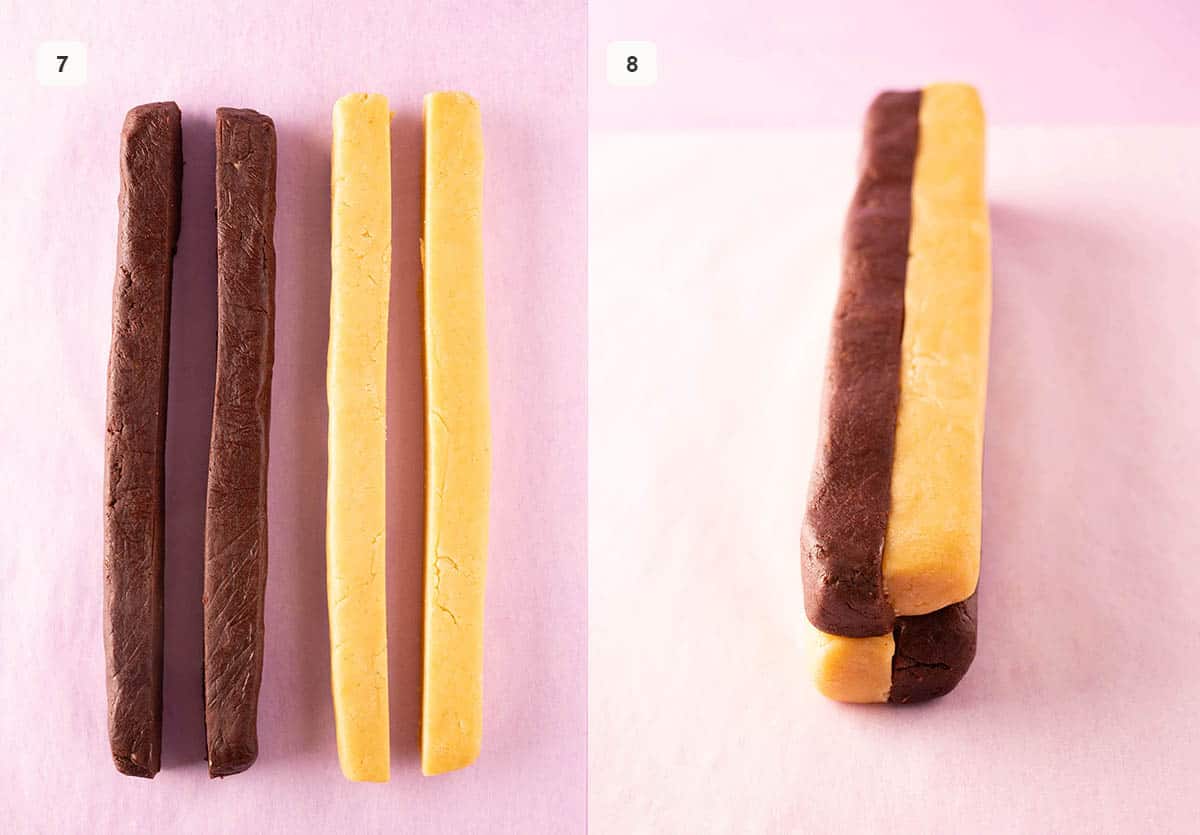
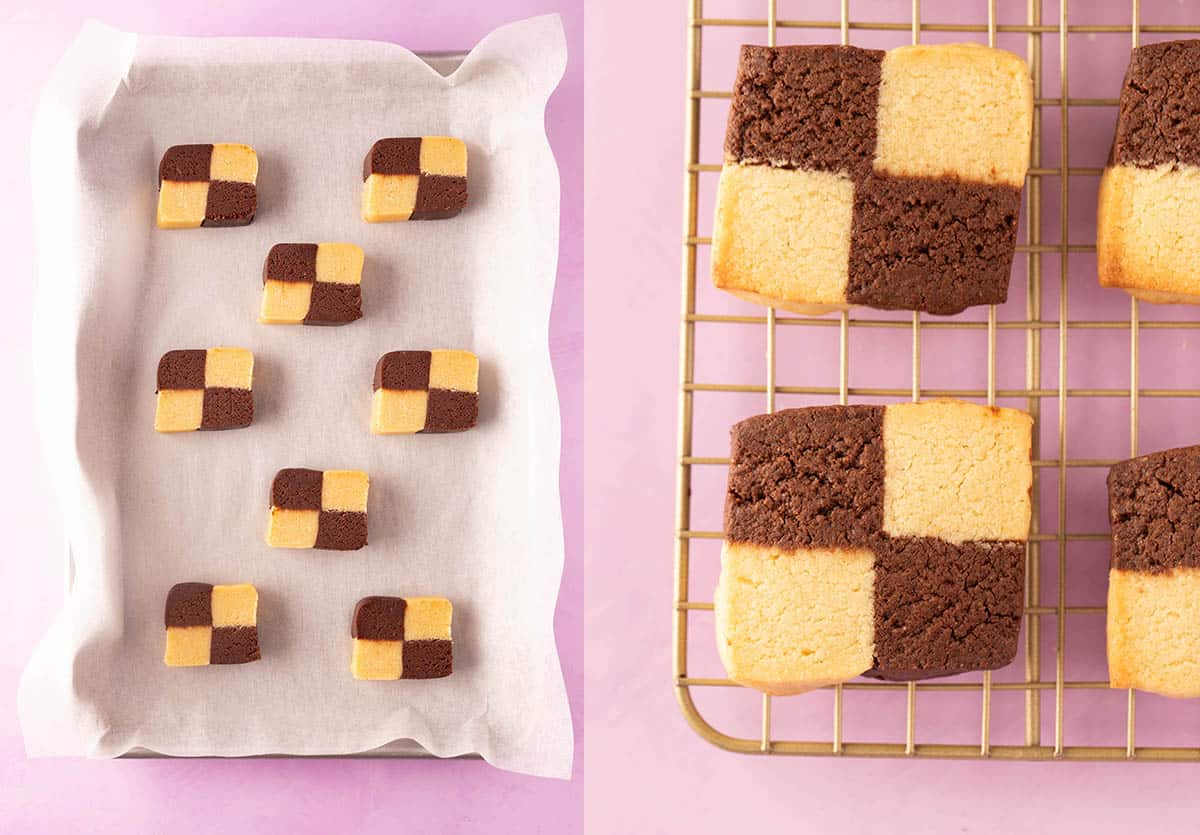
Step 7: Slice each cookie dough log in half lengthways. Then line up one vanilla cookie dough log and one chocolate cookie dough log next to each other. Press them together. Repeat with remaining two cookie dough logs. Then place them on top, ensuring they alternate in flavour.
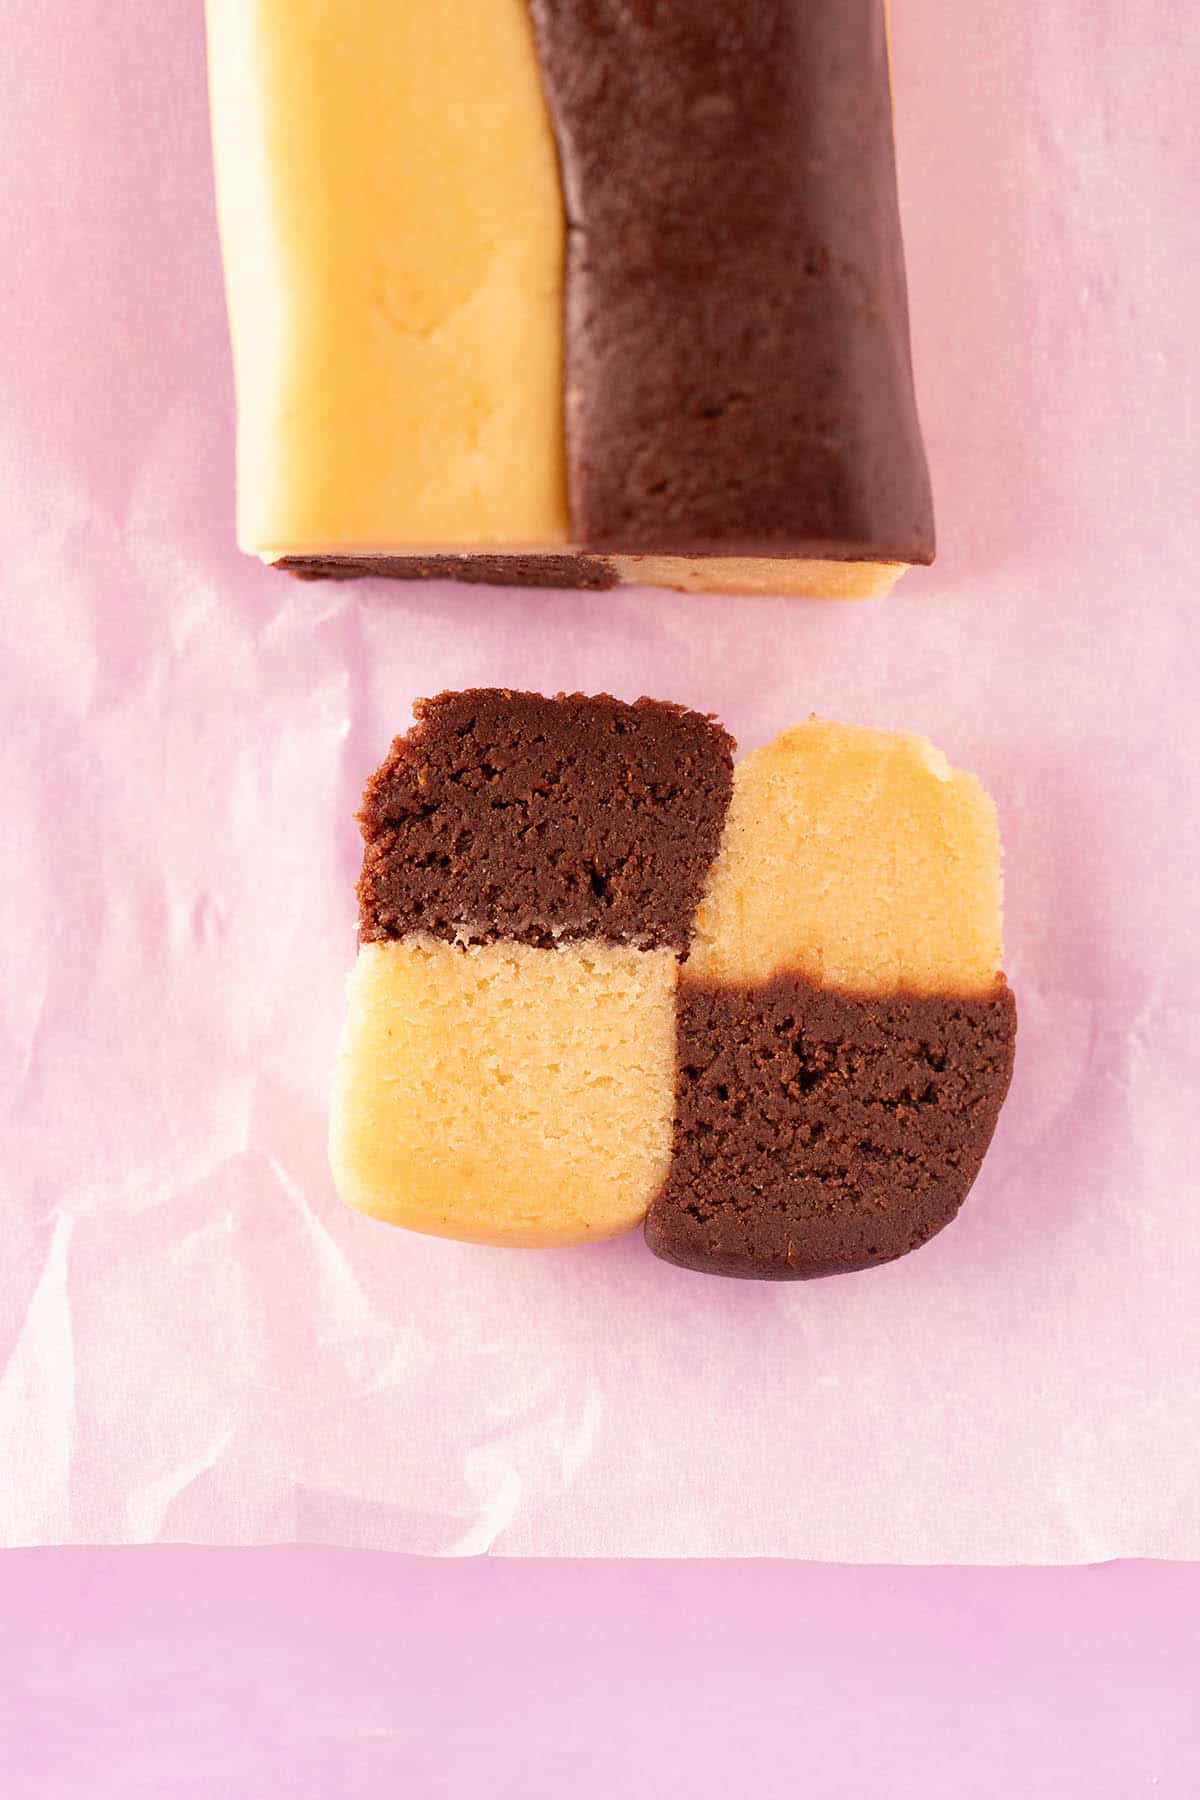
Step 8: Wrap entire checkerboard log in a piece of parchment paper or baking paper and place in the fridge for 30 minutes or the freezer for 15 minutes. Then slice into 1cm (1/3 inch) cookies. Bake for 12-13 minutes until just golden brown on the edges.
Make-ahead instructions
You can easily make these Checkboard Cookies ahead of time.
Fridge: Wrap the cookie dough log in plastic wrap and place it in the fridge. It will need to chill for 30 minutes and then it’ll be ready to slice and bake when you need it. Store the cookie dough in the fridge for up to five days.
Freezer: Alternatively, you can freeze your cookie dough. Freeze the entire log or if you plan on only baking a few cookies at a time, slice into half or thirds. Wrap cookie dough tightly in plastic wrap.
You’ll need to thaw the cookie dough slightly before slicing and baking. I recommend leaving it at room temperature for 15-30 minutes depending on your climate.
Recipe tips
- Use cold butter: Cold butter will ensure your cookies don’t spread too much and will make the dough really easy to handle.
- Weigh your ingredients: For best results, I highly recommend weighing your ingredients using a baking scale. It’s very easy to over-measure ingredients like flour and cocoa powder when using cup measurements which will make your cookie dough dry and hard to roll.
- Avoid over-mixing your cookie dough: Once your cookie dough is combined, you can stop mixing. Over-mixing can result in a dry or tough cookie.
- Don’t skip the chill time: In order to get those perfect swirls, you must chill your cookie dough. It’ll be worth the wait.
Frequently asked questions
Once baked and cooled, you can keep Checkerboard Cookies in an airtight container at room temperature for up to 5 days.
Yes. You can omit the orange zest for a pure chocolate cookie dough.
You can use room temperature butter if you prefer. You may need to chill the dough for a few minutes before shaping it as it may be too sticky. You can also bake one cookie and see how it spreads. If it spreads too much, consider chilling the dough for another 15-30 minutes and trying again.
Yes! You can slice each cookie dough log into three instead of two. Then follow on with the same instructions.
More easy cookie recipes
Did you make this recipe? Don’t forget to rate the recipe and leave a comment below. Hungry for more? Join me on Instagram, YouTube, Facebook, Pinterest and TikTok for more amazing recipe ideas.
Let’s Bake
Checkerboard Cookies recipe
Easy Checkerboard Cookies made from a simple sugar cookie dough.
Ingredients
- 170 grams (3/4 cup or 1.5 sticks) unsalted butter, cold, roughly chopped
- 200 grams (1 cup) caster sugar or granulated sugar
- 1 teaspoon vanilla bean paste or vanilla extract
- 1 large egg
Vanilla cookie dough
- 175 grams (1 and 1/4 cups) plain flour or all purpose flour
- 1/4 teaspoon baking powder
- 1/4 teaspoon salt
Chocolate cookie dough
- 140 grams (1 cup) plain flour or all purpose flour
- 30 grams (1/4 cup + 1 tablespoon) cocoa powder
- Zest of 1 large orange, finely grated, optional
- 1/4 teaspoon baking powder
- 1/4 teaspoon salt
- 1–2 teaspoons full fat or whole milk
Instructions
- In a large mixing bowl, add butter, sugar and vanilla. Beat using an electric mixer on low speed for 1-2 minutes. It’ll take a few minutes for your butter to soften.
- Turn mixer up to medium speed and beat just until your butter and sugar are combined and smooth. There shouldn’t be any lumps of butter.
- Add egg. Mix briefly on low speed until combined. It may look a little curdled – that’s ok.
- Split this butter mixture into two even portions. Use a baking scale to do this (recommended) or eyeball it if you don’t have a scale.
- Vanilla cookie dough
Place one half of the butter mixture back into your mixing bowl. Add flour, baking powder and salt needed for the vanilla cookie dough. - Mix on low speed until a soft, but thick cookie dough forms. It may seem dry and crumbly at first, but just keep mixing and it’ll slowly come together. Set aside.
- Chocolate cookie dough
Add remaining butter mixture to a large mixing bowl. Add flour, cocoa powder, orange zest, baking powder, salt and 1 teaspoon milk. - Mix on low speed until a soft, but thick cookie dough forms. If it’s too dry, add an extra teaspoon of milk.
- Shaping the dough
Using your hands, shape the vanilla cookie dough into a long rectangular log approximately 27cm (10.5 inches) long by 4cm (1.5 inches). Repeat with the chocolate cookie dough. - Wrap each log in plastic wrap and place both doughs in the fridge for 30 minutes or in the freezer for 15 minutes.
- Slice each cookie dough log in half lengthways. Then line up one vanilla cookie dough log and one chocolate cookie dough log next to each other. Press them together. Repeat with remaining two cookie dough logs.
- Place one log on top of the other, ensuring they alternate in flavour. Press gently so all the logs stick together nicely. Then wrap entire log gently in baking paper or parchment paper and pop in the fridge for another 30 minutes, or in the freezer for 15 minutes.
- Bake cookies
Preheat the oven to 170 C (340 F) standard / 150 C (300 F) fan-forced. Line two large baking trays or cookie sheets with baking paper or parchment paper. - Use a sharp knife to cut cookies into 1 cm (1/3-inch) thick slices. Place cookie dough on a baking tray lined with baking paper, leaving room for cookies to spread out.
- Bake for 12-13 minutes or until cookies just slightly start to colour on the edges. Leave to cool for 5 minutes before carefully transferring to a wire rack to cool completely.
Notes
Cold butter: Using cold butter allows us to cut down on the chill time. Once the dough has been made, it should be ready to roll out. However, if you prefer to start with softened or room temperature butter, you can. You may just need to chill the dough for 15-30 minutes before rolling if it’s too sticky to shape.
Vanilla bean paste: I love to use vanilla bean paste in these cookies as it has a nice, strong vanilla flavour – and I love those speckles of vanilla bean. However, vanilla extract will work fine as well.
Cocoa powder: I recommend using 100% natural cocoa powder or Dutch processed cocoa powder. Don’t use sweetened cocoa.
Cookie size: You can slice these cookies as thin or thick as you like. If you would like a thin and crispy cookie, slice the cookie dough into 1/8 inch thick pieces and bake cookies for 8 minutes. You can also increase the baking time if you prefer a crunchy or crispier cookie.
Make-ahead instructions:
Fridge: Wrap the cookie dough log in plastic wrap and place it in the fridge. Store the cookie dough log in the fridge for up to five days.
Freezer: Alternatively, you can freeze your cookie dough. You’ll need to thaw the cookie dough slightly before slicing and baking. I recommend leaving it at room temperature for 15-30 minutes depending on your climate. Once it is soft enough to slice with a knife you are good to go. Don’t leave your cookie dough out at room temperature for too long or the cookies will spread when baked.
Nutrition Information
Serving Size: 1 cookie Calories: 138 Sugar: 8.5 g Sodium: 53.1 mg Fat: 6.2 g Carbohydrates: 19.4 g Protein: 1.9 g Cholesterol: 23 mg

Hi, I’m Jess, the creator of Sweetest Menu and the author of Something Sweet. A self-taught baker and published recipe writer who can’t stop making easy and delicious baking recipes.


Milly says
These cookies are SOOOO good! I made them for school and everyone wanted one! They are just too cute!!!
Jessica Holmes says
I love hearing that Milly! I’m so glad you and your friends enjoyed them!
SM says
Tried this for the first time today, the clear instructions made sure it went perfectly well. My 6 year old loved it, already asking to make it for his friends! 😄
Jessica Holmes says
Love that! So glad you enjoyed this one!
Josh says
We loved these!
Jessica Holmes says
Yay! So glad to hear that Josh!