
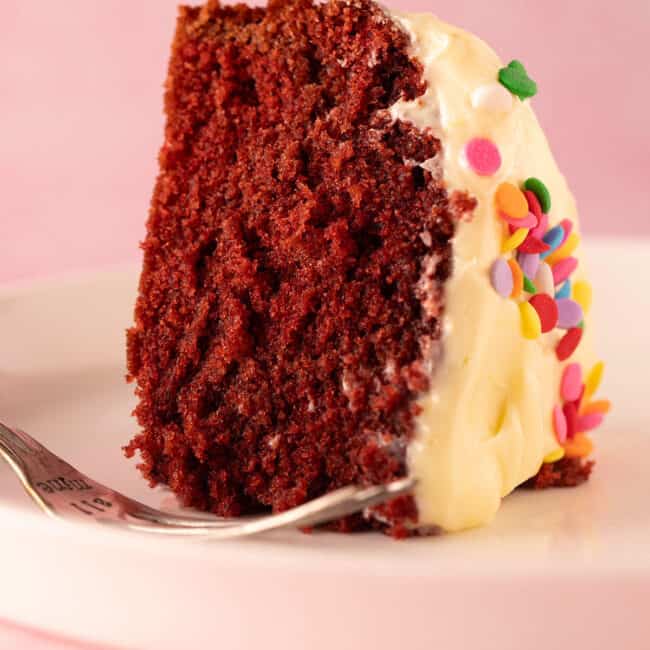
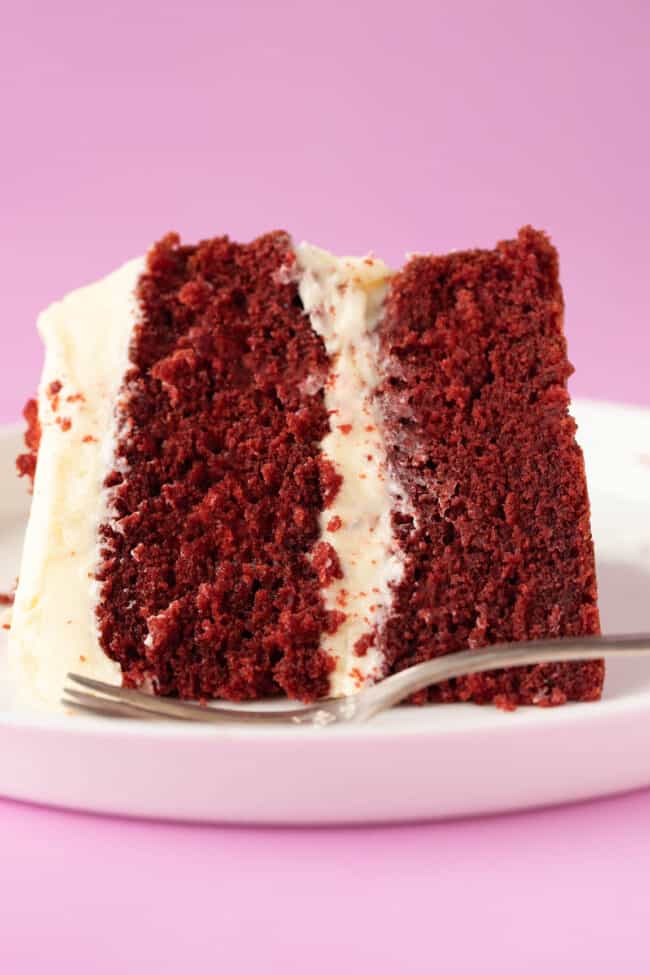
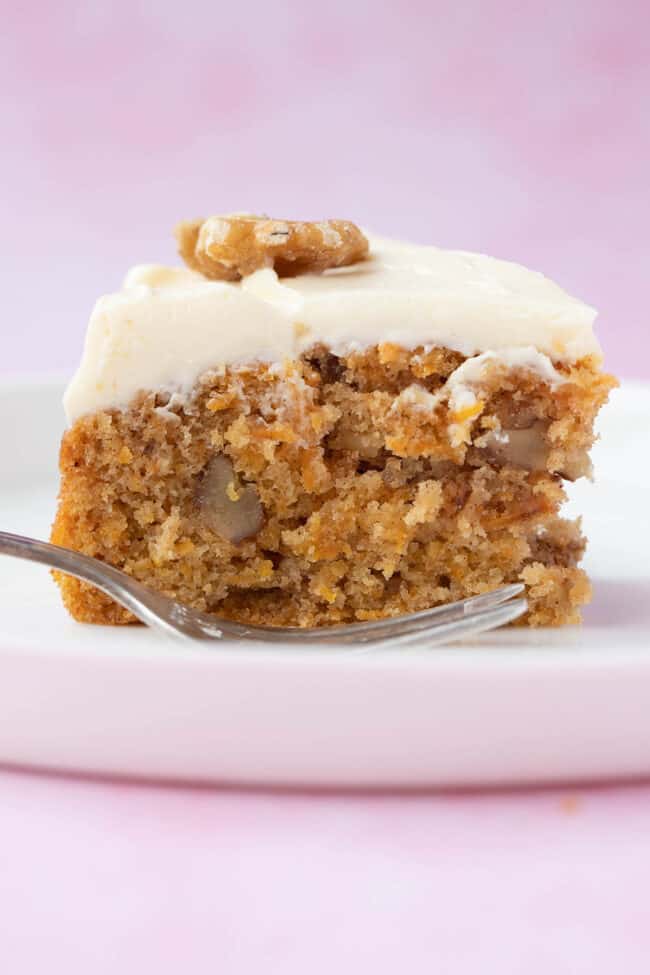
A beautiful 6-inch Small Red Velvet Cake covered in cream cheese frosting. This tiny cake is perfect for birthdays or Valentine’s Day celebrations. It makes 4-6 slices. It’s the latest recipe is our Small Batch Series.

Nothing says I love you like a big slice of Red Velvet Cake. Or at least that’s what I’m telling myself this Valentine’s Day.
And now you can make a one-layer Small Red Velvet Cake to feed just you and your love. This 6-inch cake will easily make 4-6 slices, perfect for low-key celebrations or small households.
It uses the reverse creaming method to make a super tender crumb. We’ll talk all about that in the post below.
Why you will love this recipe
- Quick and easy: This small one-layer Red Velvet Cake is easy to make and fast to decorate. Perfect for beginner bakers!
- Soft and tender: Thanks to buttermilk and a splash of white vinegar (and the reverse creaming method), this mini cake has a beautifully soft and tender texture.
- Sweet and tangy: Enjoy the subtle chocolate flavour and moist, velvety texture of the cake and the tangy cream cheese frosting.
- No leftovers: If you want all the flavour of an amazing Red Velvet Cake without the faff of a complex layer cake, this one’s for you!
Absolutely delicious! Many red velvet recipes are too soggy or underwhelming but this one is perfect. Follow the method and weigh your ingredients precisely though for the best result.
– Amie
What does Red Velvet Cake taste like?
Despite its glamorous appearance, Red Velvet Cake is mild in flavour. You can expect a hint of chocolate due to a small amount of cocoa powder in the cake batter, and sweetness from the vanilla.
There is also tanginess from the buttermilk, but it’s the surprisingly tender texture (often described as velvety) that lingers at first bite.
To someone who has never had it before, I describe it as part chocolate, part vanilla and 100% worth having!

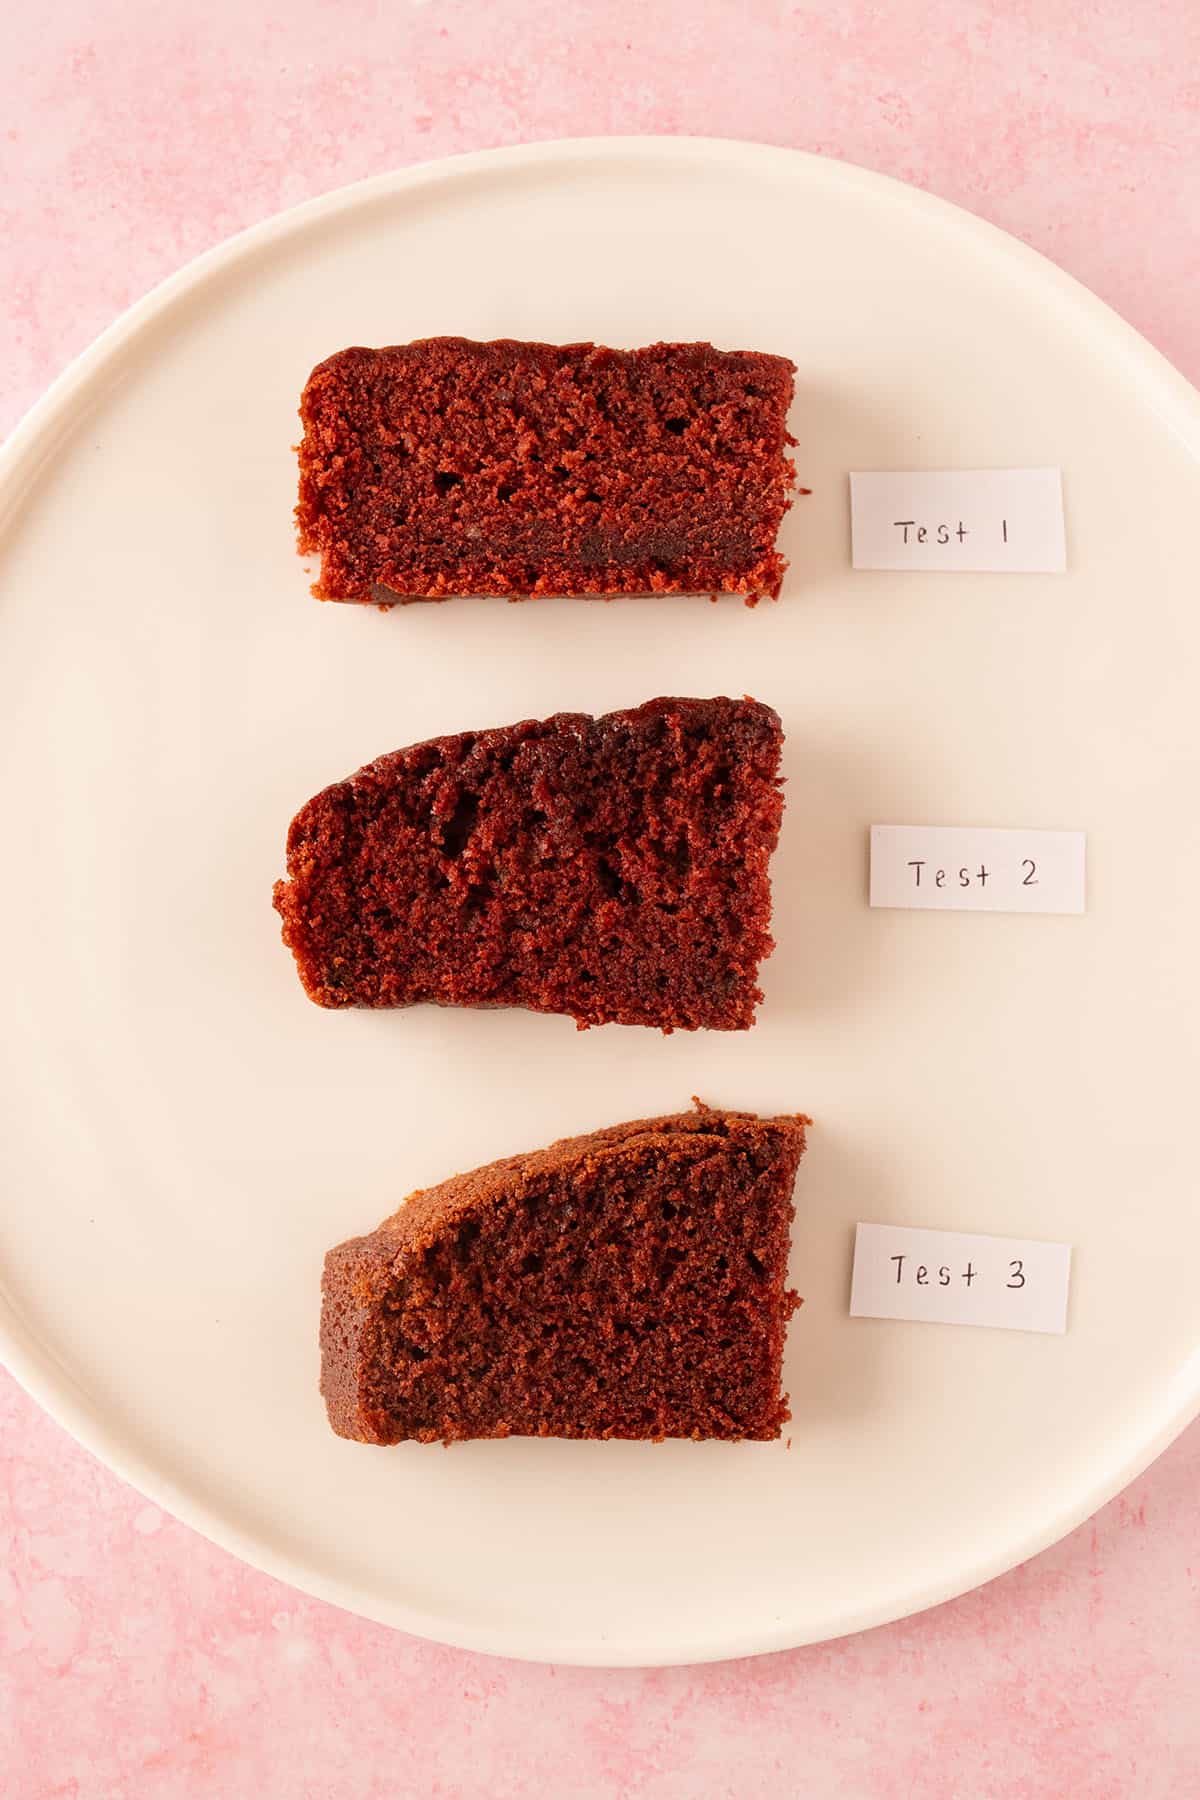
Recipe testing
Ever since I had a Sprinkles Red Velvet Cupcake from a Beverly Hills ATM, I’ve been smitten with this uniquely flavoured bright red cake. Made popular in the Southern United States, it’s velvety crumb and subtle chocolate flavour make it hard to resist.
I’ve already published my favourite classic Red Velvet Cake with tangy cream cheese frosting, and my Red Velvet Cupcake recipe with real chocolate buttercream. And even Red Velvet Cookies.
But I wanted to scale my recipe down to make a teeny tiny 6-inch Red Velvet Cake to feed just 2, 4 or 6 people.
My first attempt didn’t go very well. It had too much moisture which resulted in a soggy cake with a wet line along the bottom.
I reduced the buttermilk and tried again. Test 2 was just lovely! Beautiful flavour with the soft texture I wanted.
But I was curious if the reverse creaming method, which I use in my Small Vanilla Cake recipe, might help make an even MORE tender Red Velvet Cake.
Instead of starting by creaming together butter and sugar, the reverse creaming method begins by mixing the butter in with all of the dry ingredients – flour included!
This step prevents the formation of gluten and therefore helps to avoid a tough or dry cake. And in my opinion, it’s much more forgiving than the traditional creaming method. That’s why I love to use it in my Vanilla Layer Cake recipe.
So I made Test 2 again, but this time changed the method. The result was very similar, but the texture of the cake was even more velvet-y. I declared it the winner!
I’ve included both methods in the recipe for those who might be more comfortable with the traditional method. But I do recommend giving the reverse creaming method a go!
Ingredients
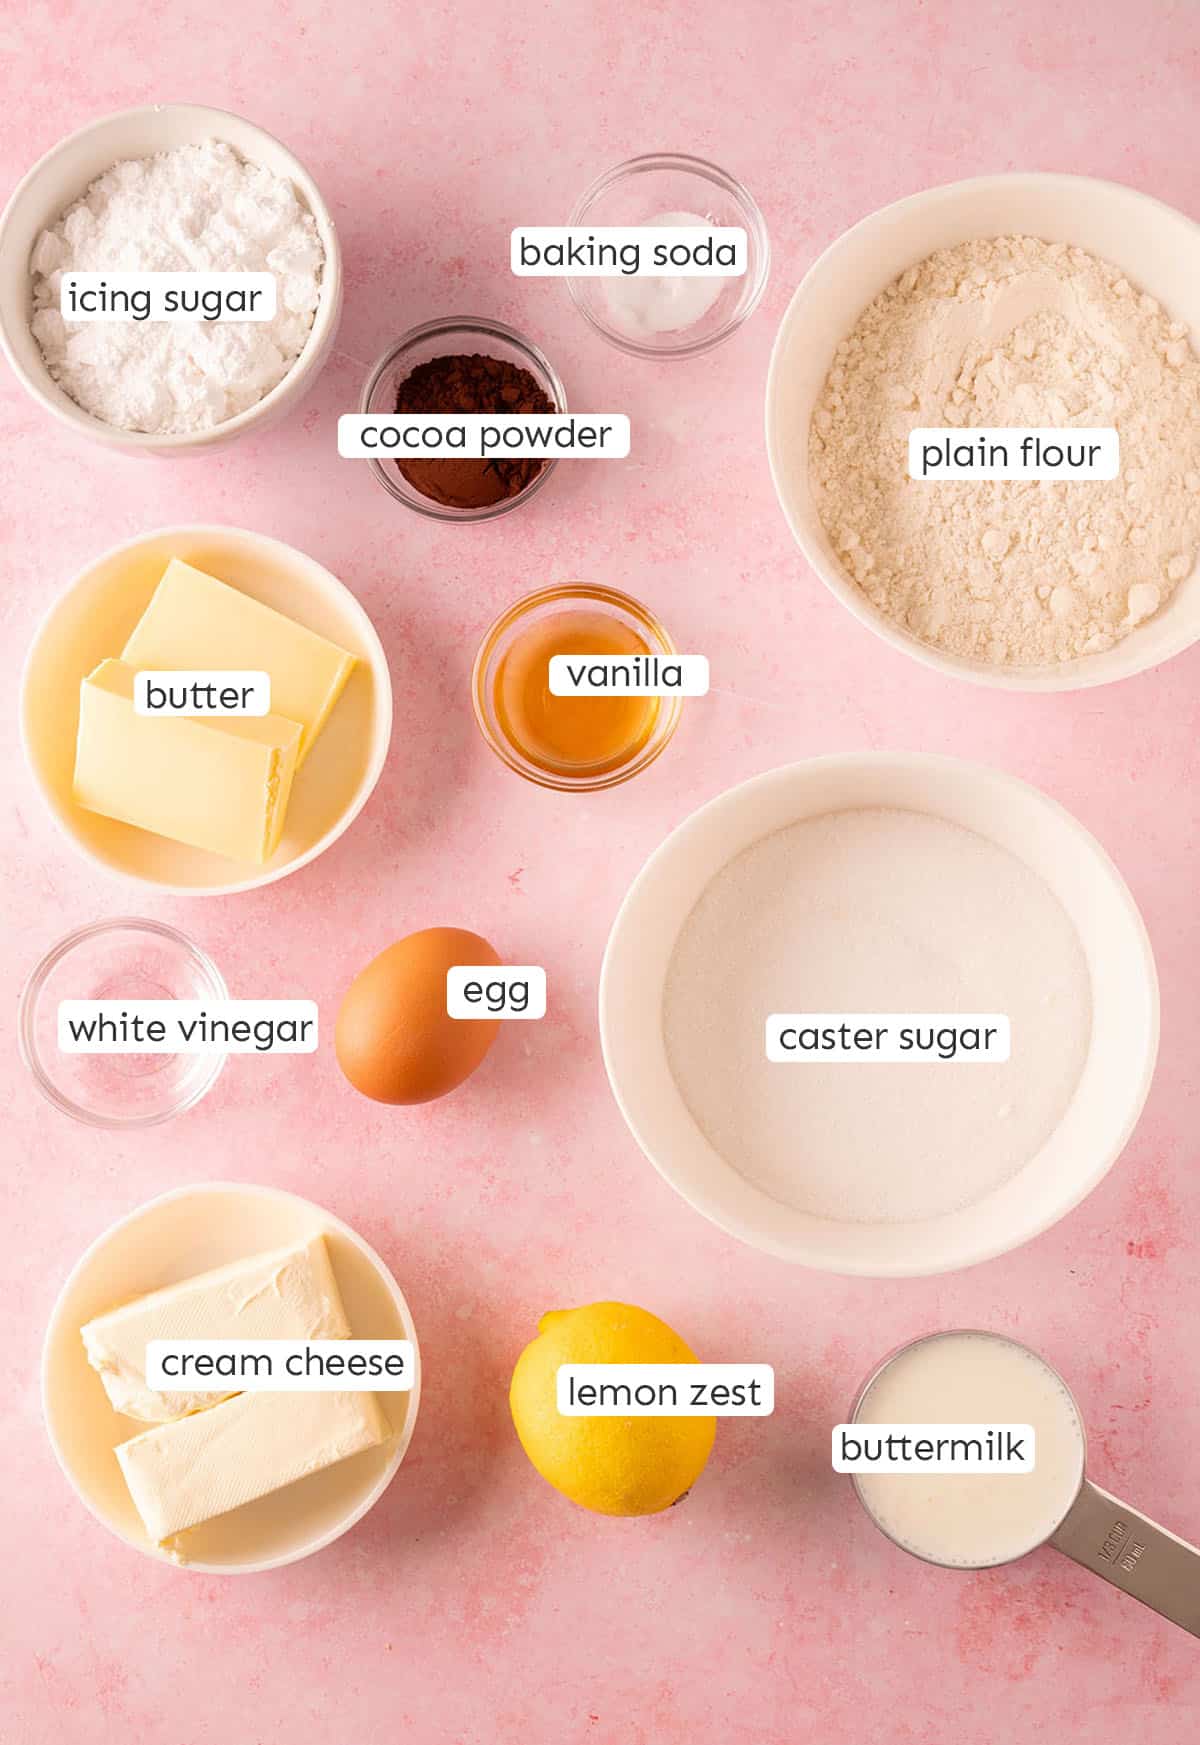
You don’t need many special ingredients to make a Small Red Velvet Cake from scratch.
It gets its lovely red glow from red food colouring but otherwise, most of the ingredients are pantry staples.
Here are the key ingredients you’ll need including any swaps or substitutions you can make.
Cocoa powder: You can use natural 100% cocoa powder or Dutch processed cocoa powder in this cake. Don’t use sweetened cocoa or drinking chocolate.
Red food colouring: I recommend using a red food gel or oil-based colour. The watery food colours you get from the supermarket are so weak that they won’t give you a vibrant red colour. You also have to use much more, which can throw out your ratio of liquids.
Buttermilk: Buttermilk is key to creating that light, fluffy texture that Red Velvet Cake is synonymous with. Storebought full fat buttermilk is best. However, you can substitute half full fat or whole milk and half full fat Greek yogurt.
White vinegar: White vinegar reacts with baking soda, along with the buttermilk, to create an airy and tender cake crumb. If you don’t have white vinegar, you can leave it out since it such a small amount. The full fat buttermilk will do most of the work!
Cream cheese: You’ll need to use cream cheese in the frosting for this cake. I recommend using full fat cream cheese rather than light cream cheese or spreadable cream cheese. Try and get hold of the brick-style or block cream cheese for best results. I use Philadelphia cream cheese.
Icing sugar: Also known as powdered sugar or confectioners sugar. This very fine sugar is perfect for baking buttercreams and frostings as it dissolves very easily.
See recipe card below for a full list of ingredients and measurements.
How to make Small Red Velvet Cake
As mentioned in the recipe testing section, I prefer to use the reverse creaming method to make this cake. I’ll show you how to do this below.
I’ve also included notes in the recipe card below if you would prefer to use the traditional creaming method.
You will need an electric mixer for this cake and the cream cheese frosting.
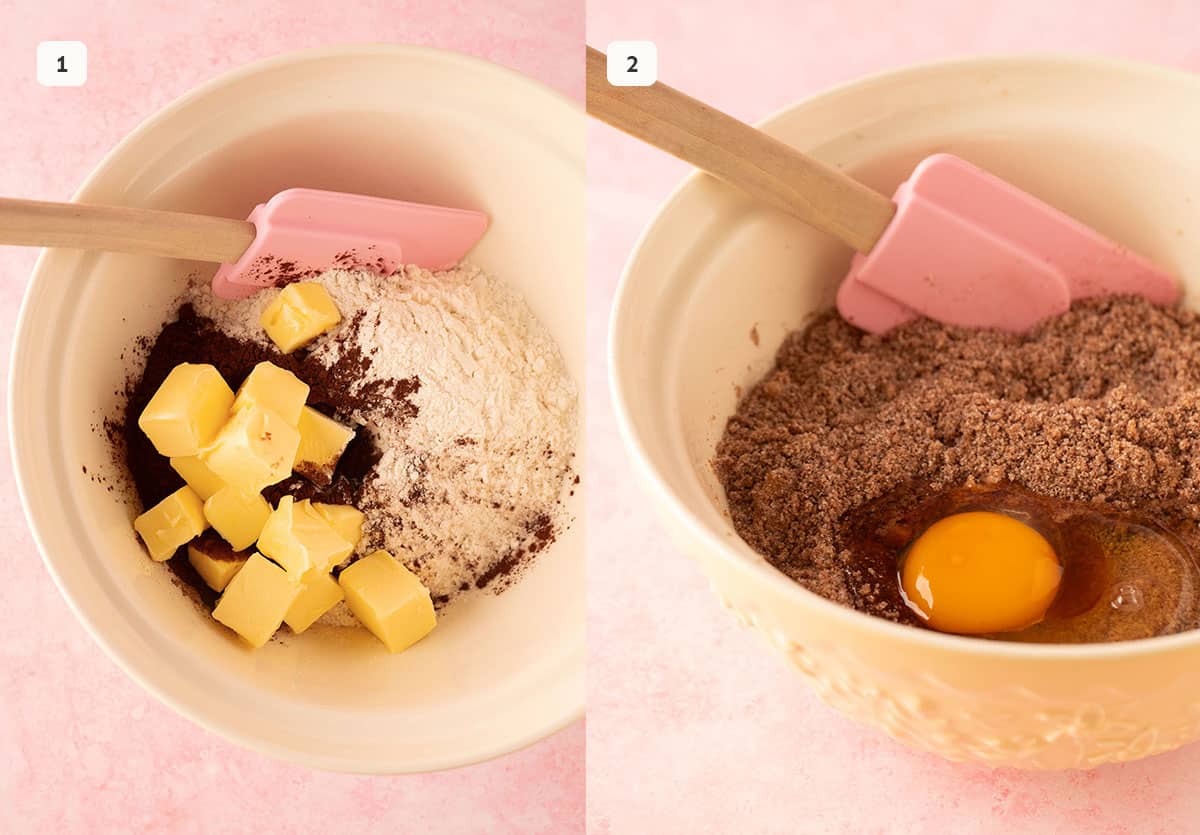
Step 1: In a medium bowl, add dry ingredients. Add softened butter and beat using an electric mixer on medium speed until combined.
Step 2: Once your butter has broken down and resembles breadcrumbs, add egg and vanilla. Beat on medium speed to combine.
save this recipe
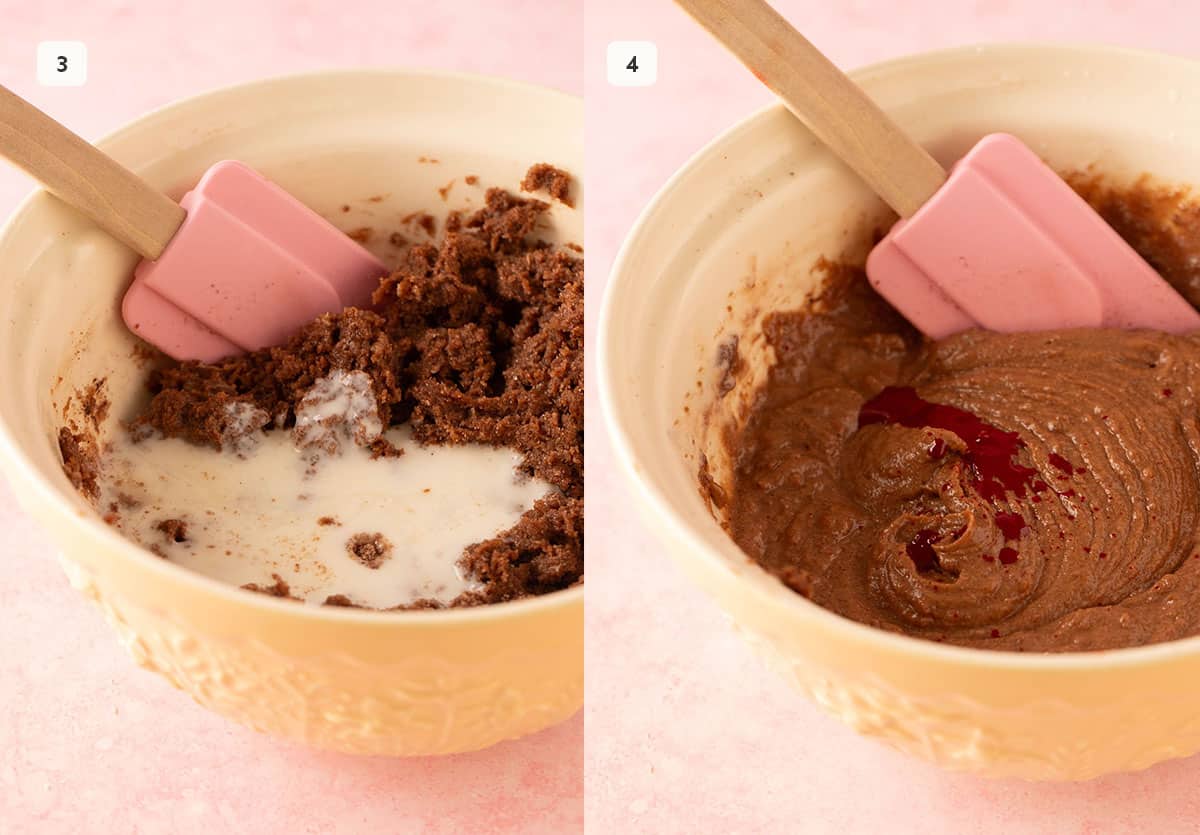
Step 3: Add buttermilk and vinegar and beat again until creamy chocolate-y cake batter forms.
Step 4: Add a few drops of red colour. Stir using a spatula until cake batter turns vibrant red.
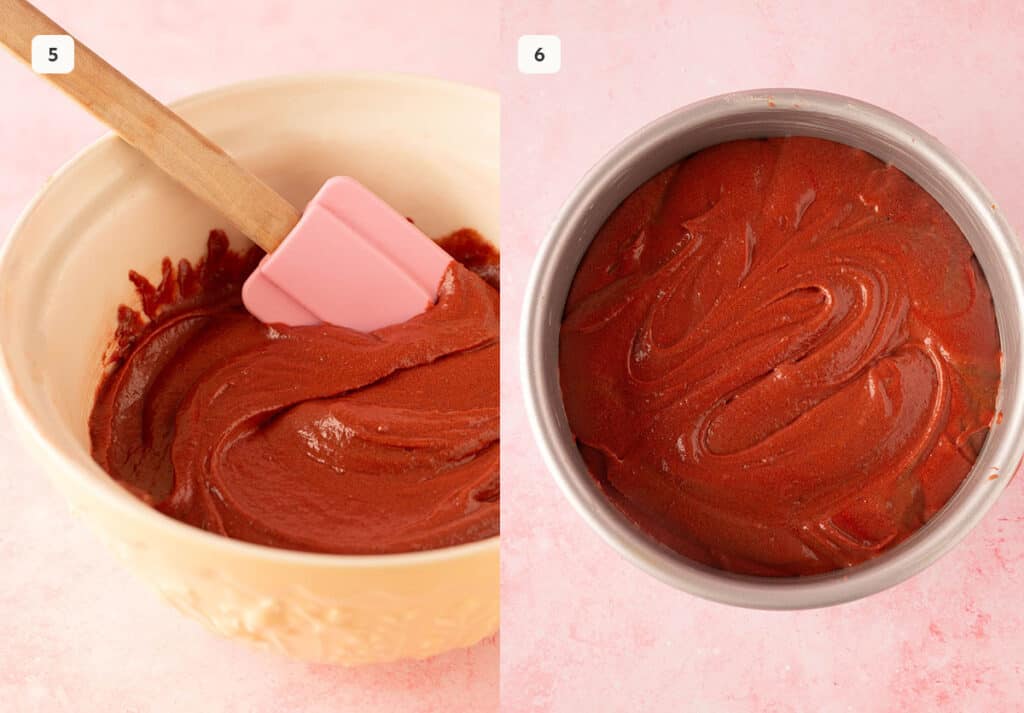
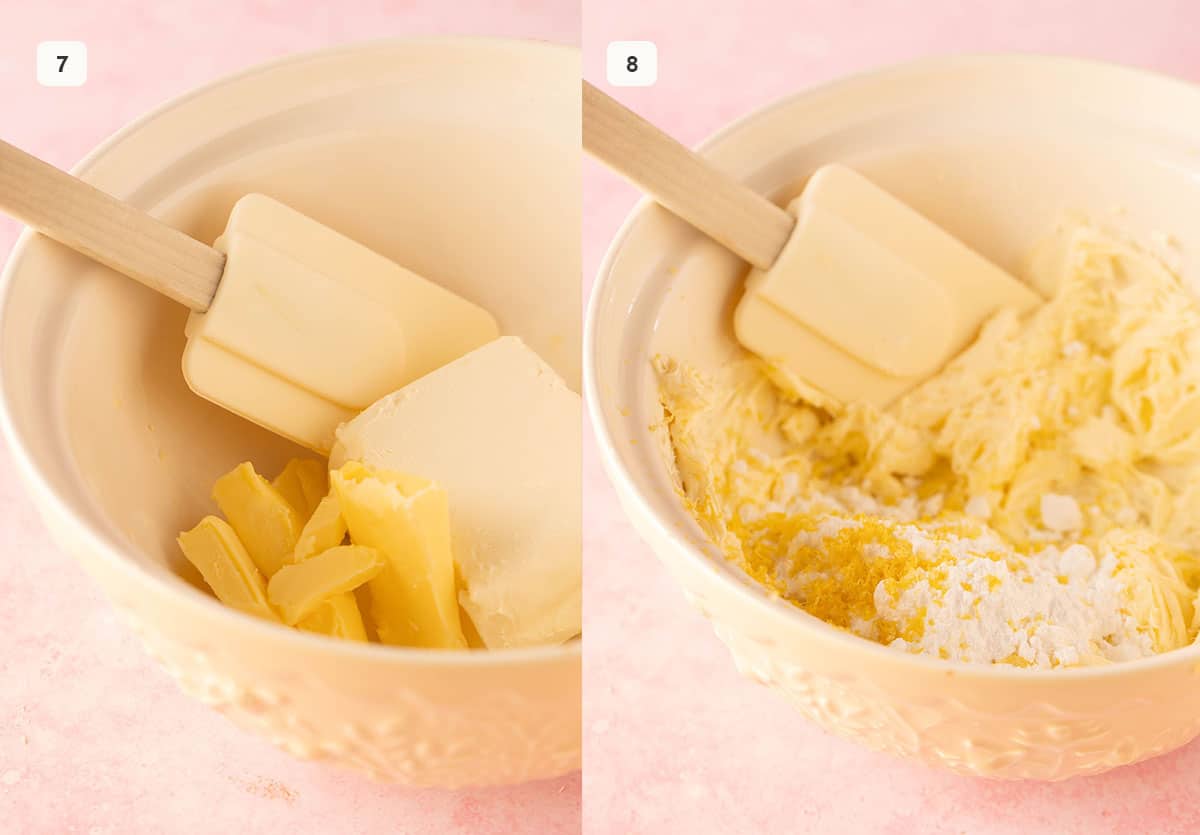
Step 5: Once combined and smooth, transfer red velvet cake batter to prepared baking pan.
Step 6: Bake cake for approximately 30-35 minutes or until a skewer inserted into the centre comes out clean.
Step 7: In a mixing bowl, add softened butter and cream cheese. Beat on medium speed until creamy and smooth.
Step 8: Add icing sugar and lemon zest.
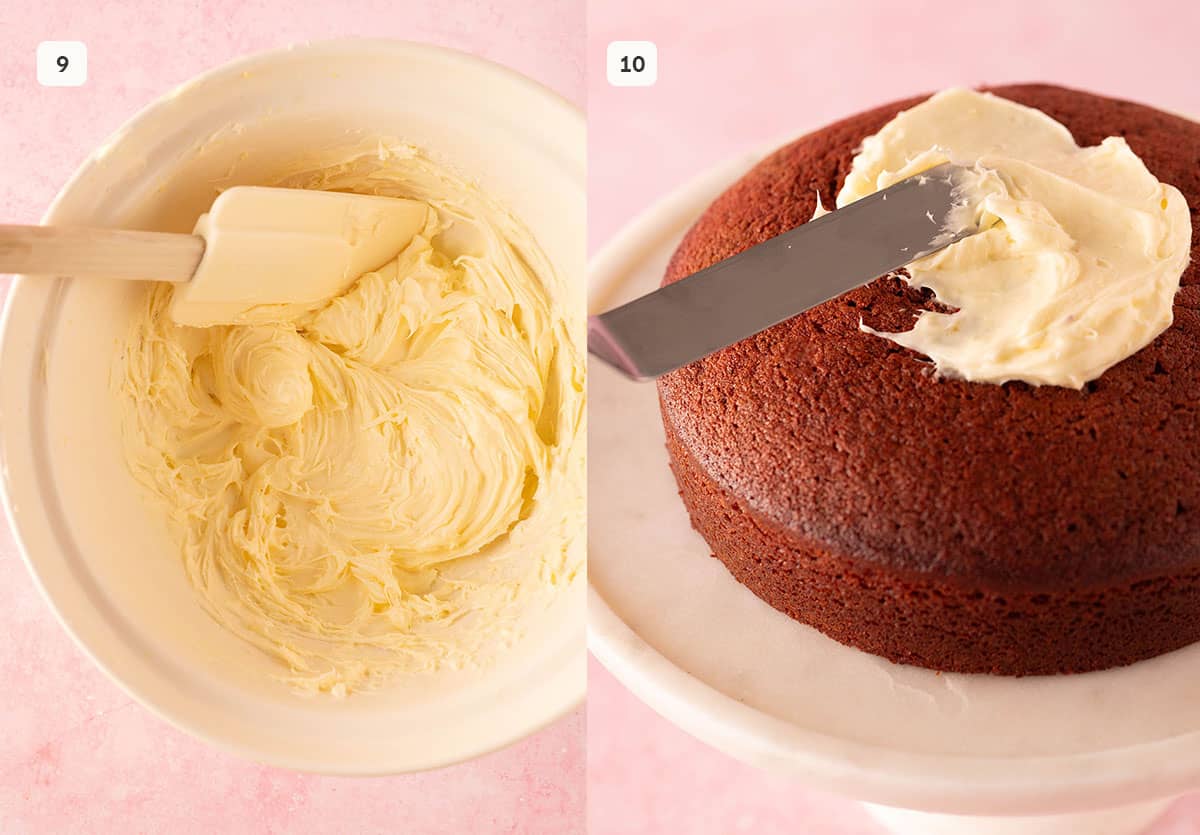
Step 9: Beat cream cheese frosting until smooth and creamy.
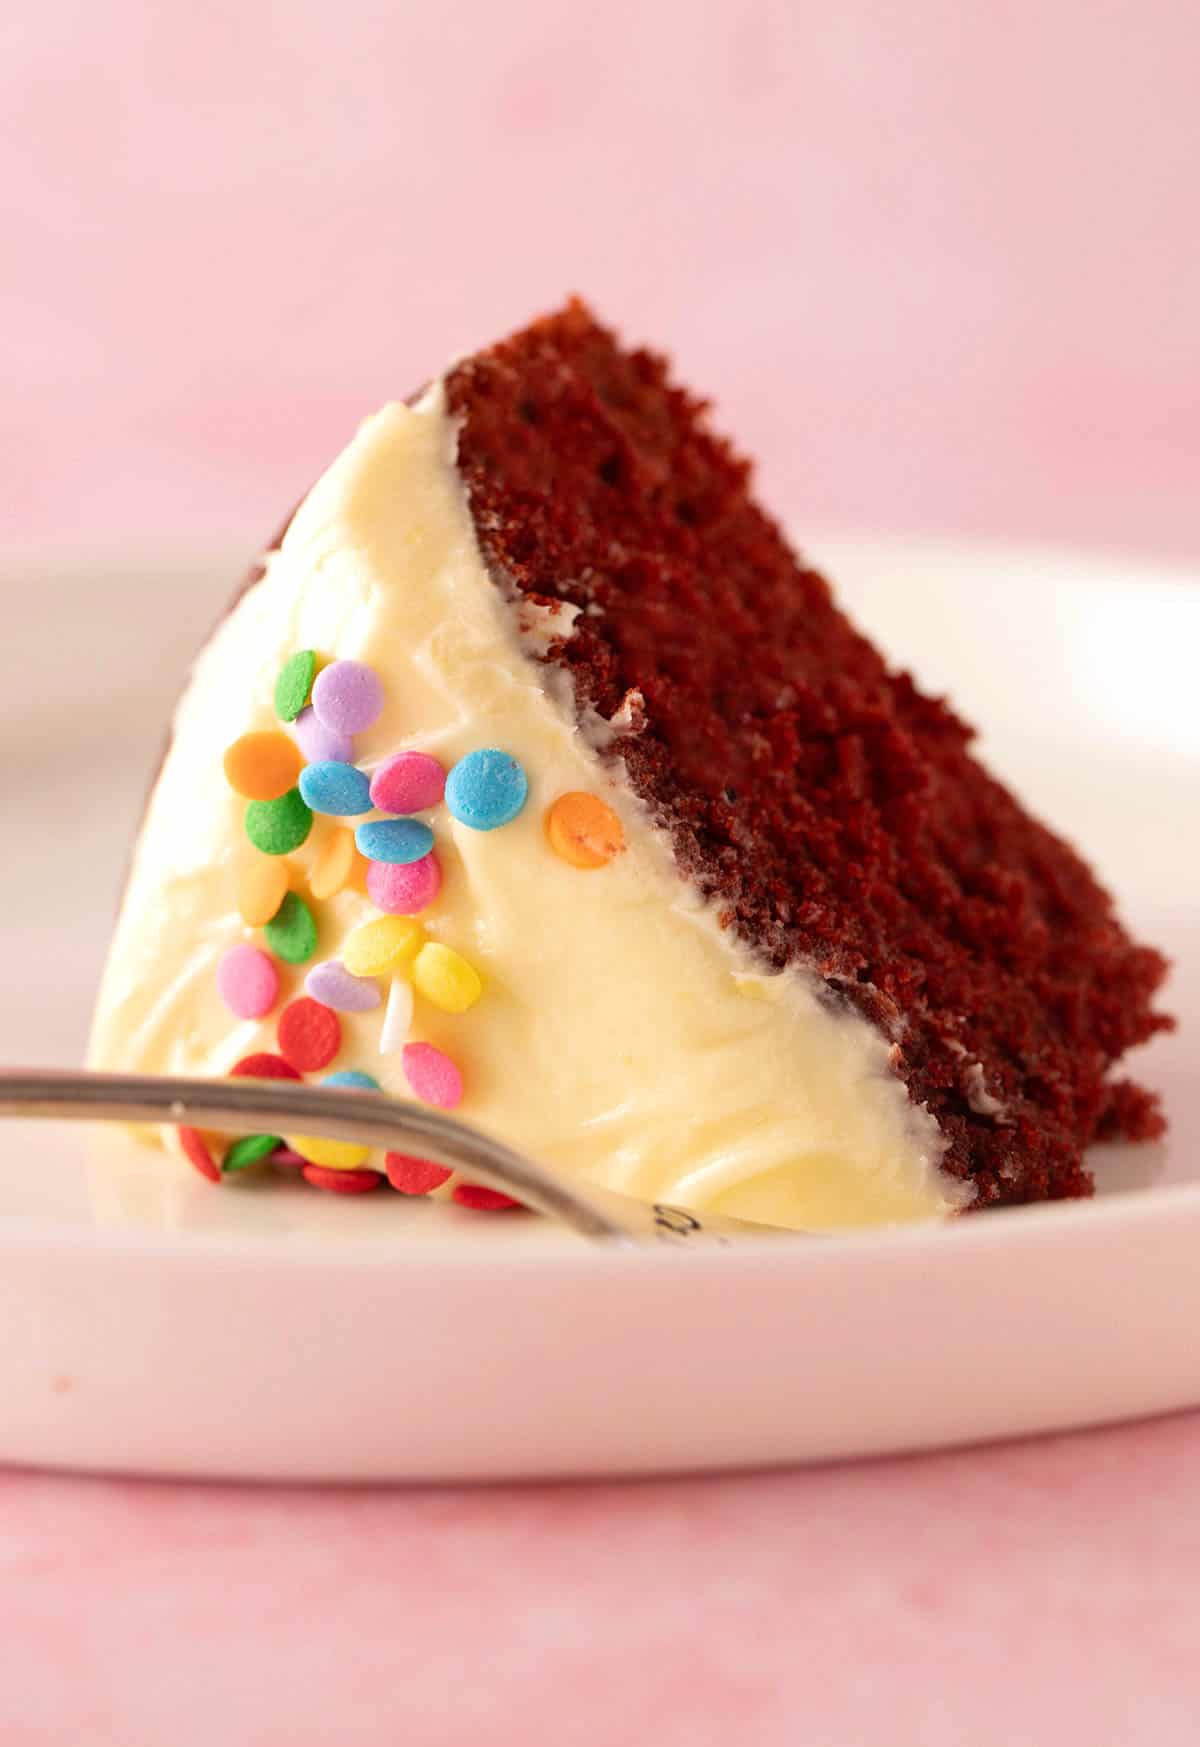
Step 10: Spread creamy frosting over the top of the cake. Add sprinkles, if desired.
Storage instructions
Red Velvet Cake is best served fresh. It’s also ideal to keep it out of the fridge, as that will tend to dry it out. Here are my suggestions when it comes to storing and serving my Small Red Velvet Cake.
Storage: If unfrosted, you can wrap the cake in plastic wrap and store it in an airtight container at room temperature. I recommend frosting this cake when you are ready to serve. Then keep any leftovers in an airtight container in the fridge.
Make-ahead: You can easily make this cake ahead of time. Once it’s completely cooled, wrap it in plastic wrap and keep it at room temperature for 1-2 days. Or freeze it and simply bring it back to room temperature to frost and serve.
You can also make the cream cheese frosting ahead of time. Once made, you can keep it covered in the fridge. To use, let it sit at room temperature for 10-15 minutes and then beat it briefly or stir by hand until it’s smooth and creamy again. You can also freeze the frosting and simply defrost and then beat briefly before using.
Jess’s recipe tips
- Use a baking scale: It’s always best to measure your ingredients (especially flour) using a kitchen scale when baking. Since this is a small batch recipe and we are dealing with small quantities, it’s super important to get the measurements just right.
- Don’t over-mix your cake batter: When making coloured cakes, it can be easy to over-mix the cake batter. To avoid this, swap to a spatula when you add the food colour and gently fold the cake batter by hand.
- Don’t over-bake your cake: There’s no faster way to make a dry or tough cake but leaving it in the oven too long. Keep a close watch on the cake and take it out when the top is no longer sticky and a skewer inserted into the centre comes out clean. It’s also a good idea to remove the cake from the cake pan as soon as you can so the edges of the cake don’t continue to cook and dry out.
- Pick the right cream cheese: If you use spreadable or light cream cheese, you are bound to end up with sloppy or wet cream cheese frosting. Be sure to pick a block or brick-style cream cheese for a thick and luscious frosting.
Frequently asked questions
Yes! You could carefully slice this cake into two lengthways. Or you could make this recipe twice to make a two-layer 6-inch cake. Alternatively, try my Red Velvet Layer Cake recipe.
Yes! This recipe will make approximately 8 cupcakes.
Be sure to use good quality oil-based red food colour or food gel. The watery supermarket red food colour won’t give you that vibrant food colour. Also, add enough to make the cake batter very red and the colour will be muted after being baked.

More Small Batch recipes
Did you make this recipe? Don’t forget to rate the recipe and leave a comment below. Hungry for more? Join me on Instagram, YouTube, Facebook, Pinterest and TikTok for more amazing recipe ideas.
Let’s Bake
Small Red Velvet Cake recipe
A small 6-inch Red Velvet Cake with cream cheese frosting.
Ingredients
Red velvet cake
- 105 grams (3/4 cup) plain flour or all purpose flour
- 100 grams (1/2 cup) caster sugar or granulated sugar
- 7 grams (1 level tablespoon) cocoa powder, sifted
- 1/4 teaspoon baking soda
- 1/8 teaspoon salt
- 75 grams (1/3 cup) unsalted butter, softened, roughly chopped
- 1 large egg
- 1 teaspoon vanilla extract
- 80 ml (1/3 cup) full fat buttermilk
- 1 teaspoon white vinegar
- 1/2 teaspoon of red food gel or oil-based food colour
Cream cheese frosting
- 30 grams (2 tablespoons) butter, softened
- 125 grams (2/3 cup) full fat cream cheese, softened, roughly chopped
- 30 grams (1/4 cup) icing sugar or powdered sugar, sifted
- Zest of 1 large lemon, finely grated
- Colourful sprinkles, optional
Instructions
- Preheat oven to 180 C (350 F) standard / 160 C (320 F) fan-forced. Grease and line one 6-inch round cake pan with baking or parchment paper.
- In a medium mixing bowl, add flour, sugar, cocoa powder, baking soda and salt. Add butter and beat with an electric mixer on low speed, until butter is broken into small pea-sized pieces and completely covered in flour.
- Add egg and vanilla and mix on medium speed just to combine. Add buttermilk and vinegar. Beat on low speed until you have a creamy and smooth cake batter.
- Add red food colour and mix using a spatula until you have a bright red cake batter. Try not to over-mix.
- Transfer cake batter to prepared cake pan. Bake for approximately 30-35 minutes or until a skewer inserted in the middle comes out clean. Carefully transfer cake to a wire cooling rack to cool completely.
- To make the cream cheese frosting, add butter and cream cheese to a large mixing bowl. Beat with an electric mixer on medium speed for 2 minutes until smooth and creamy.
- Add sugar and lemon zest beat on a low speed to combine. Turn mixer up to medium speed and continue to mix until frosting is smooth and creamy.
- Spread frosting on top of cooled cake. Add sprinkles, if using.
Notes
Cocoa powder: You can use natural 100% cocoa powder or Dutch processed cocoa powder in this cake. Don’t use sweetened cocoa or drinking chocolate.
Red food colouring: I recommend using a red food gel or oil-based colour. The watery food colours you get from the supermarket are so weak that they won’t give you a vibrant red colour. You also have to use much more, which can throw out your ratio of liquids.
Buttermilk: Buttermilk is key to creating a light, fluffy texture. Storebought full fat buttermilk is best. However, you can substitute half full fat milk and half full fat Greek yogurt.
White vinegar: White vinegar reacts with baking soda, along with the buttermilk, to create an airy and tender cake crumb. If you don’t have white vinegar, you can leave it out since it such a small amount. The full fat buttermilk will do most of the work!
Cream cheese: You’ll need to use cream cheese in the frosting for this cake. I recommend using full fat cream cheese rather than light cream cheese or spreadable cream cheese. Try and get hold of the brick-style or block cream cheese for best results. I use Philadelphia cream cheese.
Storage: If unfrosted, you can wrap this cake in plastic wrap and store it in an airtight container at room temperature. I recommend frosting this cake when you are ready to serve.
Make-ahead: Once the cake is completely cooled, wrap it in plastic wrap and keep it at room temperature for 1-2 days. Or freeze it and simply bring it back to room temperature to serve.
You can also make the frosting ahead of time. Keep it covered in the fridge, let it sit at room temperature for 10-15 minutes and then just beat or stir by hand until smooth and creamy. You can also freeze the frosting and simply defrost before using.
Traditional creaming method: In a mixing bowl, add butter and sugar. Beat on medium speed until light and creamy. Add egg and vanilla and beat again just to combine. Add flour, cocoa, baking soda and salt, along with buttermilk and white vinegar. Beat on low speed until you have a creamy cake batter. Continue with method above from step 4 onwards.
Nutrition Information
Serving Size: 1 piece Calories: 969 Sugar: 48.2 g Sodium: 401 mg Fat: 59.2 g Carbohydrates: 133.4 g Protein: 28.9 g Cholesterol: 182.9 mg
Our favourite
Cake Recipes

Savitri Dalkan says
Would love to try this but need to know if I can double this recipe.
Jessica Holmes says
Hi Savitri, you can or you might like to try my standard size Red Velvet Cake.
Ross says
Hi! Can I use this recipe for a bento cake?
Jessica Holmes says
Absolutely!
Kim Maxwell says
I baked a small batch of oatmeal cookies at 300 degrees per the recipe.
Is it safe to take them out of the oven if the centers are a bit shiny and soft? Edges golden brown.
Thank you
Jessica Holmes says
Hi Kim, was that my recipe? Cookies usually firm up as they cool so it should be ok.
Amie says
Absolutely delicious!
Many red velvet recipes are too soggy or underwhelming but this one is perfect. Follow the method and weigh your ingredients precisely though for the best result.
If you don’t like cream cheese frosting you can sub in chocolate ganache – red velvet and dark choc together tastes amazing.
Jessica Holmes says
So glad you enjoyed this one Amie! And love the idea of using chocolate ganache to decorate. Sounds incredible!
Joshua says
Great texture and loved the frosting!
Jessica Holmes says
Love hearing that Josh!