Learn how to make a soft and tender Marble Cake from scratch. This easy recipe uses one cake batter to create beautiful swirls of vanilla and chocolate. The result is a stunning, buttery Marble Pound Cake, perfect for morning or afternoon tea.
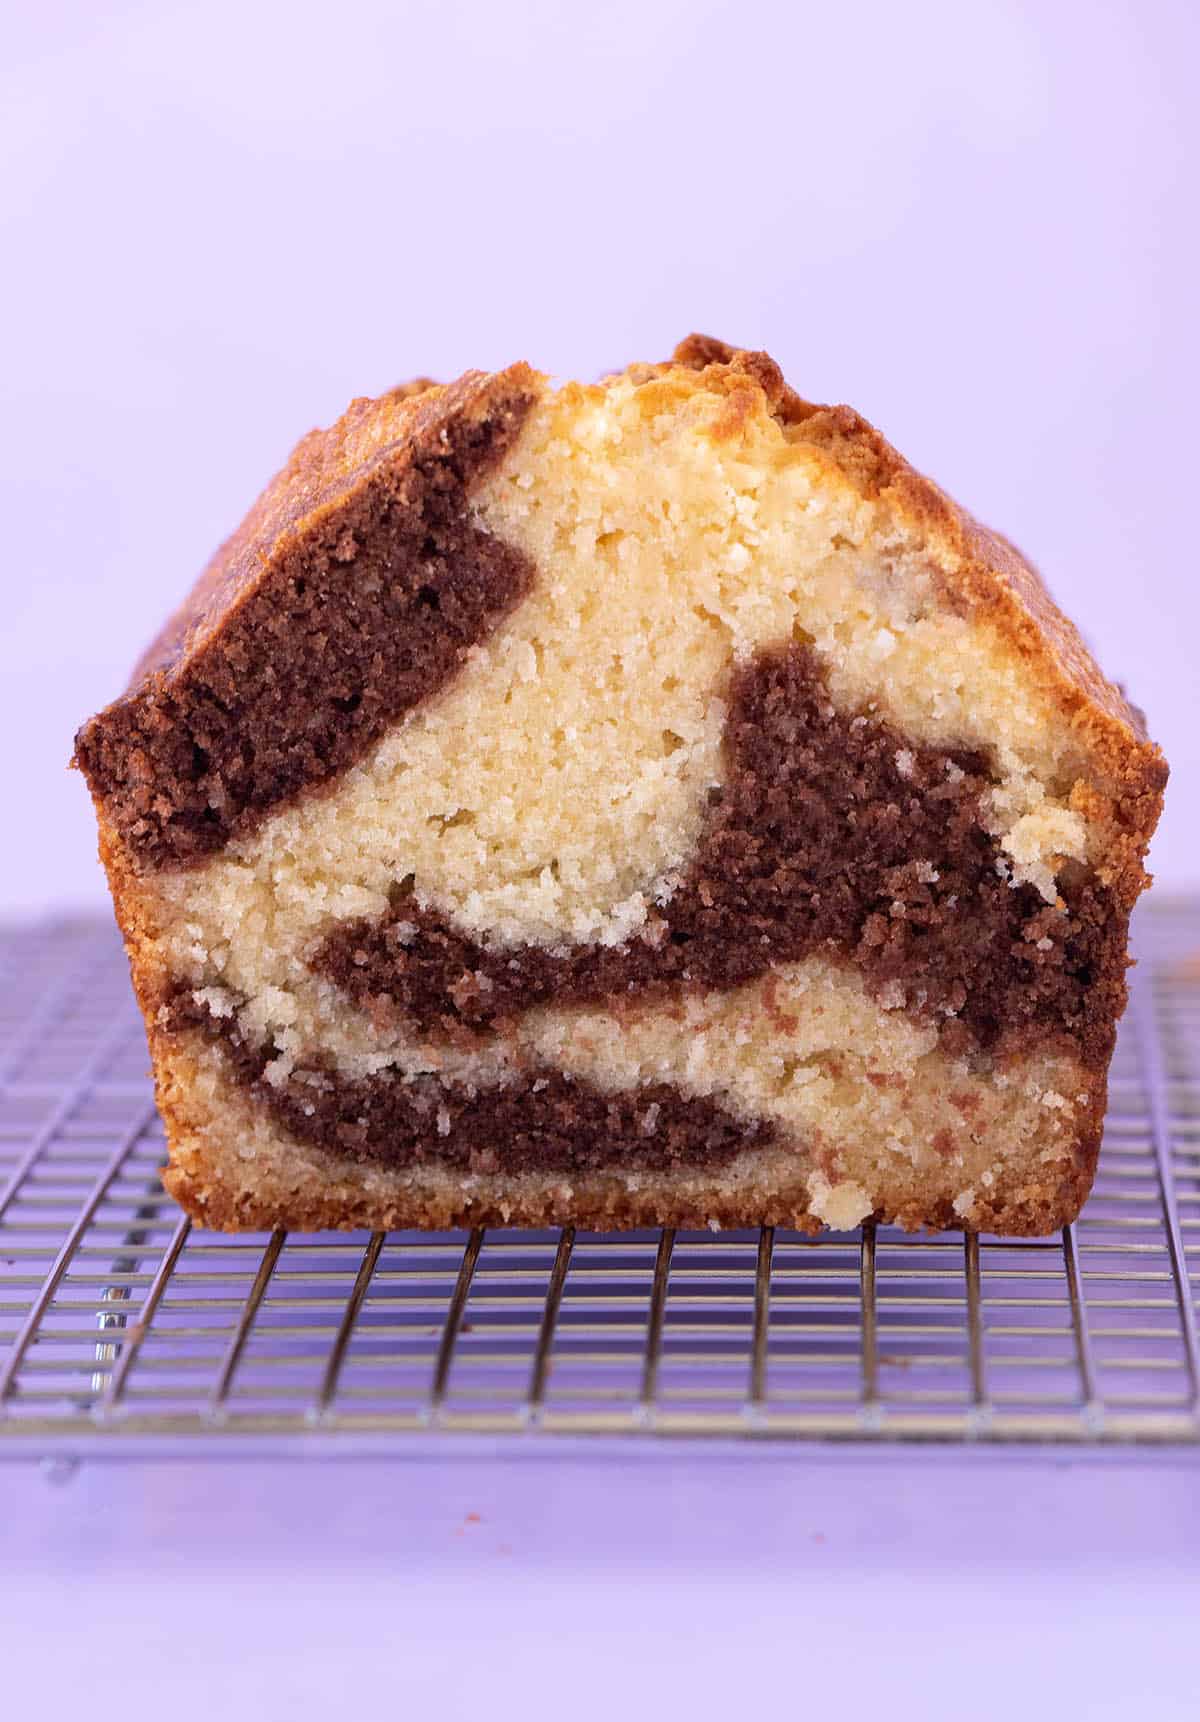
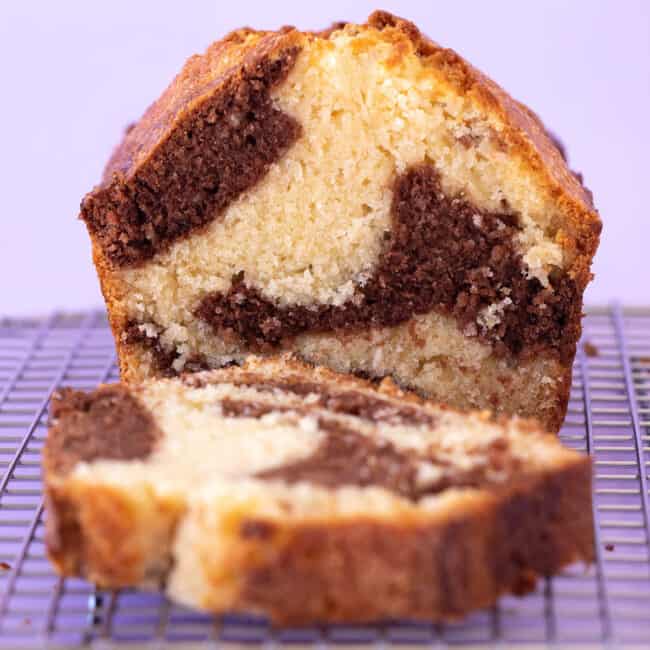
Meet my Marble Cake. She’s big, buttery and oh-so-beautiful 💜 This gorgeous loaf cake boasts swirls of both chocolate and vanilla.
Made using just one cake batter, it’s surprisingly simple to put together. I’ll show you how to create those mouthwatering swirls and achieve a moist and tender crumb.
Why you will love this cake
- Simple ingredients: It’s made using easy-to-find, everyday ingredients.
- One cake batter: You only need to make one cake batter to make those gorgeous swirls.
- Buttery crumb: It boasts a truly tender and buttery crumb.
- Unique swirl: You’ll create a beautiful, unique swirl every time!
So, What is marble cake?
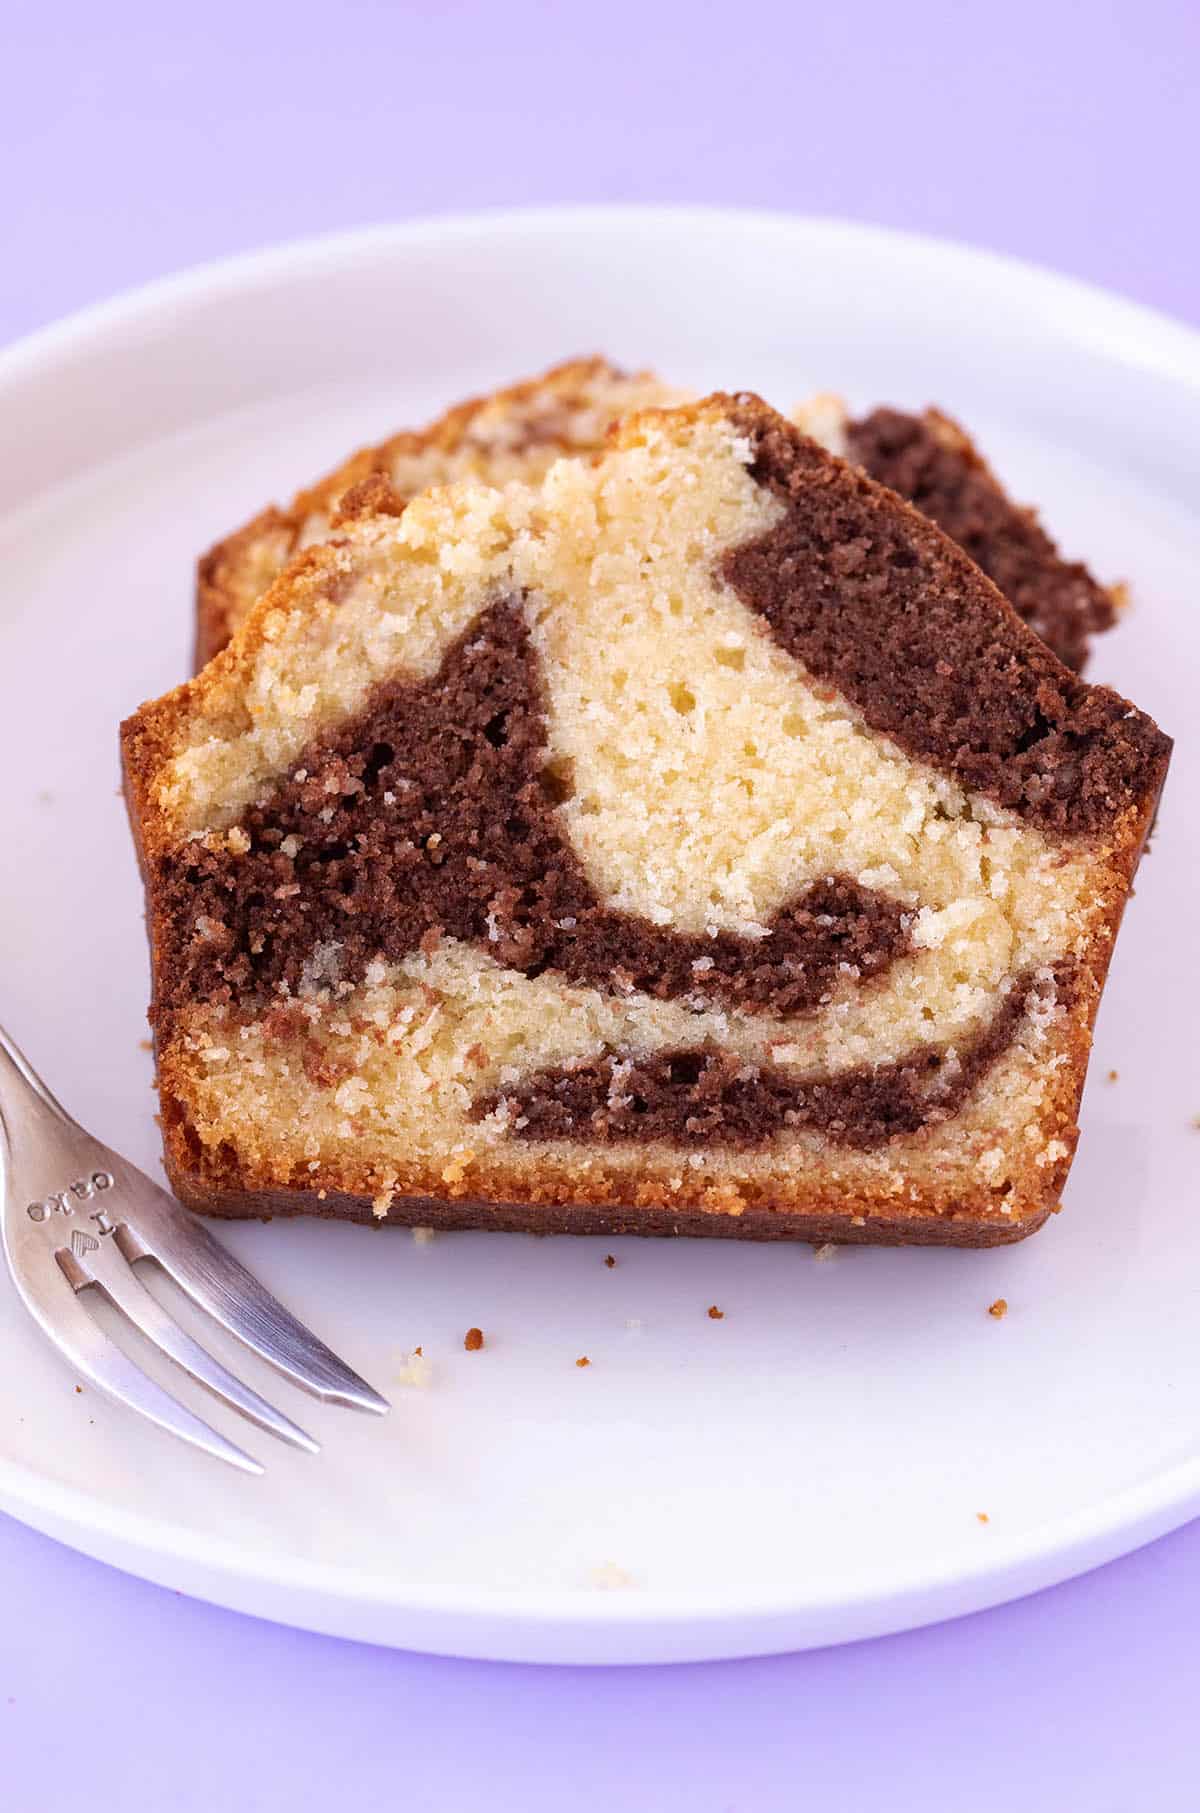
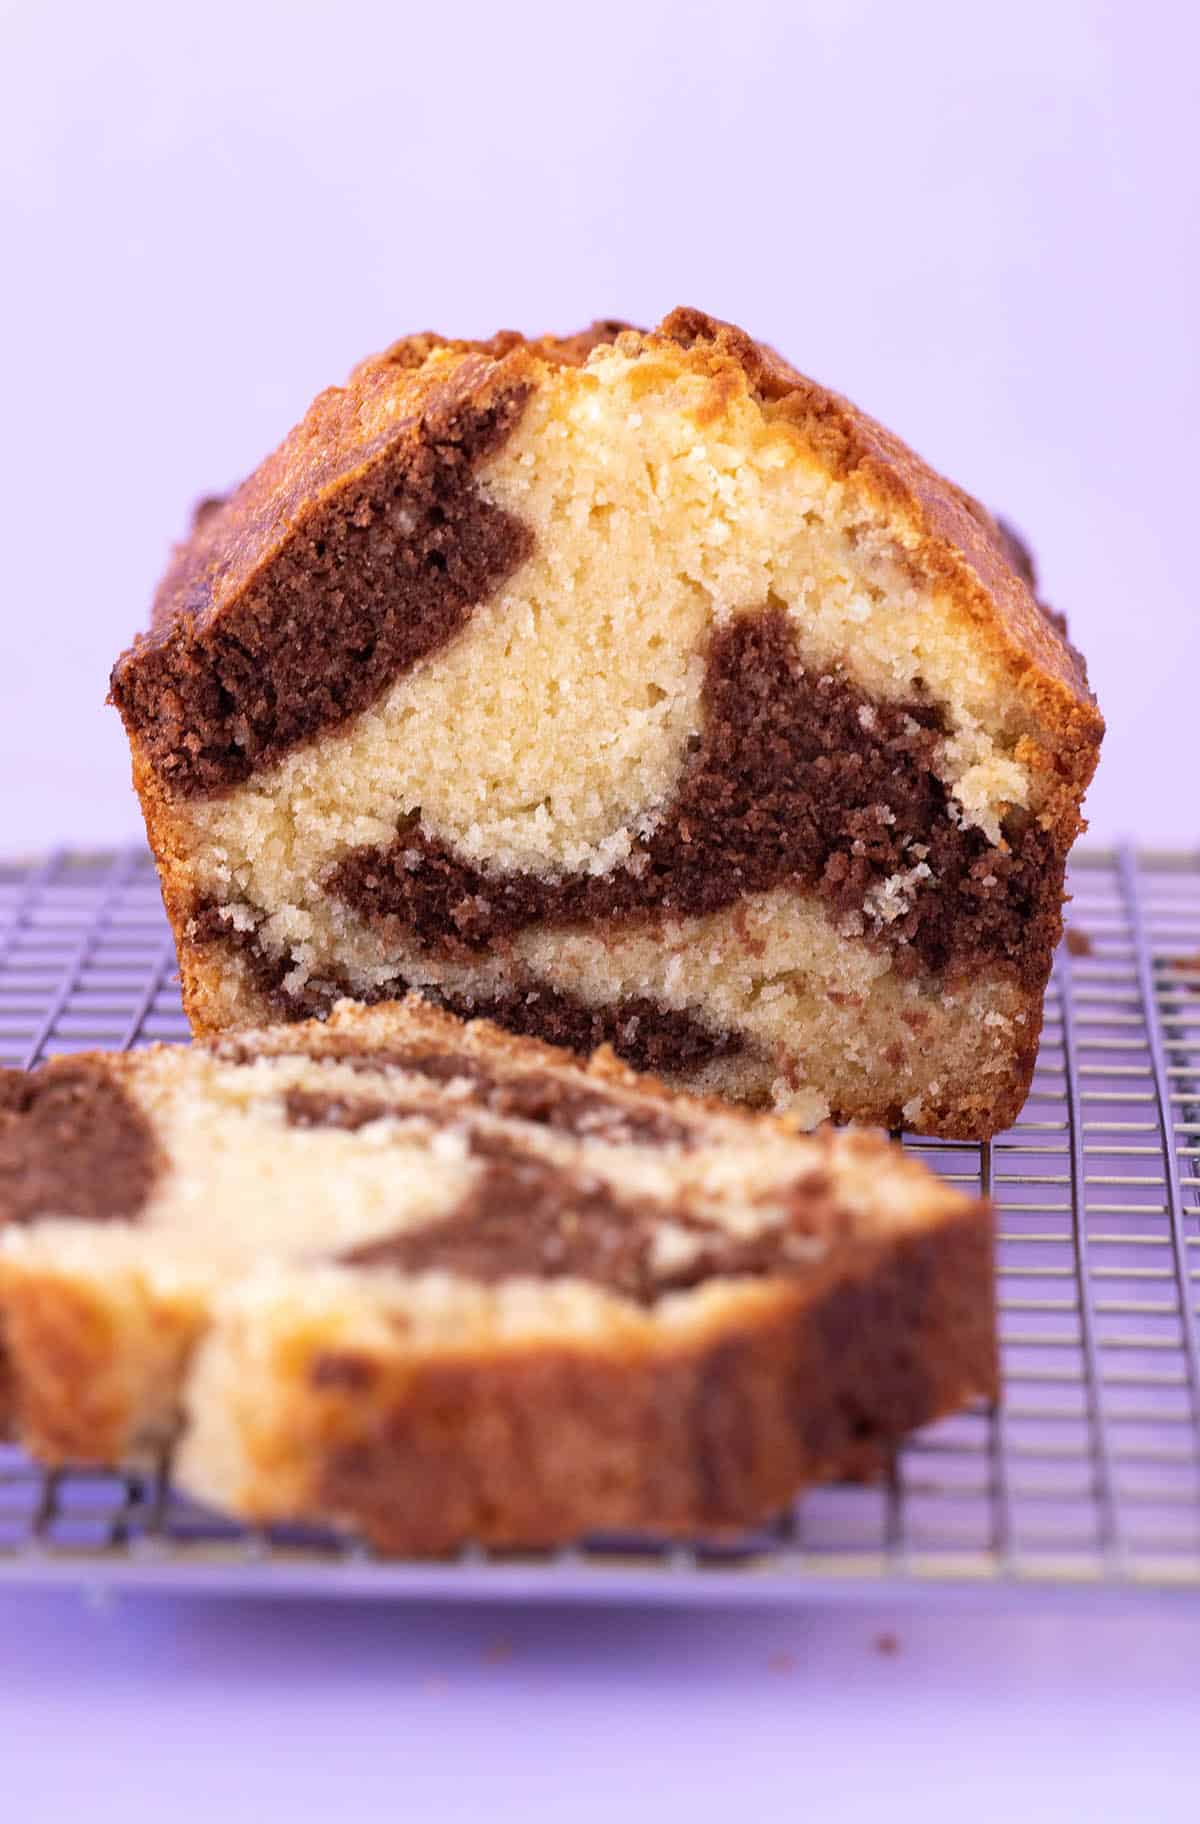
My Marble Cake is essentially a pound cake, with a dense, tight crumb. But it’s wonderfully moist and buttery. It’s full of vanilla flavour with a hint of chocolate. It’s lovely cut into thick slices and enjoyed on its own. But hey, we won’t judge if you want to add a little Chocolate Frosting 😉
Recipe testing
This Marble Cake has been a long time coming. I’ve been experimenting with Marble Cakes for a while now, but the results (while still delicious) often lacked that defined marble swirl. The two cake batters would often merge and I couldn’t quite achieve that showstopper finish. Then, one day I realised, it wasn’t my technique that was the problem, it was the type of cake I was using.
Instead of using soft and light cakes, like my favourite Yellow Cake, I needed a cake that offered a tight, more defined crumb. Thankfully, my favourite Vanilla Pound Cake was the perfect place to start. After just two attempts, I finally had the Marble Cake I’d always dreamed of!
how to make Marble Cake
- Begin by creaming together your butter, sugar and vanilla using an electric mixer. If you watch closely, you’ll see that in just a minute or two, not only will the two ingredients combine but they will change in colour and texture. Your butter mixture will become pale and creamy – almost a little fluffy.
- Next, add your eggs, one at a time, and continue to mix on low speed. It’s important for your eggs to be at room temperature. Sometimes your mixture will curdle or go a little lumpy at this stage, that’s ok.
- Add flour, baking powder and salt and start mixing. Pour in the milk. At this stage your cake batter should be smooth and creamy. Don’t over mix or your cake will be dry.
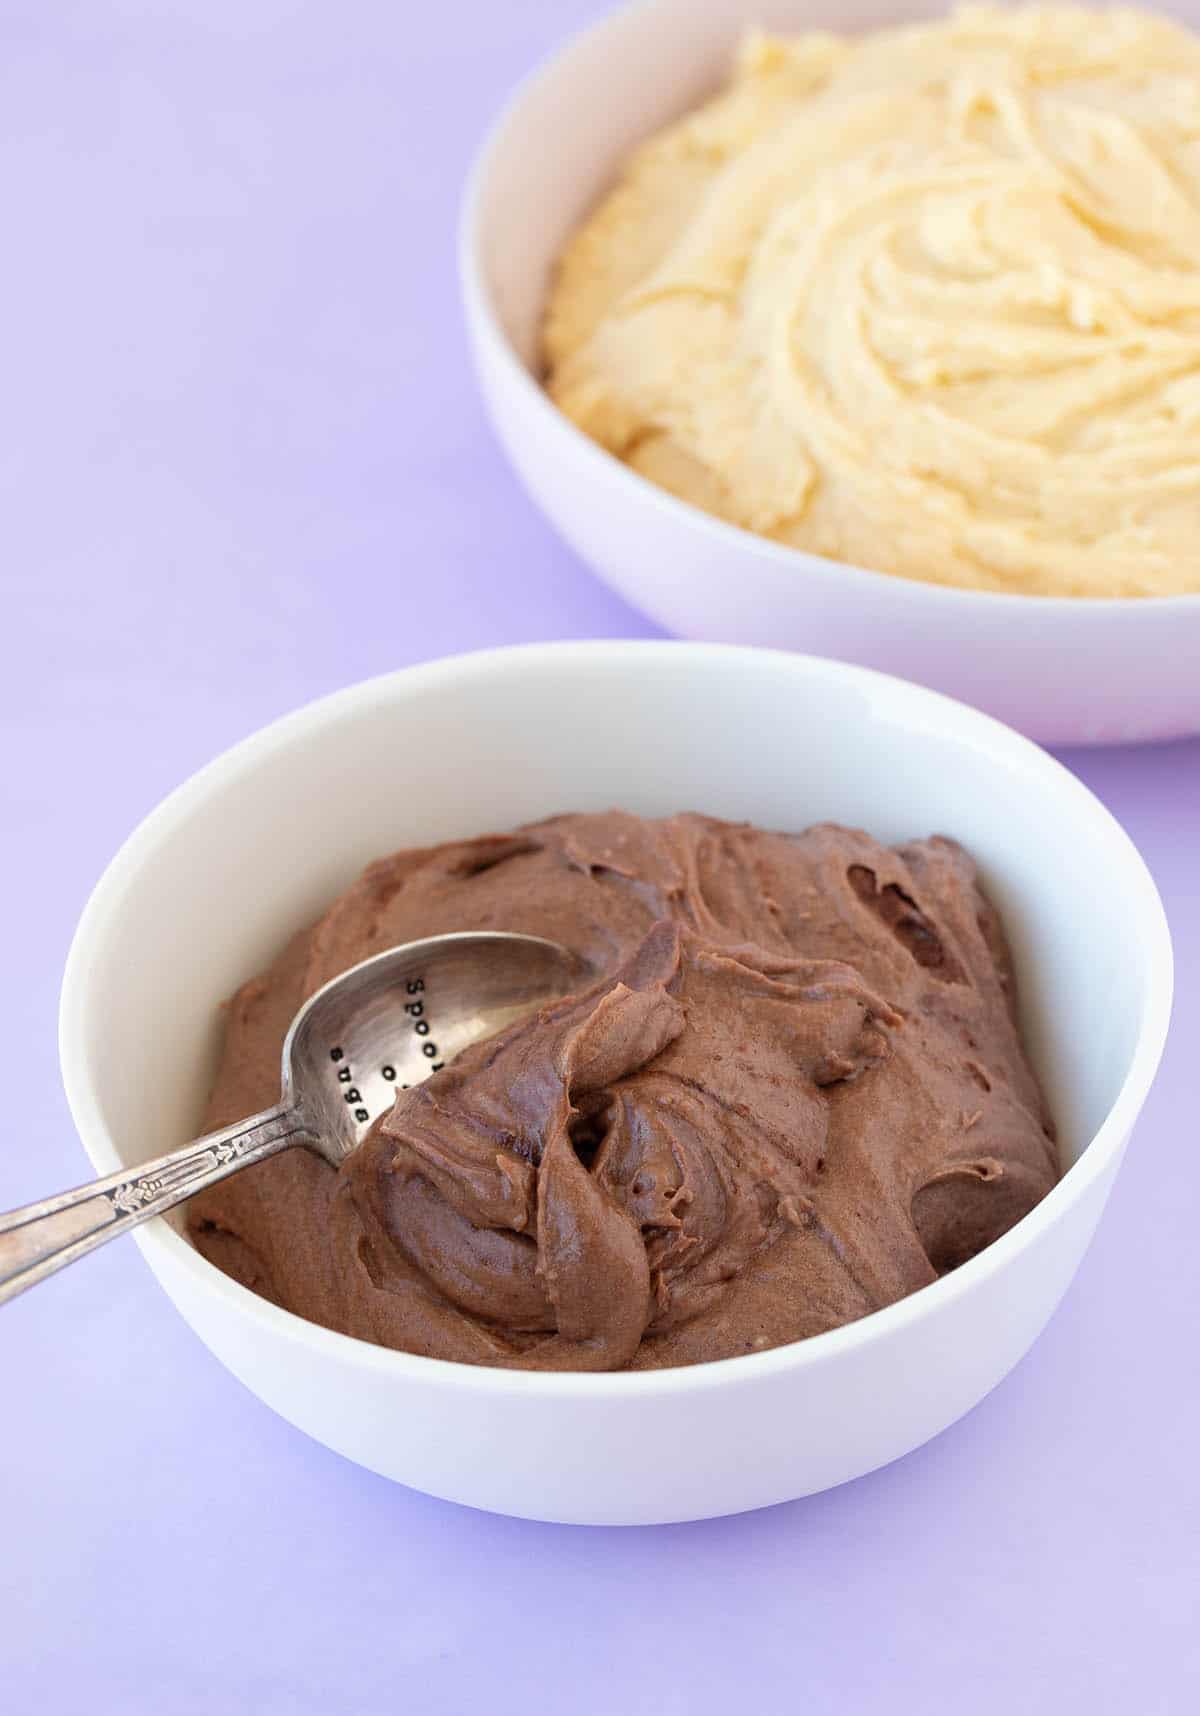
- Then, take 1 cup of vanilla cake batter and place it in a separate mixing bowl. Add 1 tablespoon of cocoa powder and 1 tablespoon of milk. Stir by hand, just until combined and you have a creamy chocolate cake batter. Now you can make those dreamy layers!
How to make the swirls
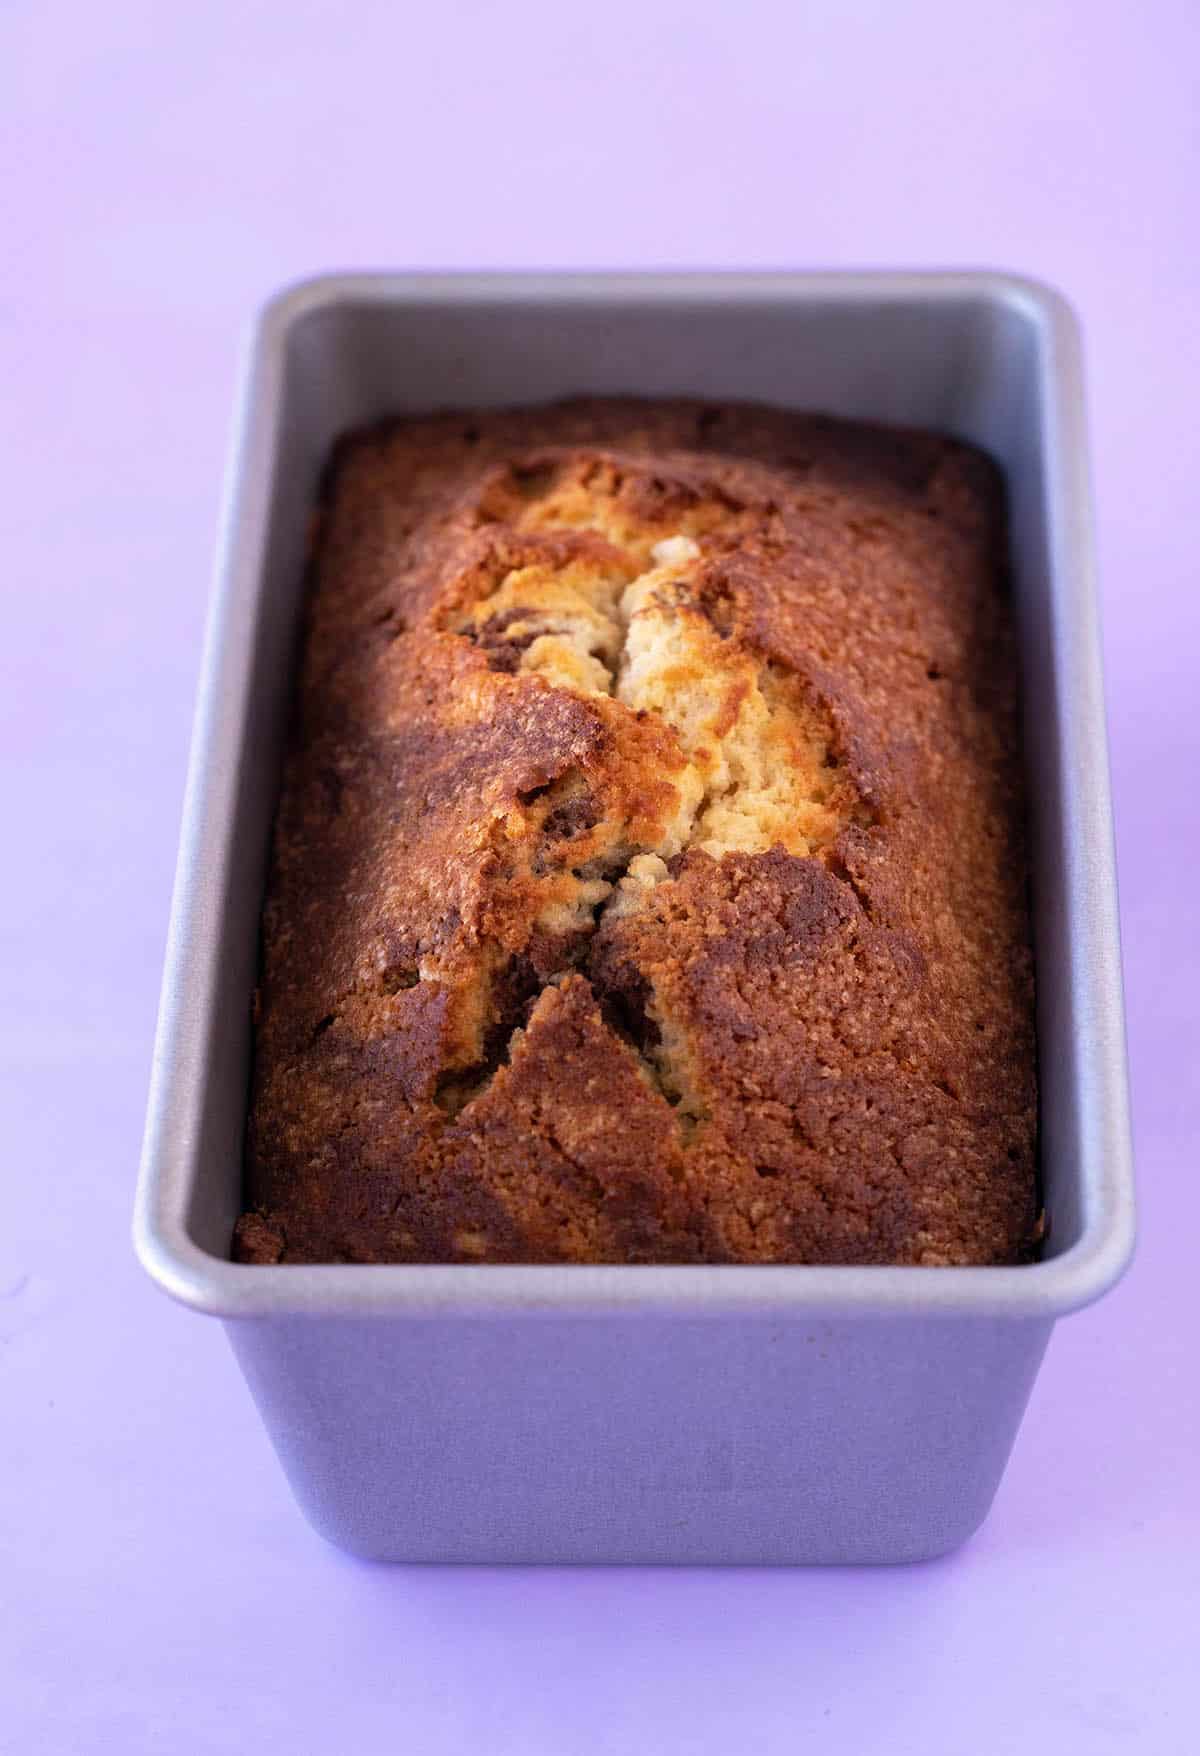
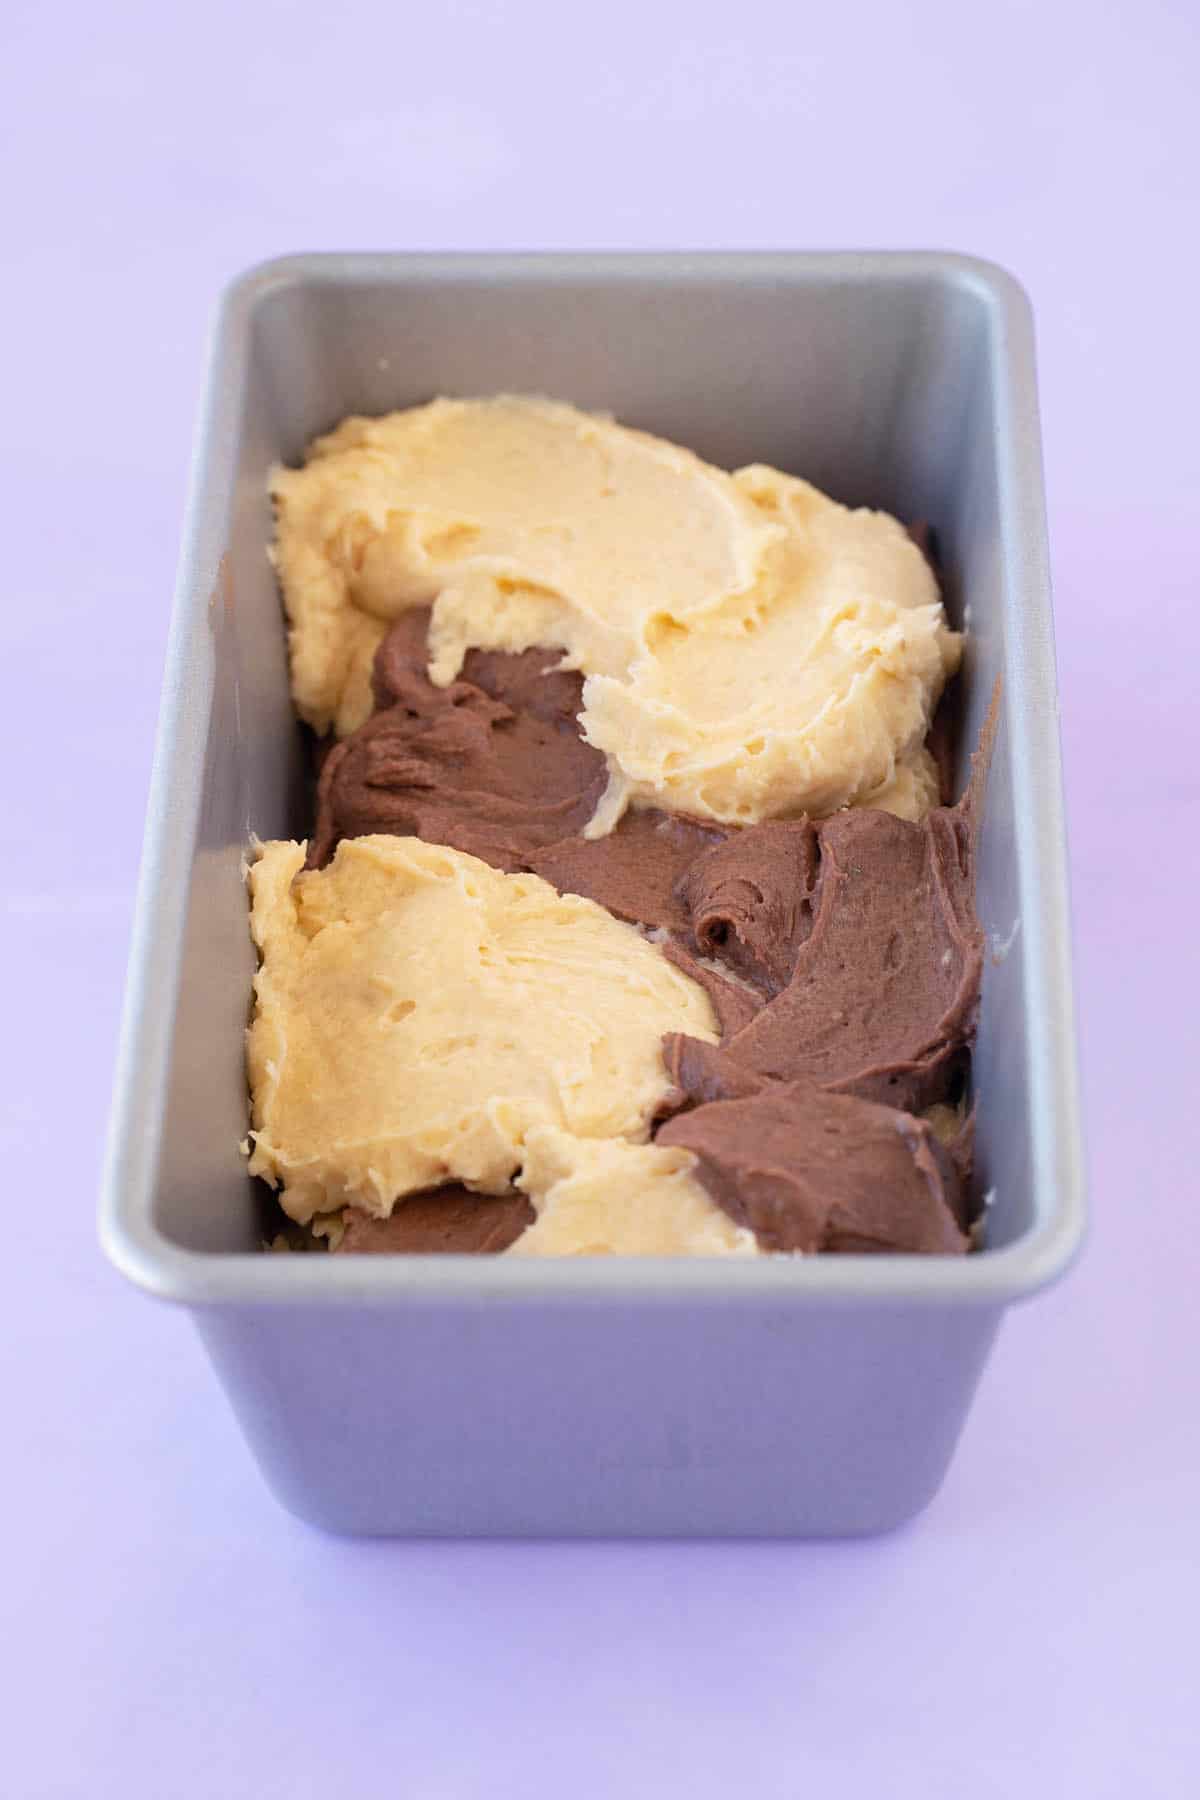
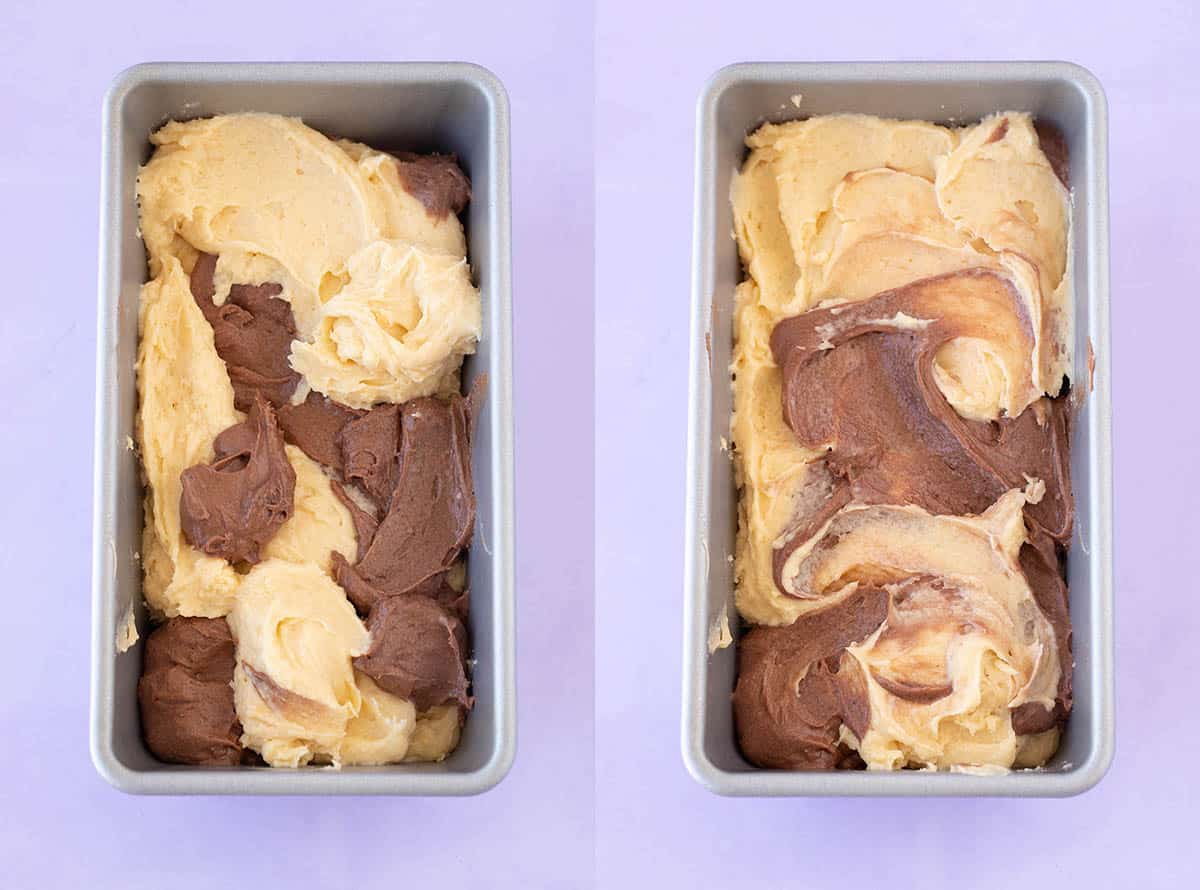
Use a dessert spoon to gently dollop spoonfuls of cake batter, alternating between vanilla and chocolate, into your prepared pan. Use a light hand, to simply place the cake batters next to each other, without swirling them together. There’s no perfect way to do this – that’s what makes each cake unique!
Keep going, layering the cake batters side by side and on top of each other. Once you’ve used up both cake batters, gently smooth the top, using the back of your spoon, to ensure an even bake. There’s no need to be exact here either!
save this recipe
What’s the secret to the perfect crumb?
One of the keys to achieving that moist and tender crumb is creaming your butter and sugar correctly! Yes, the very first step in the recipe is crucial in creating that soft and buttery crumb.
Like many Butter Cakes or Vanilla Cakes, this recipe begins by creaming together the butter and sugar. This means using an electric mixer to beat the two ingredients together. However, many people will stop when the two ingredients are simply combined.
But creaming the butter and sugar means continuing to beat until the butter turns pale, light and fluffy – almost cream-like. This is what will give you a soft and tender cake. If your butter is lovely and soft to begin with, it won’t take long, just a few minutes on medium speed.
Note: Don’t try to rush this step by turning your mixer higher than medium speed. Mixing your butter and sugar too vigorously (known as over creaming) can result in dense, gluey streaks in your cake. No thank you!
Top tips for perfect marble Cake every time
- Start with softened butter. Take your time when beating together the butter and sugar – and don’t go higher than medium speed.
- Measure your flour using a baking scale. It’s easy to over measure when using cups and too much flour will result in a dry cake.
- Don’t over mix your batter. Once you’ve added the dry ingredients, mix only to combine and then stop. When making the chocolate batter, gently fold the batter by hand just until combined.
- Watch your bake time. This cake takes a while to cook, but you’ll know it’s ready when a skewer inserted into the centre comes out clean. If your cake is very brown on top towards the end of cooking, loosely cover the top with aluminium foil and continue to bake.
FreQuently asked questions
You could also use this recipe to make a large round cake, using a 9 inch cake pan or a Bundt pan. Just note that baking a larger, flatter cake might result in fewer swirls.
I recommend using unsweetened natural cocoa. Dutch processed cocoa will also work.
See above paragraph on creating the perfect crumb. It’s very important to correctly cream your butter and sugar. Make sure your butter is soft to start with and it’ll only take 2-3 minutes. Also make sure you measure your ingredients, particularly your flour, using a baking scale for accuracy. Don’t over mix your final cake batter and don’t overbake it either!
You can keep your leftover cake tightly wrapped in plastic wrap or in an airtight container at room temperature. It will also freeze really well.
more loaf cakes to love
Did you make this recipe? Don’t forget to rate the recipe and leave a comment below. Hungry for more? Join me on Instagram, YouTube, Facebook, Pinterest and TikTok for more amazing recipe ideas.
Let’s Bake
Marble Cake
An easy, buttery Marble Cake made using just one cake batter.
Ingredients
Vanilla cake
- 230 grams (1 cup or 2 sticks) unsalted butter, softened
- 200 grams (1 cup) caster sugar or granulated sugar
- 2 teaspoons vanilla extract
- 3 large eggs, room temperature
- 280 grams (2 cups) plain flour or all purpose flour
- 1 teaspoon baking powder
- 1/4 teaspoon salt
- 120 ml (1/2 cup) full fat or whole milk, room temperature
Chocolate swirl
- 1 tablespoon cocoa powder, sifted
- 1 tablespoon full fat or whole milk, room temperature
Instructions
- Preheat oven to 170 C (340 F) standard / 150 C (300 F) fan-forced. Grease and line a 9 by 5 inch loaf pan with baking or parchment paper.
- In a large mixing bowl, add butter, sugar and vanilla. Beat with an electric mixer on low speed until combined and then turn speed up to medium and beat for a further 1-2 minutes or until butter turns pale, creamy and almost fluffy.
- Add eggs, one at a time, and beat briefly to combine – don’t worry if the mixture goes a little bit lumpy at this stage – then scrape down the sides of the bowl.
- Add flour, baking powder and salt. Start to mix together on a low speed. Add milk. Continue to mix on low speed until the cake batter is smooth and creamy (but try not to over mix).
- Transfer 1 cup of cake batter to a mixing bowl. Add cocoa powder and milk and gently stir by hand until combined.
- Use a dessert spoon to gently dollop batter into your prepared tin, alternating between vanilla batter and chocolate batter. There’s no need to exact. Keep layering until you’ve used all the cake batter, then gently smooth the top.
- Bake for approximately 1 hour and 10 minutes or until a skewer inserted into the middle of the cake comes out clean. If your cake is very brown after 50 minutes, loosely cover the top with aluminium foil.
- Transfer cake to a wire rack to cool completely. Cut into thick slices to serve.
Notes
Butter: It’s important to use softened butter for this recipe. Do not use cold butter. You want the butter to be soft so it will easily combine with the sugar. This step is crucial in creating a light and tender cake (rather than being dense and dry).
Cocoa powder: I recommend using unsweetened natural cocoa. Dutch processed cocoa will also work.
Nutrition Information
Serving Size: 1 slice Calories: 375 Sugar: 20.9 g Sodium: 89.7 mg Fat: 20.4 g Carbohydrates: 43.1 g Protein: 5.5 g Cholesterol: 105.5 mg

Hi, I’m Jess, the creator of Sweetest Menu and the author of Something Sweet. A self-taught baker and published recipe writer who can’t stop making easy and delicious baking recipes.
Annie says
Easy to make but very one dimensional in flavour. Just sweet, very sweet.
Jessica Holmes says
I’m glad you found it easy to make Annie! Sorry it was too sweet for you.
Letitia says
I was wondering if i could make this cake and drizzle it with your easy to make caramel sauce. Should i pierce the cake with a skewer before adding the sauce?
Jessica Holmes says
Yes and yes! Sounds amazing!
michelle perry says
I will send you a pic of the next one with one of the kids;s cell phone and send it to you when I make it again. I think I will try adding more milk because I don’t think I put enough in the chocolate batter as it was a little thick and the cake is a little tiny dry but tastes okay still with the icing I put on it. the kids still love it and are going to learn how to make the next one with me. they love marble cake. thanks again for the awesome recipe.
Chelsea says
I just made it and I added a little more milk and a tad more baking powder. It definitely came out super fluffy and perfectly moist.
Jessica Holmes says
That’s wonderful to hear Chelsea! So glad you enjoyed this one!!
michelle perry says
I made this wonderfully easy cake and it was awesome to make. the batter tastes so fluffy and soft, however I messed up on it and slightly burnt the bottom a bit by leaving it in too long. I also shouldn’t have made meatloaf at the same time for dinner as the oven was too high I think. so I scraped off the burnt pieces easily and just made chocolate buttercream icing and covered it up. going to do it again but be smarter the second time I make it. I love it and thank you so much for this recipe. once I master it I will send you a pic of it. this is going to be my go-to marble cake recipe permanently. even the batter tasted awesome!!!
Jessica Holmes says
That’s so wonderful to hear Michelle! I’m sure it’ll turn out even better the next time 🙂 And I’d love to see a photo! You can either DM me on Instagram or email me at jessica@sweetestmenu.com
Lamees says
All I’ll say is I made this cake THREE TIMES in one month and YUUUMMMM. Best marble cake I’ve ever had. Used Hersheys cocoa powder and added Hersheys chocolate chips
Jessica Holmes says
Yes! That’s amazing Lamees!
Sandra says
This is a winner. Turns out great each time and is a crowd favourite.
Jessica Holmes says
I’m so happy to hear that Sandra!
Petra Dalessandro says
Absolutely love this recipe.
Jessica Holmes says
Love hearing that!
Isabel says
Love this recipe and would defo make again. Just wondering how many mini loaves it would make as i was hoping to give them out at new years?
Jessica Holmes says
Hi Isabel, so glad you enjoyed this one! It would depend on the size of your loaf pans. Sounds like a lovely gift idea!
Nancy says
Hi!
I’d like to make this ahead of time in a Bundt pan for Christmas. How should it be stored?
Jessica Holmes says
Hello, you can store cooked cake in an airtight container or wrapped in plastic wrap at room temperature. I hope you enjoy it!
cindy says
I found this cake to be very dry..
Jessica Holmes says
I’m sorry to hear that Cindy! This cake should be dense but very moist inside. Did you make any changes to the recipes? Two common culprits for making a dry or tough cake are not creaming the butter and sugar correctly, and adding too much flour. Overbaking will also always result in a dry cake.
Karen Bergann says
For a Sunday school brunch, I wanted an easy marble loaf cake recipe, reminiscent of the recipe my mom taught me decades ago. This was perfect. I had all the ingredients except whole milk. I used almond milk instead, and it worked perfectly. It was easy and delicious! There were no leftover slices to take home, which disappointed my husband. I may bake it again tomorrow to take to my in laws for Thanksgiving.
Jessica Holmes says
How lovely is that Karen! I’m so thankful for your lovely review.
Desiree says
If I want to make this for a 1/4 sheet pan will it work or do I double the recipe
Can u please let me know what will be best for a 1/4 sheet cake
Jessica Holmes says
Hi Desiree, yes this cake would work in a quarter sheet pan. You’ll need to adjust the cooking time as it’ll cook much faster. Hope you enjoy it!
Isabel says
Made this and it was delicious. I i wanted to make this in a circle tin what size would i use and how long would i bake it for? Thank you xx
Jessica Holmes says
Hi Isabel, I’m so glad you enjoyed this one! Typically this amount of batter would make a 9 or 10-inch cake. Cook times will vary, so I’d check with a skewer around the 30 minute mark.
Gaby says
Hi I made this replacing the sugar for brown sugar, added an espresso shot to the batter and a spoon of nutella to the chocolate side; it came out perfect.
Jessica Holmes says
That sounds incredible Gaby!