
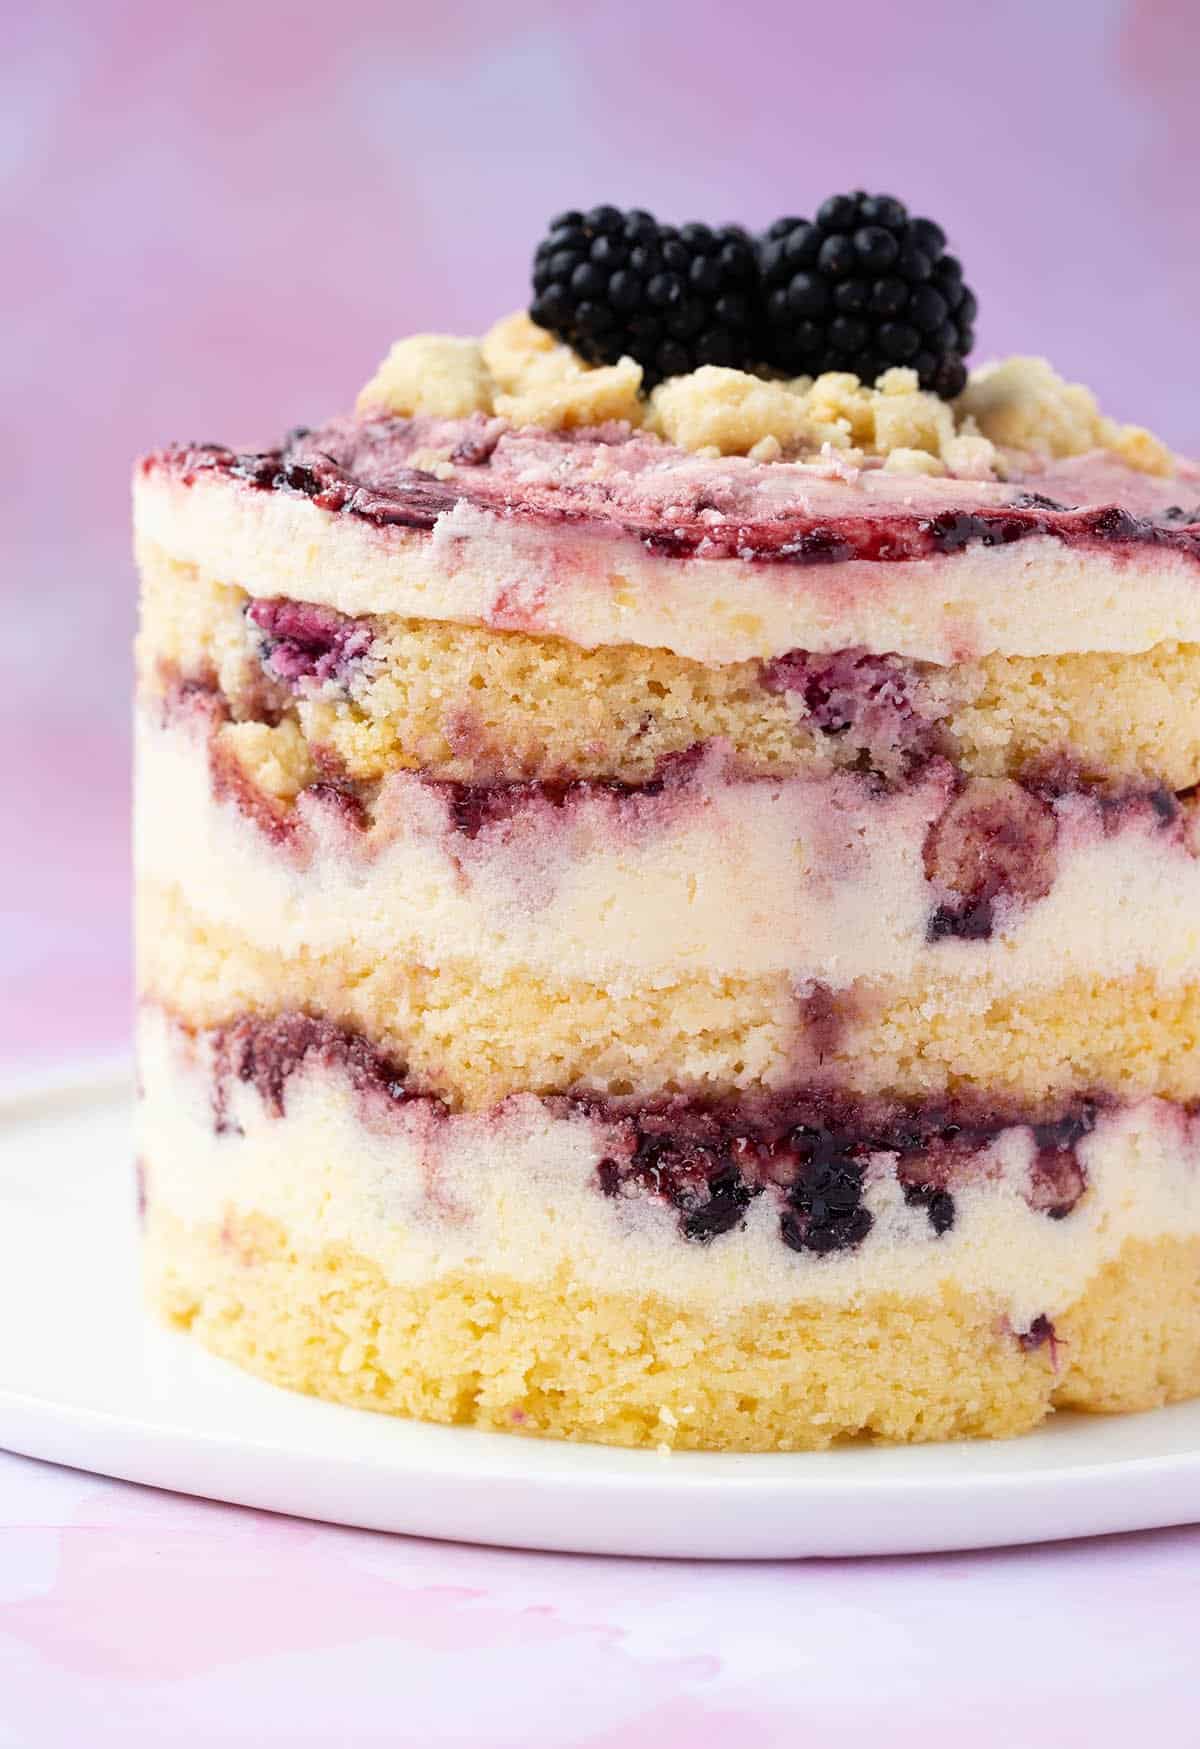
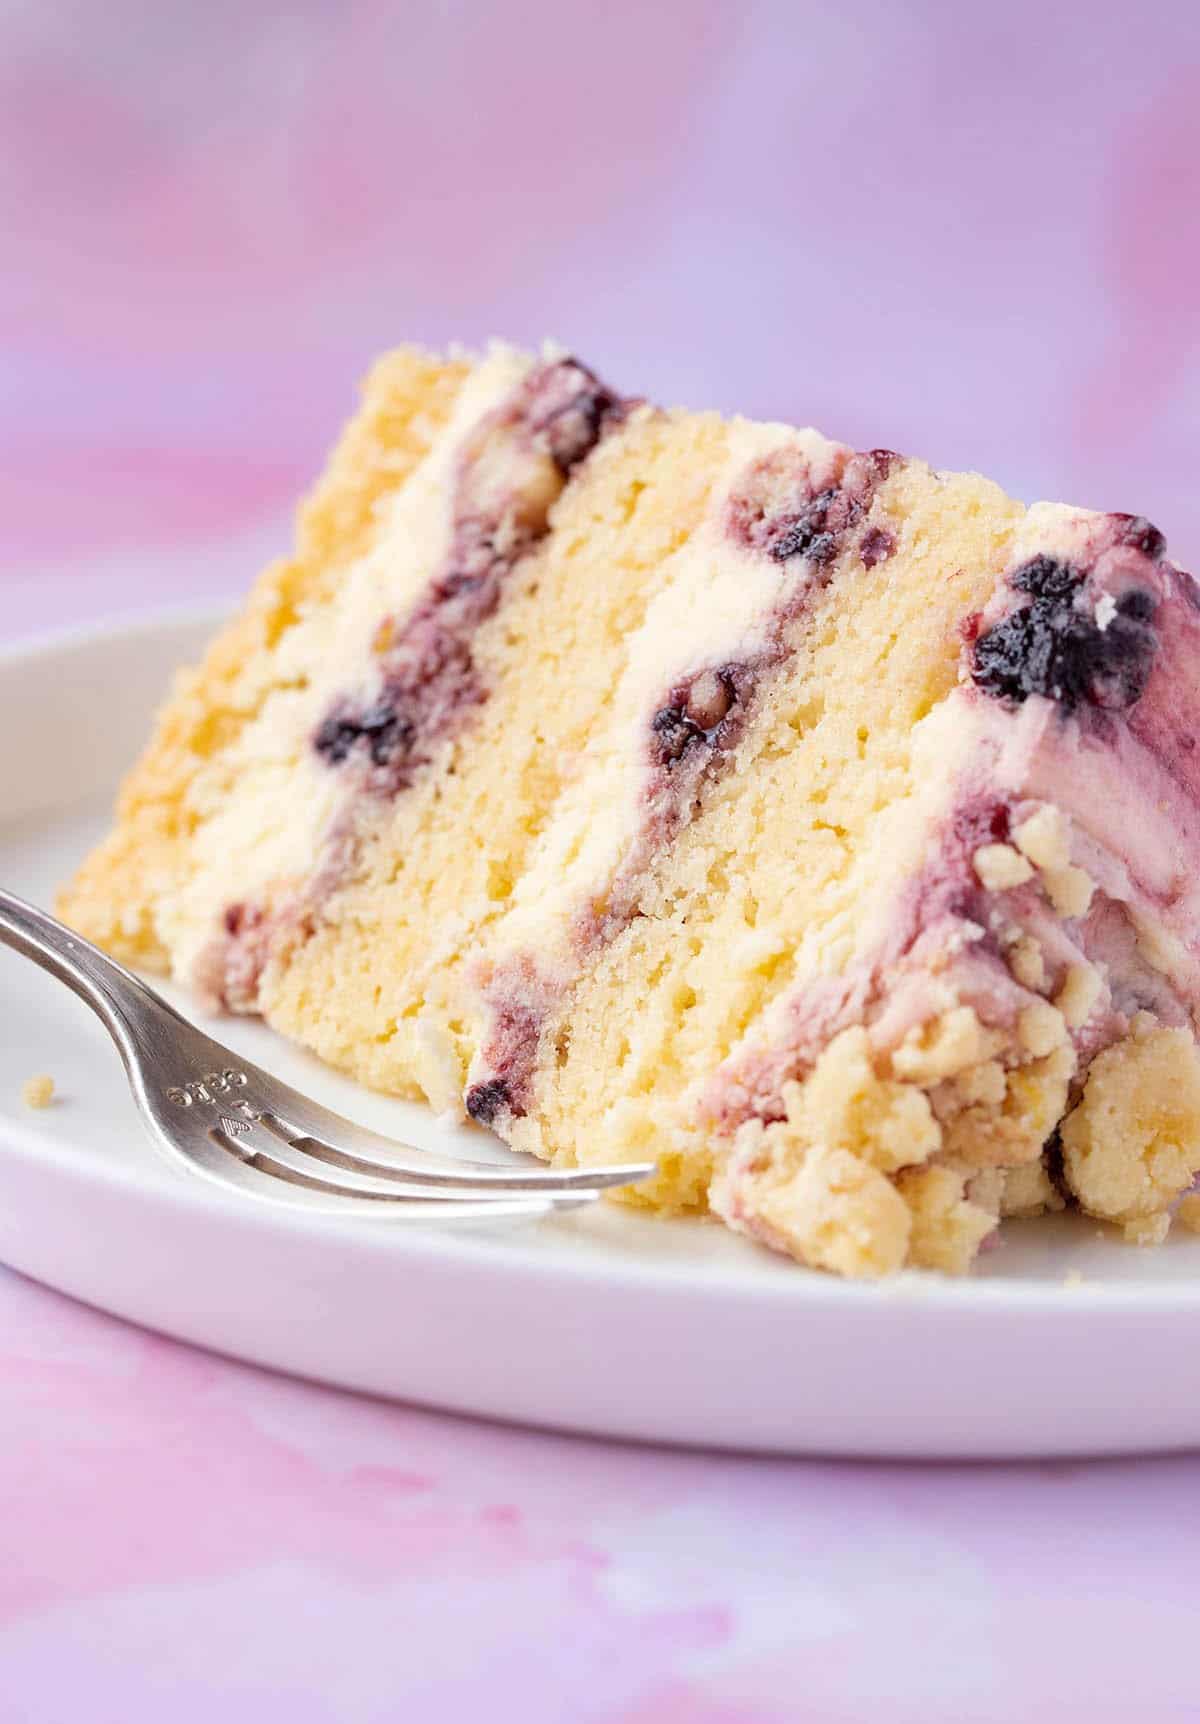
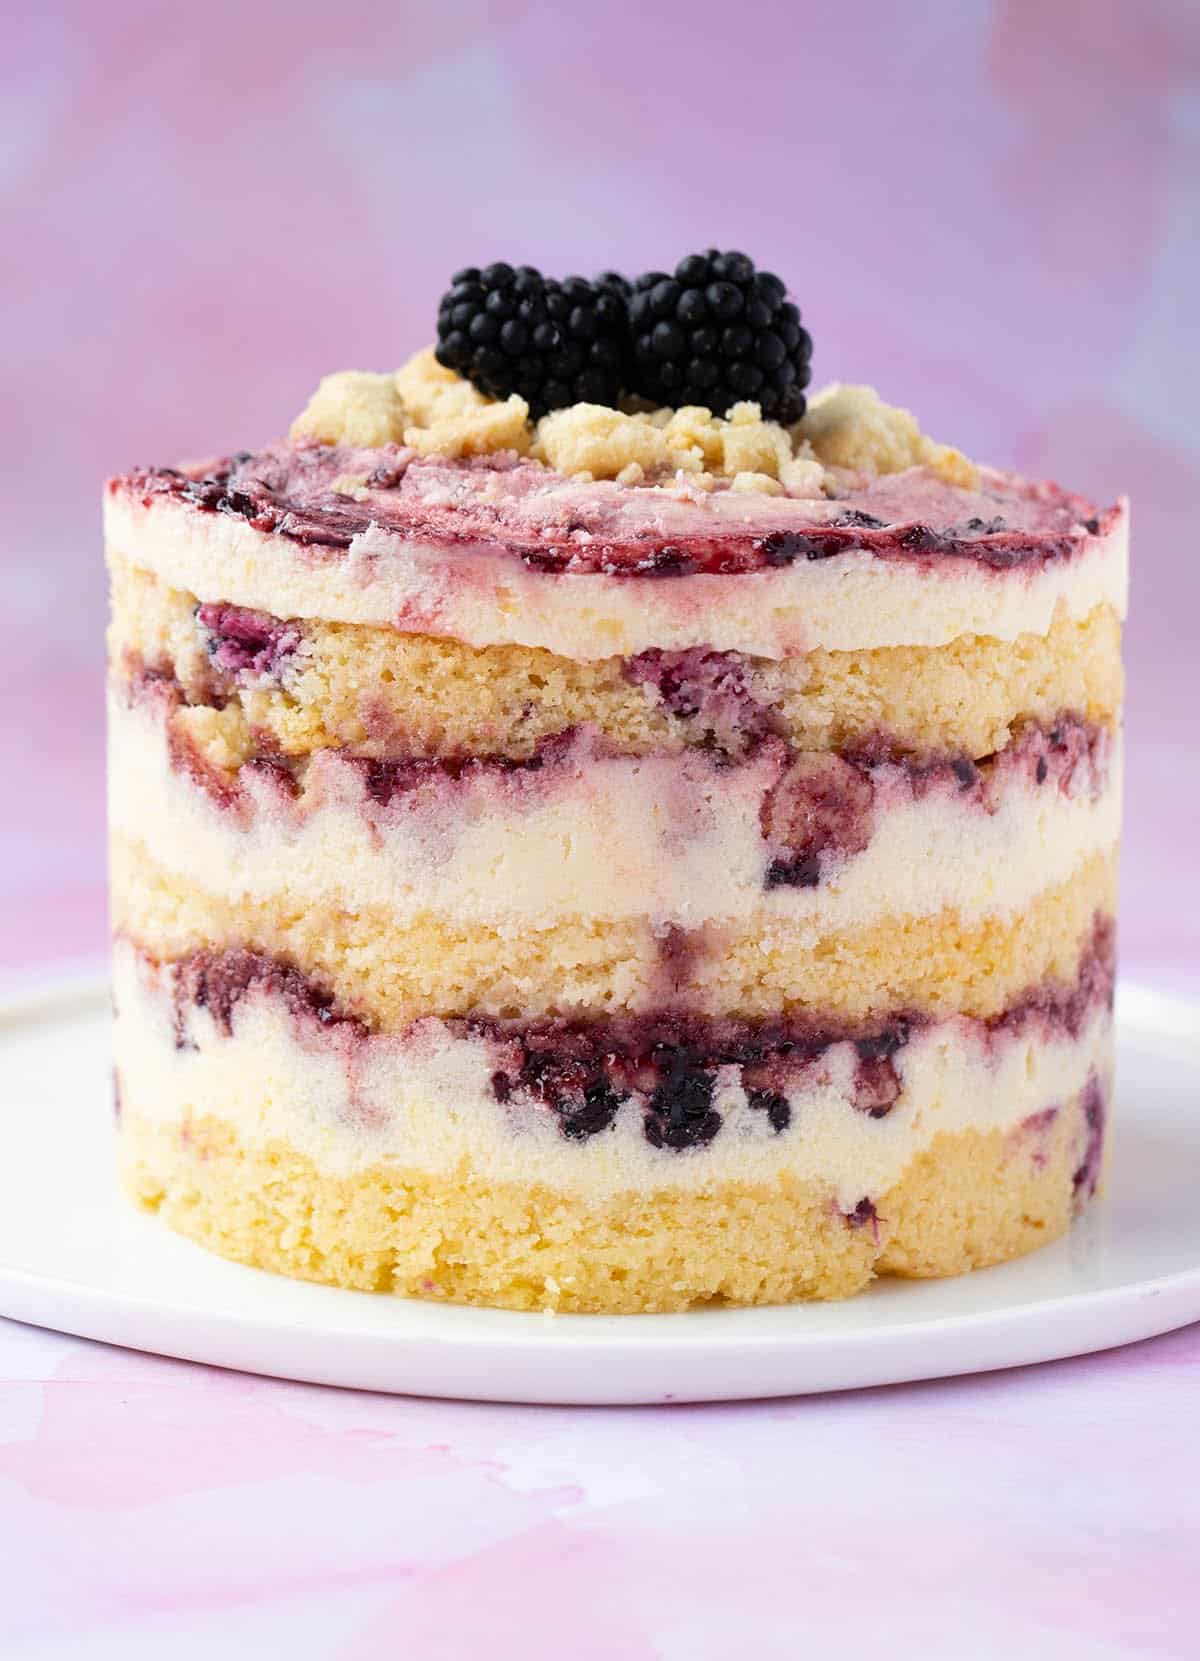
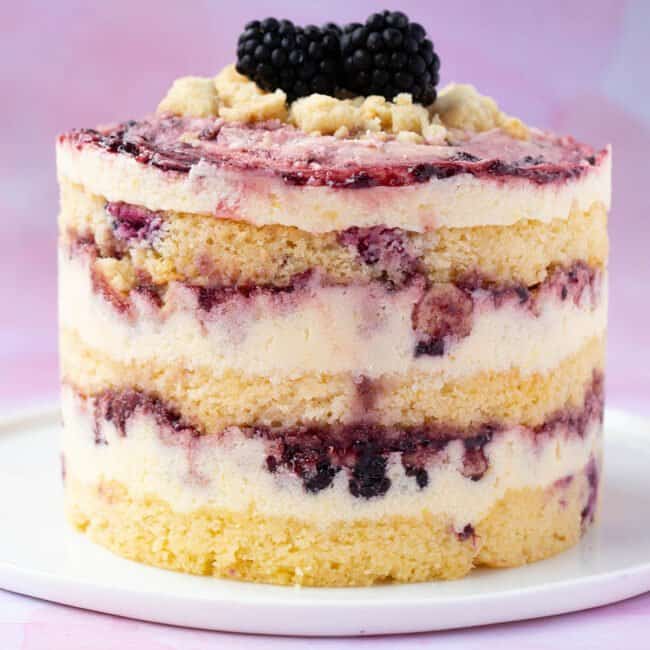
Amazing 6-inch Lemon Blackberry Cake. This stunning Milk Bar-inspired cake boasts layers of soft lemon and blackberry sponge, creamy white chocolate buttercream, blackberry jam and homemade lemon cookie crumbs.
Creamy, crunchy, zesty and buttery. This Lemon Blackberry Cake has it all.
It’s a beautiful three-layer cake made up of soft lemon blackerry cake, creamy white chocolate buttercream, sweet blackberry jam and zesty lemon crumbs.
Made from one large sheet cake, it is then transformed to look like the famous cakes from Milk Bar Bakery in New York. Sounds tricky, but I promise it’s so much easier than you’d think!
It’s perfect for celebrations, birthdays and parties 🥳
why you will love this recipe
- The lemony cake is soft and flavourful
- Assembling the cake is surprisingly quick and easy
- You can easily make it ahead of time
- It looks and tastes AMAZING!
recipe testing
Ever since I went to Milk Bar Bakery in Los Angeles and did one of their super fun cooking classes, I’ve been obsessed with their stunning naked-style cakes.
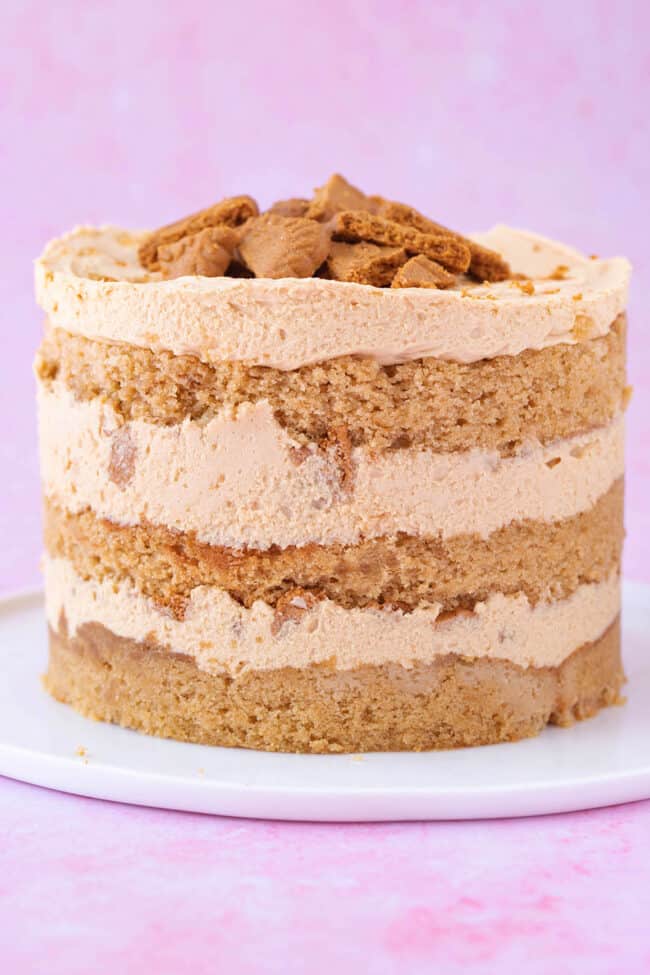
I’ve made copycat versions of their signature Milk Bar Birthday Cake and their Birthday Cake Truffles. And I’ve used their technique of using one large cake to create a multi-layer cake masterpiece in many of my recipes, like my Peanut Butter Cake and my Biscoff Cake.
So when I had the inkling to make a Lemon Blackberry Cake, I couldn’t help but draw on Milk Bar Bakery for inspiration. Not only does this cake look incredible, but honestly, it’s very easy to assemble – and you don’t have to fuss around with making perfect edges of buttercream. Win win!
what you will need
To make this Milk Bar-inspired layer cake, you will need a few pieces of special equipment. This cake is made by baking one large sheet cake and then cutting out three 6-inch layers. You will use a piece of acetate (plastic) to help build all the layers. Here’s what you will need:
- One quarter sheet pan (9 by 13 inch)
- 6-inch cake ring
- A sheet of acetate (at least 6 inches high)
the cake
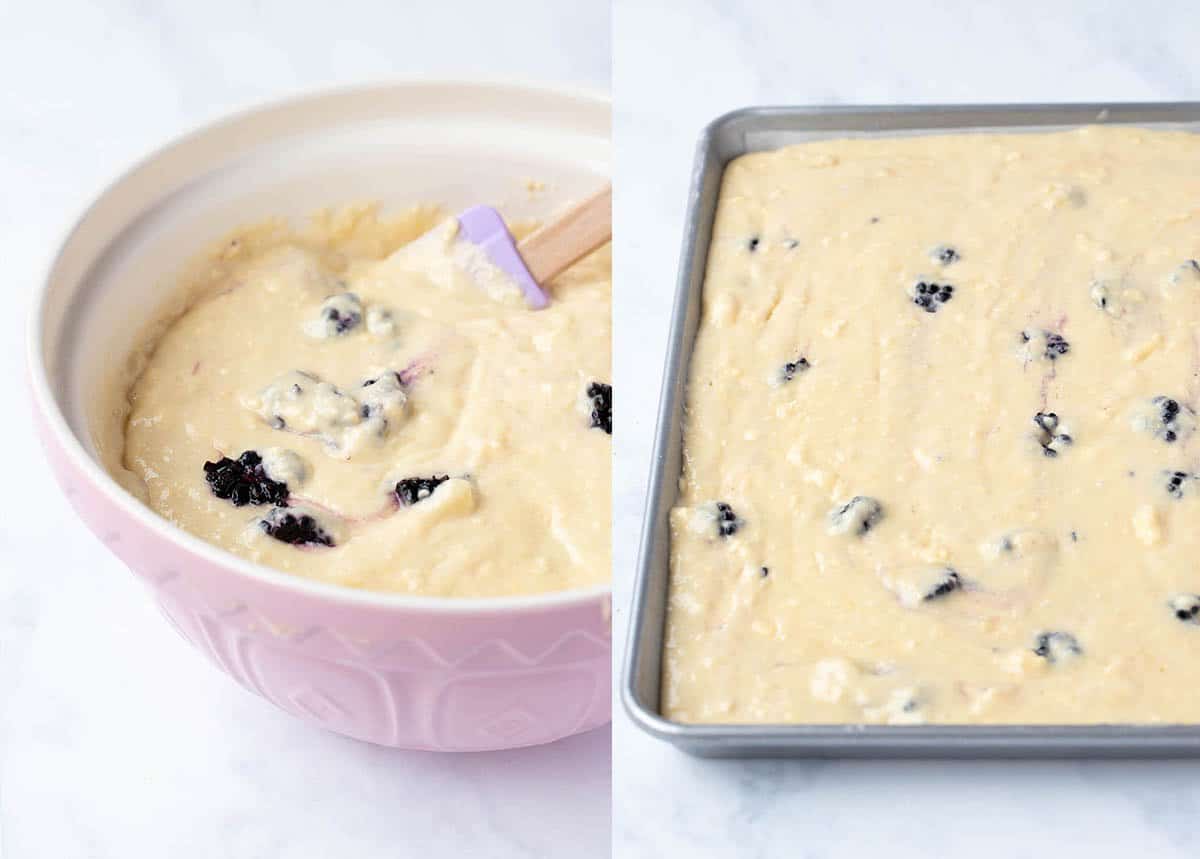
For this Lemon Blackberry Cake, I use the same method as my popular Lemon Blueberry Cake. In order to create a super soft, tender, buttery cake, I recommend the reverse creaming technique (more on that below).
Be sure to chop up the blackberries so they disperse evenly throughout the batter. The cake is baked in a 9 by 13 inch baking pan. I know baking one rectangular cake to make a round layer cake seems a bit strange, but trust me on this one. It works!
In saying that, you can absolutely make this cake in a more traditional form. You can bake a regular two layer 8-inch cake or three layer 6-inch cake.
But I encourage you to give this creative technique a go! It’s sure to wow your friends and family.
reverse creaming method
The reverse creaming method helps create a light and soft cake with a tender crumb, and an almost velvety texture. I absolutely love using this method to make cakes.
How does it work?
Instead of mixing the butter and sugar together first – the method commonly known as creaming – the butter is mixed with the flour.
By coating the butter in flour – and essentially the flour in butter – you create a barrier that slows down the development of gluten once you add the wet ingredients.
The result? A soft cake with a light, velvety crumb.
WHY USE IT?
In my opinion, this method is a little more foolproof than the traditional creaming method, which relies heavily on the baker’s ability to correctly cream the butter and sugar (and not over-or under-mix).
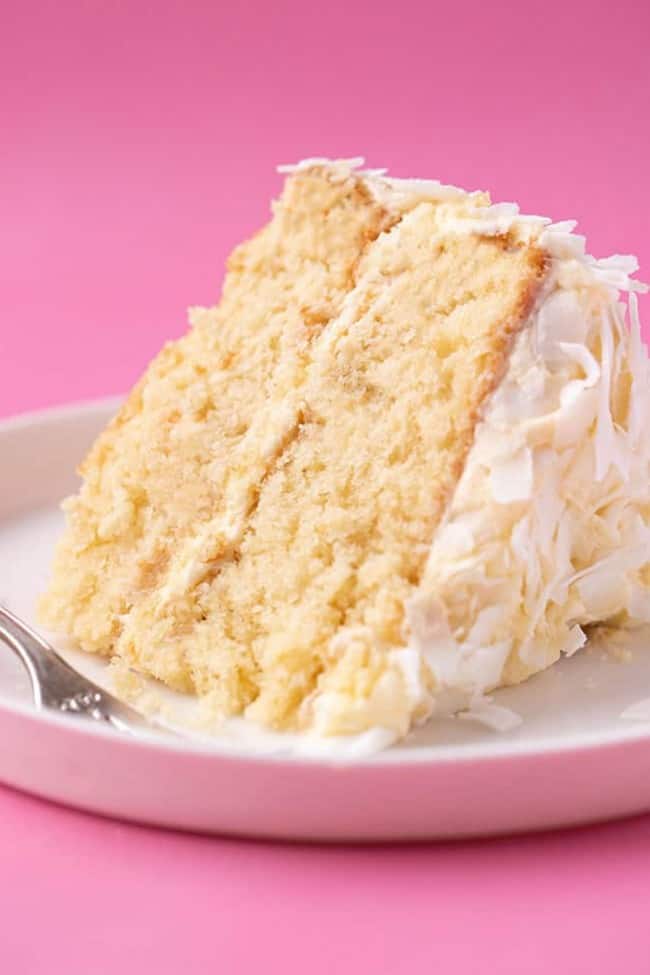
I use the reverse creaming method in both my Coconut Cake and my Vanilla Cake recipes.
Make ahead: You can make the cake a day in advance. Once it’s completely cooled, wrap it in plastic wrap and leave it at room temperature.
save this recipe
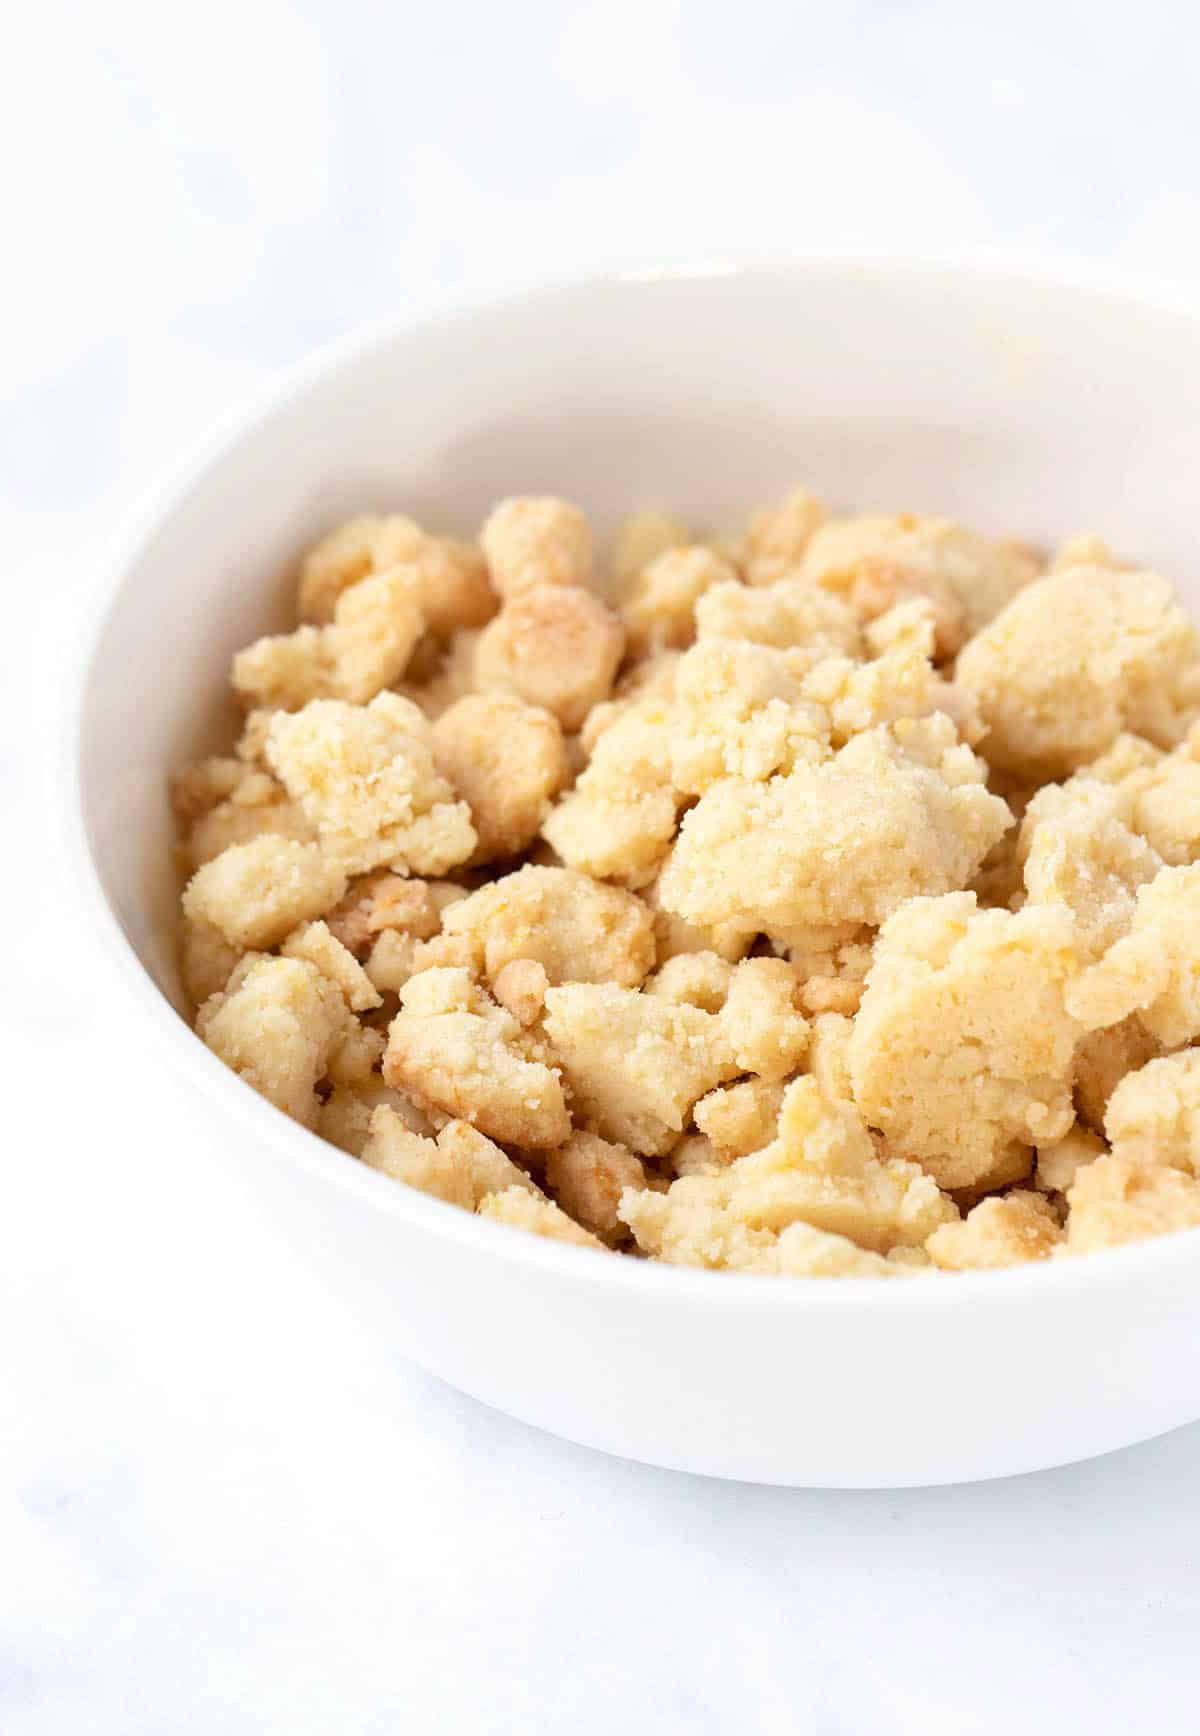
the crumbs
One of the defining features of a Milk Bar Cake is the cookie crumb. They add a lovely crunchy texture to the cake – and honestly, I can eat those things by the handful.
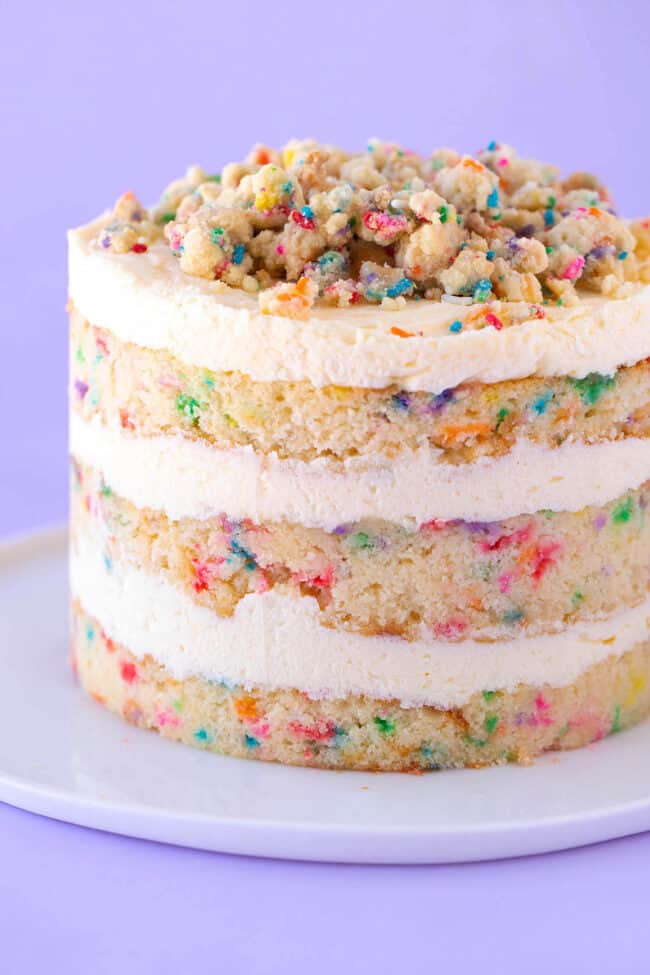
Over the years, I’ve made chocolate ones and funfetti ones, but for this cake, I had to make lemon ones!
I use plenty of lemon zest to make these sweet, shortbread cookie crumbs really pop. You’ll use them between each layer of cake and also to decorate the top.
How to make them
Here’s how to make them in four simple steps:
- Combine plain flour, sugar, cornflour, salt and lemon zest.
- Add melted butter and vanilla and mix mix mix.
- Place crumbs on a baking tray lined with baking paper.
- Bake for 10 minutes.
Make ahead: You can easily make these cookie crumbs in advance. Store them in an airtight container at room temperature for up to a week.
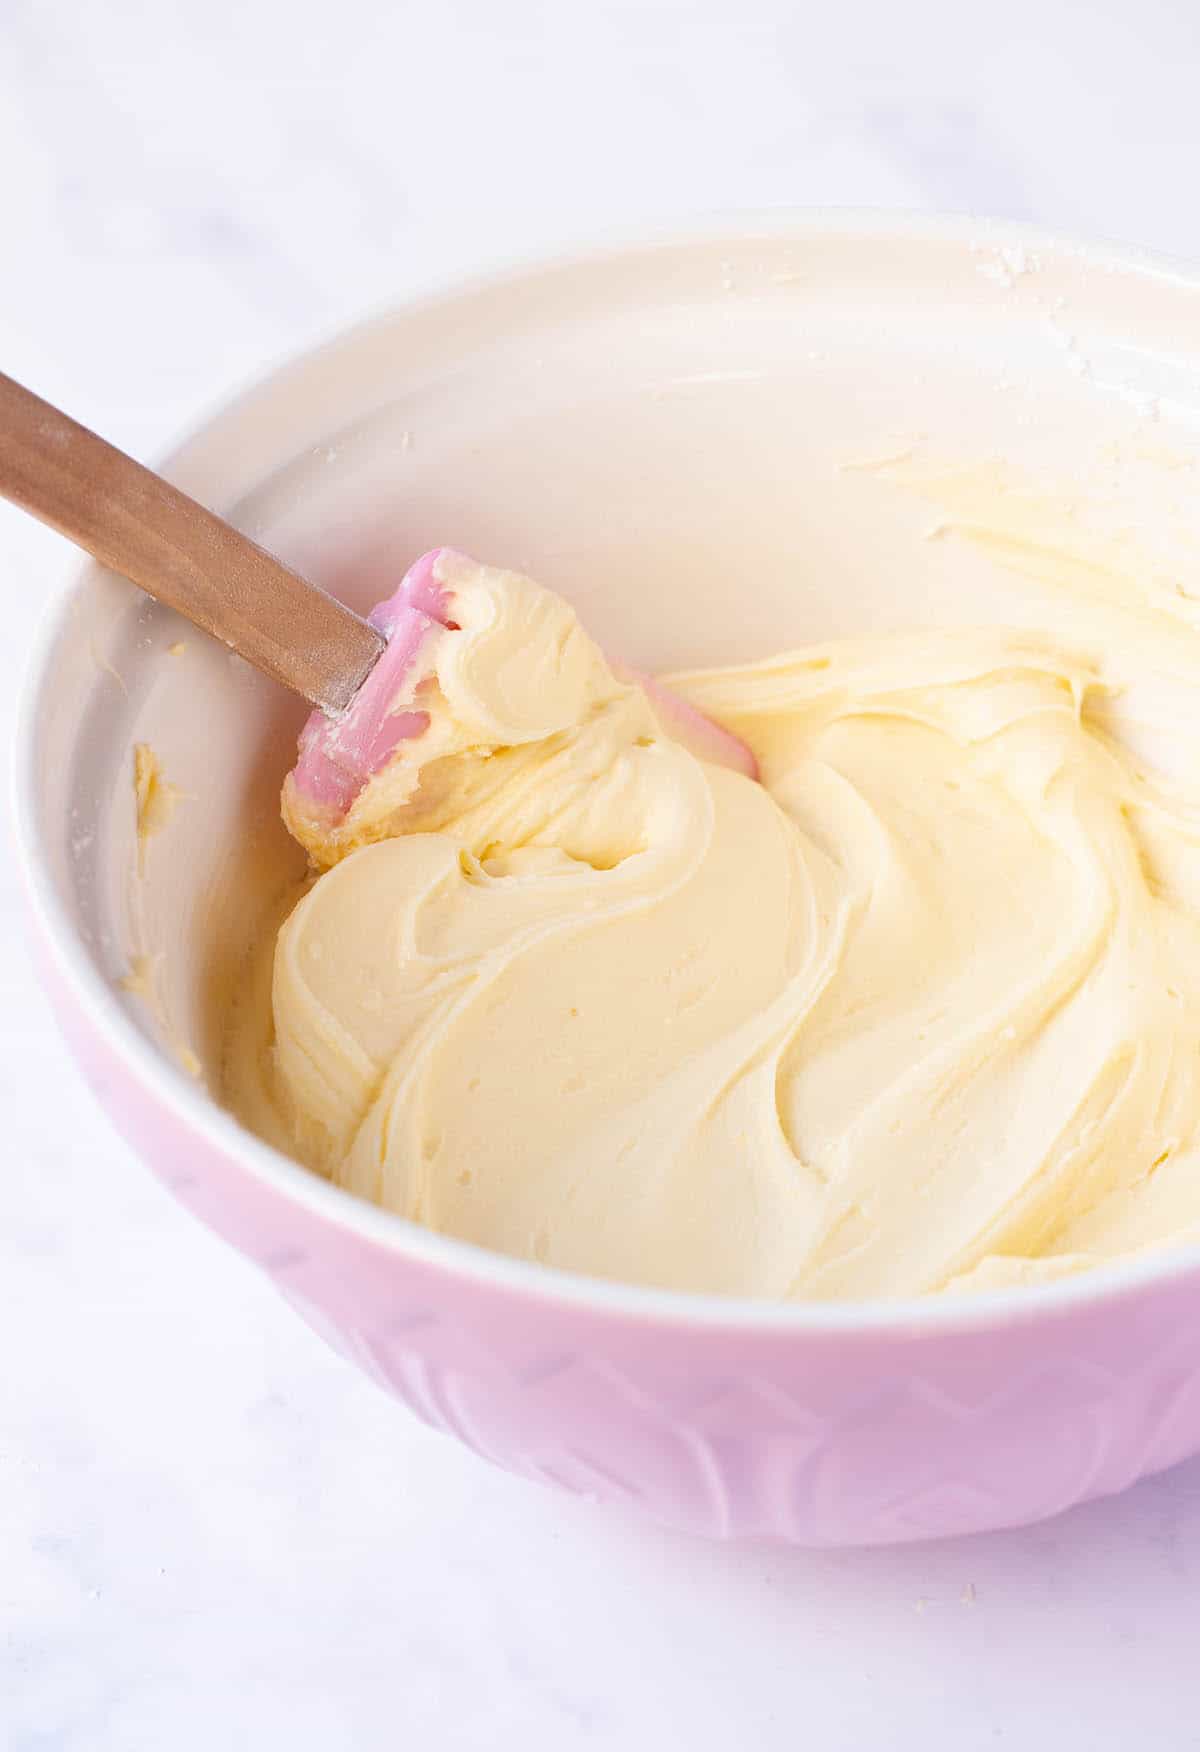
the frosting
Hello white chocolate buttercream! 💜 When I was testing this cake, I tried making it with a lemon buttercream. While it was super tasty, I felt the cake was a little one note – zingy and zesty but without much more to it.
So I decided to switch it up and use dreamy white chocolate buttercream. It has REAL white chocolate actually drizzled into the buttercream, which makes it sweet and oh-so-creamy.
It also blends perfectly with the gooey blackberry jam and fresh lemon sponge.
PERFECT BUTTERCREAM every time
Here are a few tips for getting perfect white chocolate buttercream every time.
- Start with room temperature butter. It’ll be quick and easy to beat your butter until smooth if it’s softened first. You’ll also avoid having any lumps in your buttercream. To know when your butter is good to go: you should be able to easily press your thumb into the butter and it will leave a large indent. It shouldn’t be melty or warm.
- Sift your icing sugar or powdered sugar. Sifting your sugar is so important when making a super smooth buttercream.
- Be careful when melting your white chocolate. White chocolate is known for being finicky, so take care when melting. If you use the microwave to melt your chocolate, turn down the power halfway and stir the chocolate every 20 seconds to make sure it heats slowly and gently. When you add the melted chocolate to your buttercream, it should be smooth and melty but not warm.
- Add your milk sparingly. You can add more milk but you can’t take it away. Keep mixing to get your desired consistency and only add milk as needed.
Make ahead: You can easily make the buttercream in advance. Store it in an airtight container in the fridge for up to a week. To bring it back to life, let it come back to room temperature. Add a touch of milk and then beat with an electric mixer until smooth.
the assembly
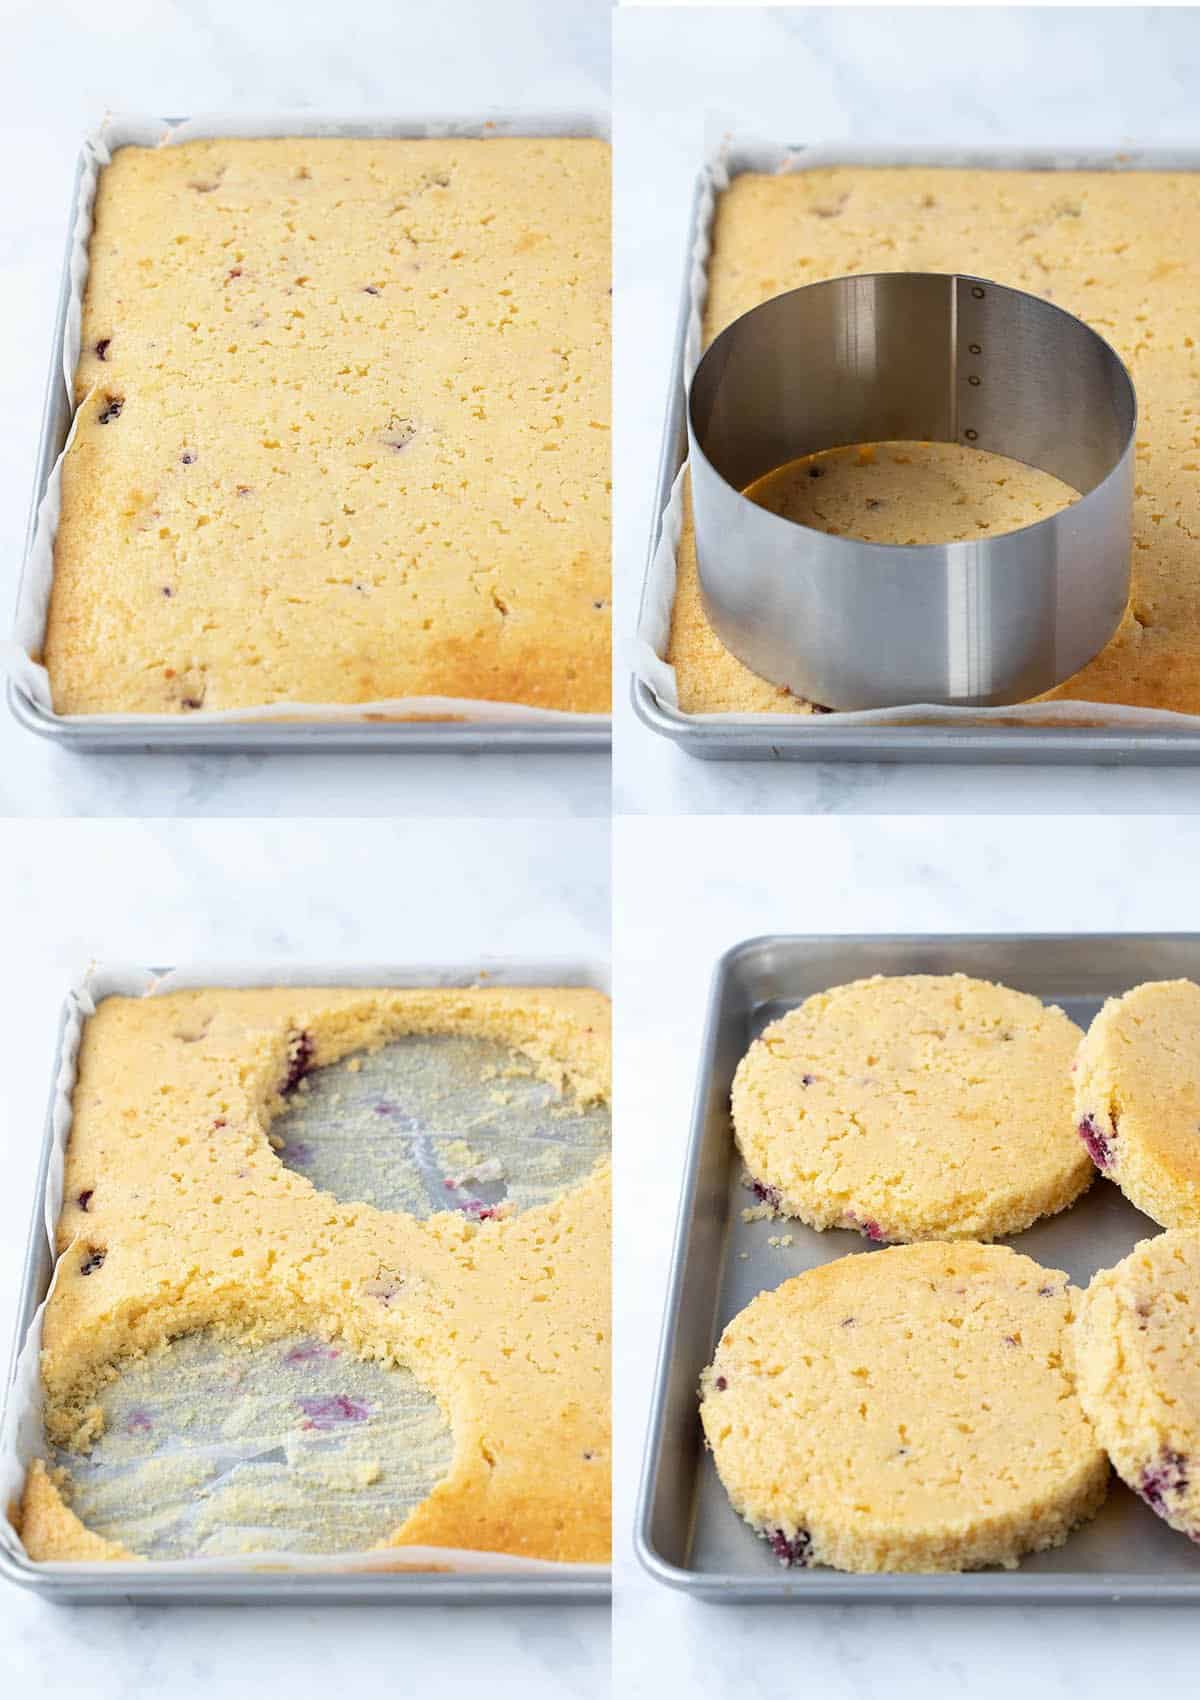
Assembling the cake is surprisingly easy. You’ll need to cut out three layers of cake – but you won’t get three perfect circles. You’ll have to cut out two circles and then two half-moons that you can shove together to create the bottom layer. Don’t worry, no one will know.
Place a sheet of acetate inside the rim of your 6-inch cake ring. Then it’s simply a case of layering up. The acetate will help keep everything locked in place until it’s had time to set.
There’s no need to be extra neat or strive for perfection here. The messier the layers, the more amazing it looks!
the layers
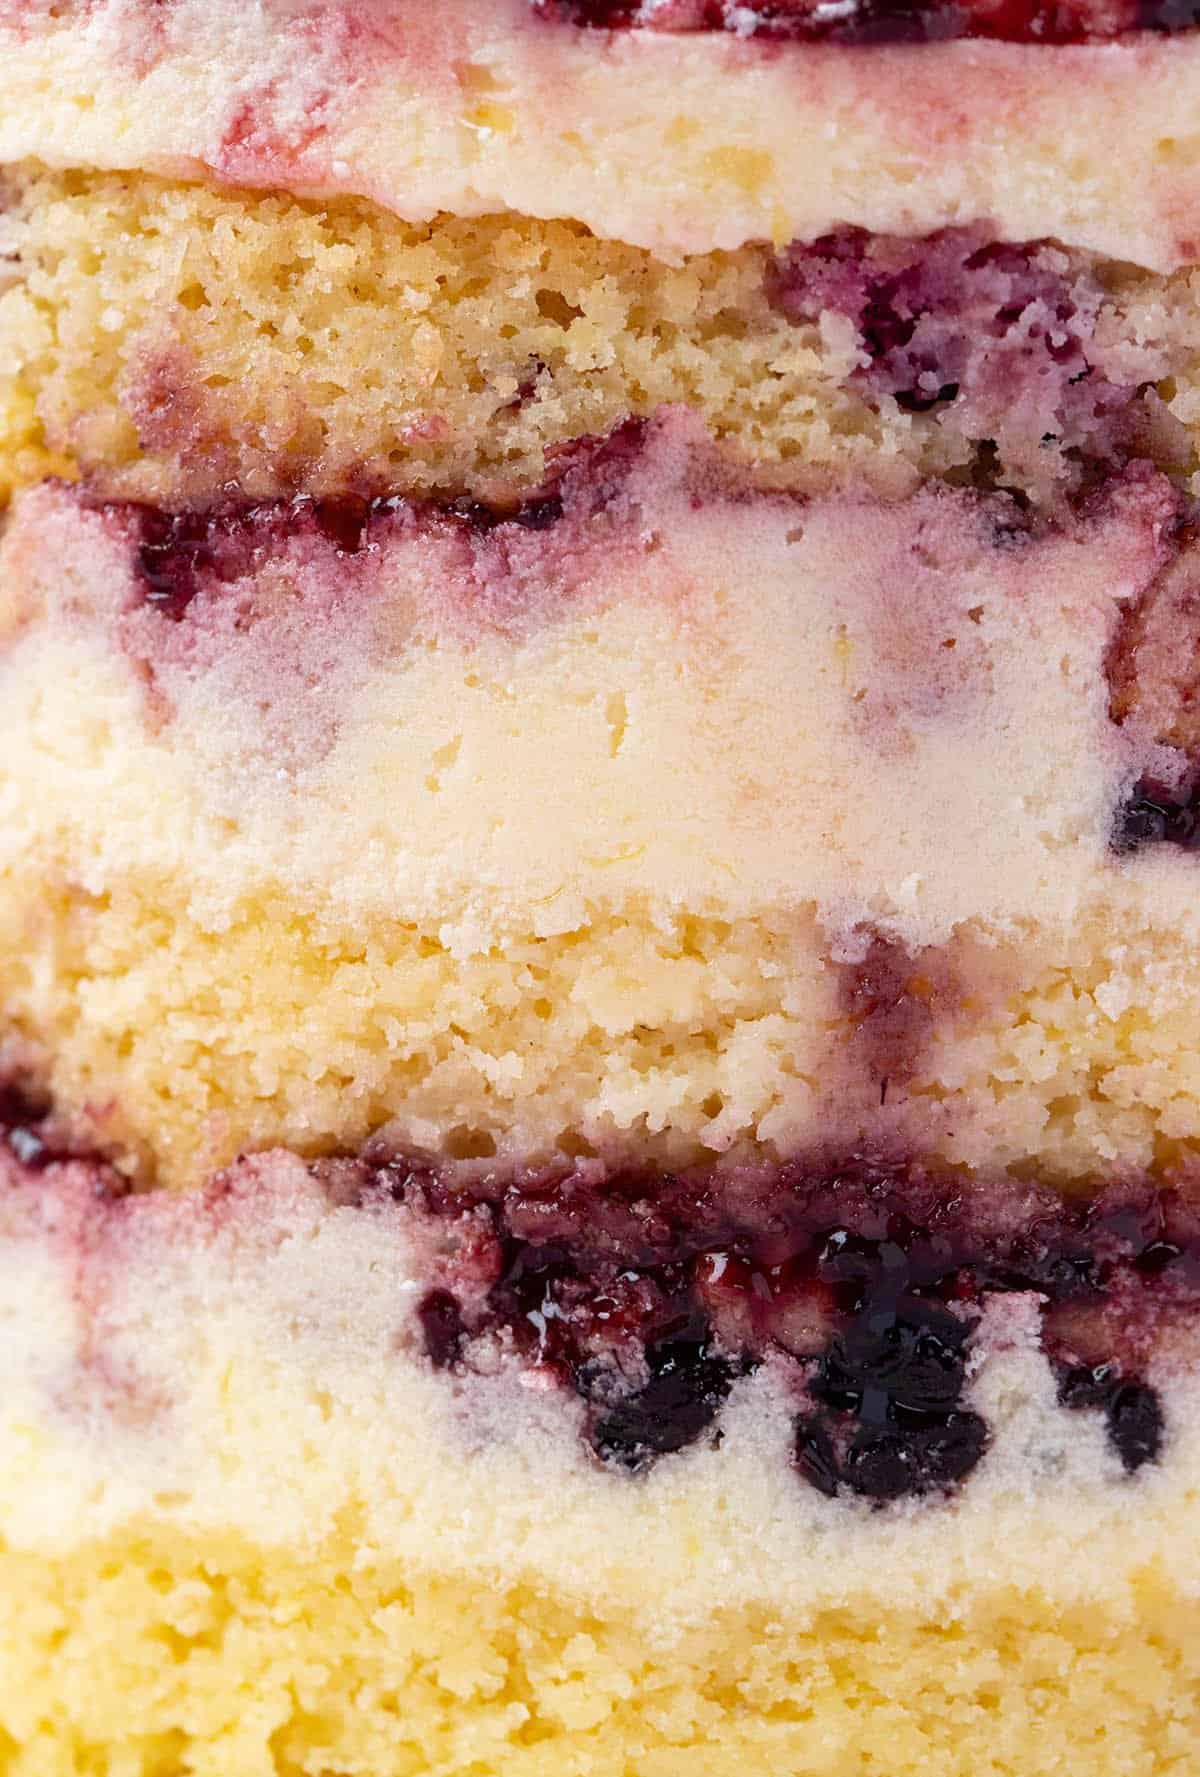
This delicious cake has 16 incredible layers. Let’s breakdown it down.
- lemon blackberry cake
- vanilla milk soak
- white chocolate buttercream
- blackberry jam
- lemon crumbs
- REPEAT 1-5
- REPEAT 1-5
- Fresh blackberries
frequently asked questions
Absolutely! You can use this recipe to make a regular two layer 8-inch cake or three layer 6-inch cake.
Keep the acetate around the cake, cover the top and keep it in the fridge. Once you are ready to serve, unwrap the acetate and admire your masterpiece. You can keep the leftover cake in an airtight container in the fridge. You can choose to serve the cake cold or at room temperature.
I recommend using a block of good quality white chocolate. I find blocks of chocolate tend to melt more easily, than chocolate chips or bits. Just make sure your chocolate is lovely and smooth before adding it to your buttercream. If it has seized at all – don’t use it.
more milk bar-inspired cakes
Did you make this recipe? Don’t forget to rate the recipe and leave a comment below. Hungry for more? Join me on Instagram, Facebook, Pinterest and Twitter for more amazing recipe ideas.
Let’s Bake
Lemon Blackberry Cake
A stunning three layer 6-inch Lemon Blackberry Cake.
Ingredients
Lemon blackberry cake
- 315 grams (2 and 1/4 cups) plain flour or all purpose flour
- 250 grams (1 and 1/4 cups) caster sugar or granulated sugar
- 2 teaspoons baking powder
- 1/4 teaspoon salt
- 230 grams (1 cup / 2 sticks) unsalted butter, room temperature, roughly chopped
- Zest of two lemons, freshly grated
- 3 large eggs, room temperature
- 240 ml (1 cup) full fat or whole milk
- 1 teaspoon vanilla extract
- 60 ml (1/4 cup) lemon juice, freshly squeezed
- 90 grams (3/4 cup) fresh blackberries, chopped into thirds
Lemon crumbs
- 105 grams (3/4 cup) plain flour or all purpose flour
- 50 grams (1/4 cup) caster sugar or granulated sugar
- 1 tablespoon cornflour or corn starch
- 1/8 teaspoon salt
- Zest of one lemon, freshly grated
- 60 grams (1/4 cup) unsalted butter, melted
- 1 teaspoon vanilla extract
White chocolate buttercream
- 230 grams (1 cup / 2 sticks) unsalted butter, room temperature
- 150 grams (1 cup) good quality white chocolate, broken into pieces
- 1 teaspoon vanilla extract
- 375 grams (3 cups) icing sugar or powdered sugar, sifted
- 2 tablespoons whole or full fat milk, room temperature
To assemble
- 60 ml (1/4 cup) full fat or whole milk
- 1/2 teaspoon vanilla extract
- 130 grams (1/2 cup) blackberry jam
- Fresh blackberries, to decorate, optional
Instructions
- Lemon blackberry cake
Preheat oven to 180 C (350 F) standard / 160 C (320 F) fan-forced. Grease and line a quarter sheet pan (9 by 13 inches) with baking or parchment paper. - In a large mixing bowl, add flour, sugar, baking powder and salt. Whisk briefly. Add butter and beat with an electric mixer on medium speed, until butter is broken into small pea-sized pieces.
- Next, add lemon zest, eggs, milk and vanilla. Start to beat on low speed and then turn up to medium speed. Add lemon juice and continue to beat just until combine and smooth. Gently fold through the blackberries by hand.
- Pour cake batter into your prepared pan. Bake for approximately 30-35 minutes or until a skewer inserted in the middle comes out clean. Leave cake in pan to cool completely.
- Lemon crumbs
Preheat oven to 180 C (350 F) standard / 160 C (320 F) fan-forced. Line a medium-sized oven tray or cookie sheet with baking or parchment paper. - In a large mixing bowl, add flour, sugar, cornflour, salt and lemon zest. Whisk together. Pour over melted butter, along with the vanilla, stir until crumbs are fully coated. They should look like wet sand.
- Pour cookie crumbs on to prepared tray and spread out into one layer. Bake for 10 minutes, then leave crumbs to cool completely.
- White chocolate buttercream
In a large mixing bowl, beat butter with an electric mixer on medium speed until pale and creamy. Meanwhile melt the chocolate in a microwave, stirring in between 20 second bursts, until just melted and set aside. - Add vanilla, half the sugar and one tablespoon of milk to the butter and beat until combined. Add the remaining sugar and beat until smooth.
- Add melted chocolate, ensuring the chocolate is still smooth and melted but is not warm. Beat until the chocolate is completely mixed through. If frosting is too thick, add an extra tablespoon of milk.
- To assemble
Gently remove cooled cake from pan and remove baking paper. Cut out three 6-inch layers using a six inch cake ring. Note the diagram below – you’ll get two whole layers and two semicircles. - Place the six-inch cake ring on a cake board or plate. Line the inside of the cake ring with a sheet of acetate. Place the two semicircles of cake at the bottom. Press down the cake firmly. If there are any gaps, use extra cake scraps to fill in the holes and press down firmly to make one even layer.
- Spoon 2-3 tablespoons of the milk soak (milk and vanilla combined) over the first cake layer. Add one third of the buttercream and spread out into one even layer using the back of a dessert spoon. Add 2-3 tablespoons of jam and swirl it into the buttercream. Scatter over a handful of lemon cookie crumbs.
- Add another layer of cake and press down firmly. Spoon 2-3 tablespoons of the milk soak over the cake layer. Add another third of buttercream and spread into one layer. Add 2-3 tablespoons of jam and swirl it into the buttercream. Scatter over a handful of lemon cookie crumbs.
- Add final cake layer and press down firmly. Add remaining buttercream and spread it out into one even layer. Add 2-3 tablespoons jam and swirl it into the buttercream. Scatter over remaining cookie crumbs.
- Place cake in the fridge for at least 2 hours to set. To serve, remove acetate and add fresh blackberries to the top.
Notes
Blackberries: I recommend using fresh blackberries in the lemon sponge. But if you choose to use frozen ones, do not thaw them. Add them into the cake batter frozen and stir very gently to minimise bleeding.
Cornflour: If you don’t have access to cornflour, replace it with an extra level tablespoon of flour.
White chocolate: I recommend using a block of good quality white chocolate. I find blocks of chocolate tend to melt more easily, compared to chocolate chips, melts or bits. Just make sure your chocolate is lovely and smooth before adding it to your buttercream. If it has seized at all – don’t use it.
Cutting out the cake layers: You’ll need to cut out three layers of cake – but you won’t get three perfect circles. You’ll need to cut out two circles and two half moons that you can then use to create the bottom layer. Don’t worry, no one will know. See diagram below.
MAKE AHEAD
Lemon blackberry cake: Fresh is best but you can make the cake a day in advance. Once it’s completely cooled, wrap it in plastic wrap and leave it at room temperature.
Cookie crumbs: You can easily make these cookie crumbs in advance. Store them in an airtight container at room temperature for up to a week.
White chocolate buttercream: You can make the buttercream in advance. Store it in an airtight container in the fridge for up to a week. To bring it back to life, let it come back to room temperature. Add a touch of milk and then beat with an electric mixer until smooth.

Nutrition Information
Serving Size: Calories: 701 Sugar: 60.2 g Sodium: 106.4 mg Fat: 36.7 g Carbohydrates: 87.3 g Protein: 7.9 g Cholesterol: 125.3 mg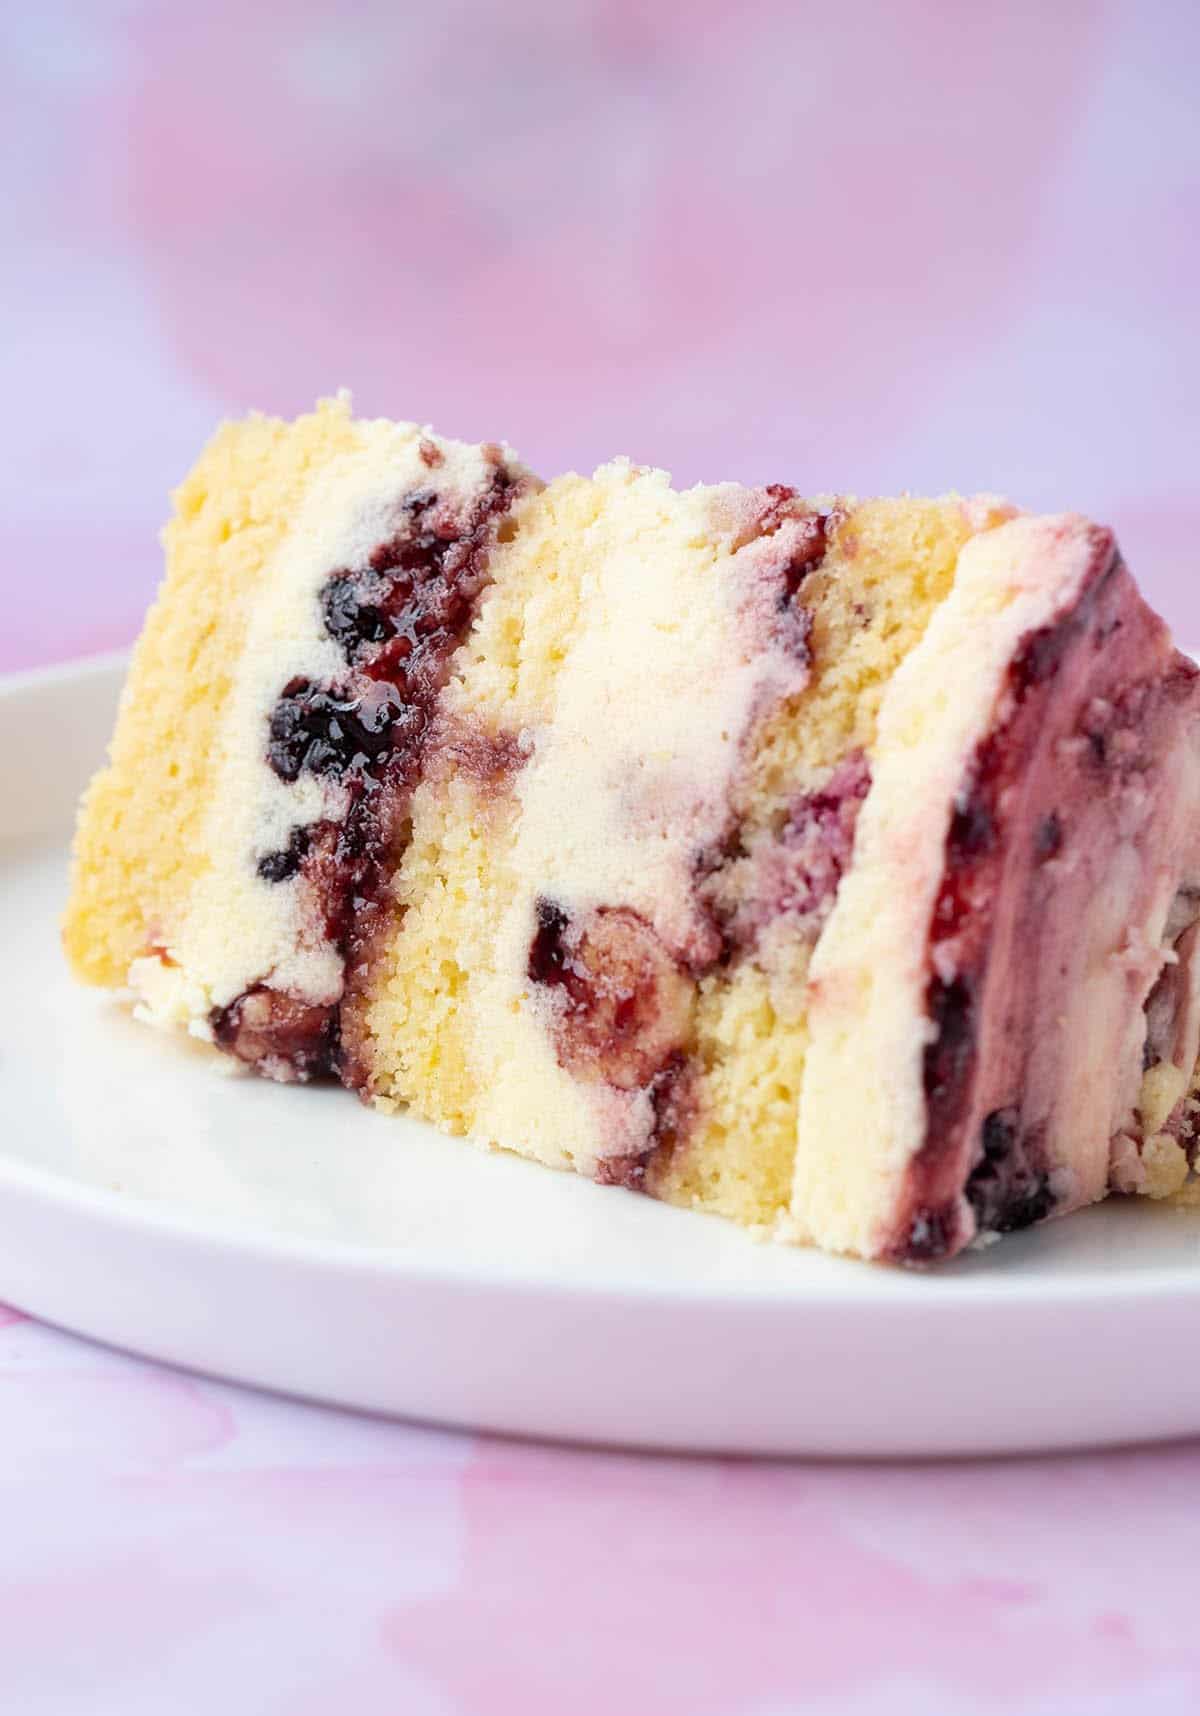
Hi, I’m Jess! I’m a self-taught baker, recipe writer, creator of Sweetest Menu and the author of Something Sweet cookbook.

John says
Thanks so much for your reply! Oh my goodness! This was a great hit! I look for to ways to challenge myself. I did not wait till it was at room temp before removing the cake ring but managed. I appreciate the tip. Thank you so much for sharing this recipe. I love each and all components. A true symphony of delicious tastes. Wow! I appreciate it you breaking down each component individually which made it so easy to process. Than you again. Keep them coming.
Jessica Holmes says
That’s so awesome to hear John! So pleased you enjoyed this one as much as I do! You might like to try Raspberry Ripple Cake next or my Peanut Butter Cake!
John says
I was at Milk Bar in NYC and was intrigued by Christina’s methodologies. I bought her book. I was so excited to have come across this recipe as it breaks down the process step by step – THANK YOU! Since I did not have the correct size pan, I employed the conventional approach and used 2-‘“8 cake pans. I’m planning to cut them side ways to create the additional layers, would that work to provide the layering effect? My plan is to use the ‘8 pan ring to cut the edges once completely cooled. Is that ok? Now, I’m a little confused as to how to remove the cake collars and cake pan ring after the cake has set? Any words of wisdom? I’m making the recipe for a special occasion and simply can’t fail due to unwanted criticism from the professional baker in the family. Any thought are greatly appreciated. I’m looking forward to the final product. Thank you again!
Jessica Holmes says
Hi John, glad to meet another Christina Tosi fan! Her cakes are so cool. You can definitely use this recipe to make two 8-inch cakes like you did, or three 6-inch ones. You can probably just lightly trim the edges if you want to just so they fit in the 8-inch pan ring. I leave the acetate and the cake ring on in the fridge, and then once I bring the cake back to room temperature to serve, I find the cake ring slides off with a little jiggle. And then you can just unwrap the acetate. I hope that helps? Let me know if I missed anything. And let me know how it all goes!
Lisa Howell says
Where is the recipe to make the blackberry jam? And the milk soak?
Jessica Holmes says
Hi Lisa, in the recipe card under ‘to assemble’ you’ll see the milk and vanilla listed for the milk soak and also the blackberry jam. I haven’t made the jam from scratch here, just used a good quality store-bought jam. Hope that helps!
Lisa Howell says
Thank you. I never thought about using store bought jam 🤦🏼♀️. I made some and it turned out pretty good. 😊
Jessica Holmes says
Oh sounds wonderful Lisa!
Hailee says
Could I use cake flour instead of all purpose flour?
Jessica Holmes says
Hi Hailee, I’m sorry I haven’t tested this one with cake flour so I can’t say for sure. But it’s worth a try!
Natalie says
I have made this cake three times in the past couple weeks and it is absolutely perfect. Everyone has raves about how it looks and tastes. And I was pleasantly surprised to discover how deceptively easy it is to make. Thank you for sharing!
Jessica Holmes says
I’m so happy to hear that Natalie! Thank you for your kind review.
Josh says
Loved this cake, especially when it was cold.
Jessica Holmes says
So happy to hear that Josh!
Dani says
Looks amazing! If I wanted to make this bigger using a 10 in. cake ring, would I need to double recipe?
Jessica Holmes says
Hi Dani, if you used a 10-inch cake ring, you could likely get two layers out of this cake, but you might want to make it twice for extra layers.