Prep: 70 minutesCook: 20 minutesTotal: 1 hour 30 minutes
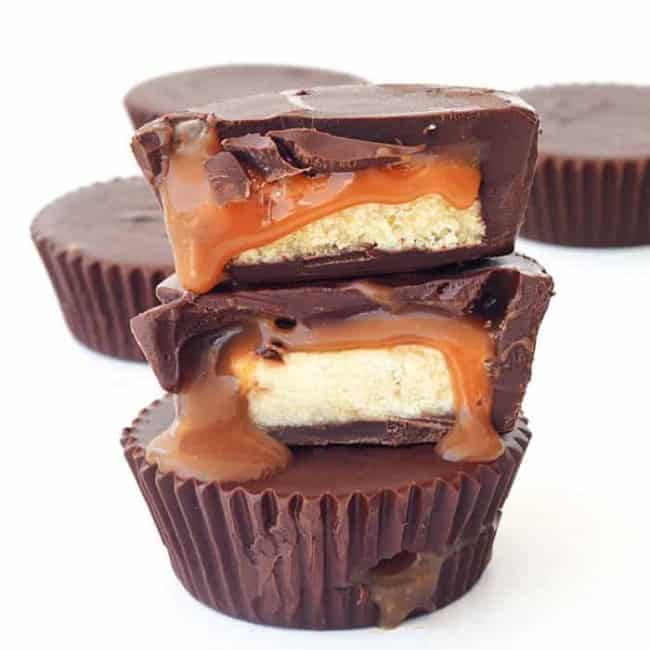
Twix Caramel Chocolate Cups made with homemade shortbread cookies and golden caramel sauce covered in delicious dark chocolate.
Ingredients
Salted caramel sauce
- 200 grams (1 cup) caster sugar
- 120 ml (1/2 cup) water
- 55 grams (1/4 cup) unsalted butter, room temperature
- 120 ml (1/2 cup) thickened or heavy cream, room temperature
- Pinch of sea salt
Shortbread cookies
- 115 grams (1/2 cup or 1 stick) unsalted butter, softened
- 60 grams (1/2 cup) icing or powdered sugar
- 1 tablespoon cornflour or corn starch
- 1 teaspoon vanilla extract
- 140 grams (1 cup) plain flour
- 600 grams (4 cups) good quality dark or milk chocolate
Instructions
- In a medium saucepan, add the caster sugar and the water and pop onto the stove on a medium heat. Let the sugar melt, swirling the pan gently occasionally. As the sugar melts, it will start to turn golden in colour. Continue to watch it, swirling the pan every now and then, until it turns dark golden in colour.
- Add all your butter and whisk rigourously. It will bubble up but just keep going until the butter has completely melted and mixed with the sugar syrup. Then remove your saucepan from the heat and gradually pour in your cream and whisk it through. Again, it will bubble up but just keep going until it is fully incorporated. Then whisk in the salt. Pop back on the heat for 30 seconds or so until nice and smooth. Then leave your caramel to cool down for 15 minutes before transferring to a glass bowl or jar and popping it into the fridge until you are ready to use it. You can keep the caramel in the fridge for up to 2 weeks.
- In a large mixing bowl, add your butter and sift the sugar and cornflour and beat with an electric mixer until creamy and combined. Add your vanilla and continue to beat, then sift in the plain flour. Beat on low for 30 seconds or until a soft dough forms. Bring the dough together into a ball using your hands and then wrap in plastic. Pop into the fridge for around 30 minutes.
- Preheat oven to 180 C (350 F) standard / 160 C (320 F) fan-forced. Line a baking tray with baking or parchment paper.
- Lightly flour your bench, take out your shortbread dough and roll it out using a rolling pin until it is about 1/2 inch thick. Use a small round cookie cutter to cut out small rounds of dough (approximately 1.5 inches wide) and carefully transfer them to your prepared tray. Bake the shortbread for approximately 10-12 minutes or until just lightly golden – it’s better to under bake, then over bake. Transfer to a wire rack to cool completely.
- Place 12 cupcake liners into a 12-hole muffin tray. Place a small saucepan on medium heat with about 5cm or 2 inches of water in the bottom. Pop the chocolate into a small heatproof bowl and place the bowl on top of the saucepan, ensuring the bottom of the bowl will not touch the water below. Gently stir as the steam slowly melts the chocolate and it becomes silky and smooth.
- Once the chocolate has completely melted, remove the saucepan from the heat but keep the bowl on top. Grab the caramel from the fridge. Add approximately 1-2 teaspoons of chocolate into the bottom of your cupcake liners, ensuring it covers the entire base. Then grab a small round shortbread cookie and place a teaspoon of caramel on top. Then pop it on top of the chocolate in your cupcake liner. Try to make sure the cookie won’t touch the side of the liner so there is room for the chocolate to completely cover it.
- Then spoon more chocolate over the caramel shortbread so it is completely covered. Continue with remaining chocolate, shortbread and caramel. Pop your chocolate cups into the fridge for at least one hour or until set.
Notes
- For the caramel, make sure your cream and butter are at room temperature, otherwise your mixture will seize and burn.
- No matter how many times I make caramel, I still always end up with a few little lumps of sugar. So I just run my caramel through a sieve at the end to get rid of any lumps and I am always left with silky smooth salted caramel sauce.
Category: DessertCuisine: American